“I never thought a simple batch of brownies could cause such a stir,” my neighbor, Mrs. Lopez, chuckled one sunny Thursday afternoon. She was packing a little gift box with her homemade treats for her son’s teacher, and the rich, chocolatey aroma was pulling me right into the kitchen. Honestly, it reminded me of that time I tried to bake brownies late at night, half-asleep and mixing up sugar with salt—yet somehow, they turned out delightfully fudgy and full of character. Maybe you’ve been there, too, when a small kitchen mishap leads to a recipe that sticks around for all the right reasons.
This recipe for the Irresistible Thank You Teacher Brownies Gift Box isn’t just about chocolate and sugar. It’s about crafting a heartfelt, homemade surprise that says “thank you” better than any card could. The recipe came from an unexpected source—my former barista, who swore by these brownies as the perfect teacher appreciation gift, saying they’re both simple and unforgettable.
What makes these brownies stand out isn’t just the rich flavor or the gooey center; it’s the way they bring a little joy and gratitude wrapped up in every bite. Whether you’re rushing to put together something sweet last minute or planning ahead for a special occasion, this recipe is a keeper. Plus, the gift box presentation adds that personal touch that teachers truly appreciate. I still remember the slightly cracked bowl I used when making my first batch—messy, sure, but so worth it. These brownies have become my go-to, and I’m betting, once you try them, they’ll have a spot in your kitchen favorites, too.
Why You’ll Love This Recipe
Making this Thank You Teacher Brownies Gift Box has been a game-changer in my gift-giving arsenal. The recipe has been tested over countless school years and potlucks, and it always delivers smiles and “can I have the recipe?” requests. Here’s why it might become your new favorite, too:
- Quick & Easy: The whole batch comes together in about 35 minutes, perfect for busy afternoons or last-minute ideas.
- Simple Ingredients: You probably already have everything in your pantry—no fancy trips needed.
- Perfect for Gifts: Whether it’s teacher appreciation week, holidays, or just because, these brownies make a thoughtful and tasty present.
- Crowd-Pleaser: Kids love them; adults can’t get enough. The texture is just right—rich, fudgy, and a little chewy.
- Unbelievably Delicious: The secret to the flavor is a touch of espresso powder (don’t worry, it’s subtle!) that deepens the chocolate without making it taste like coffee.
This isn’t your average brownie recipe. I’ve played around with the ingredients to get a perfect balance between dense and moist. Plus, the gift box idea adds a layer of charm that turns a simple dessert into a heartfelt message. You’ll find that making these brownies is as satisfying as giving them away.
What Ingredients You Will Need
This recipe uses straightforward, pantry-friendly ingredients that work together to create a luscious texture and rich chocolate flavor without fuss. You can easily swap in some items if needed, making it flexible for your kitchen.
- Unsalted butter, 1 cup (227 g), melted (adds richness and moisture)
- Granulated sugar, 1 ½ cups (300 g)
- Brown sugar, ½ cup (100 g), packed (for chewiness and depth)
- Large eggs, 3, room temperature (helps with structure)
- Pure vanilla extract, 2 teaspoons (for aroma and flavor)
- All-purpose flour, 1 cup (125 g), sifted (for structure)
- Unsweetened cocoa powder, ¾ cup (75 g), sifted (the chocolate base)
- Espresso powder, 1 teaspoon (optional, for enhanced chocolate flavor)
- Salt, ½ teaspoon (balances sweetness)
- Chocolate chips, 1 cup (170 g), semi-sweet or dark (melts into gooey pockets)
Ingredient tips: I prefer using Callebaut cocoa powder for its rich flavor, but any good quality brand will work. If you want to make these gluten-free, substitute the flour with a 1:1 gluten-free baking blend. For a dairy-free version, swap the butter for coconut oil or vegan butter and use dairy-free chocolate chips.
Equipment Needed
- 8×8-inch (20×20 cm) baking pan: This size is perfect for thick, fudgy brownies. You can line it with parchment paper for easy removal.
- Mixing bowls: One large for wet ingredients, one medium for dry ingredients.
- Whisk and spatula: For mixing and folding ingredients gently.
- Measuring cups and spoons: Precision matters here for consistent results.
- Cooling rack: To let brownies cool evenly without getting soggy.
If you don’t have an 8×8 pan, a 9×9-inch pan works but the brownies will be thinner. For budget-friendly options, a glass baking dish can substitute metal pans but watch cooking time closely as glass heats differently. Lastly, a good parchment liner saves you from scrubbing the pan, trust me—it’s a game changer for presentation and cleanup.
Preparation Method
- Preheat the oven to 350°F (175°C). Grease your 8×8-inch pan or line it with parchment, leaving an overhang for easy removal.
- Mix the wet ingredients: In a large bowl, whisk together the melted butter, granulated sugar, and brown sugar until combined but not overmixed. Add the eggs one at a time, beating well after each addition. Stir in the vanilla extract. This should take about 5 minutes.
- Combine the dry ingredients: In a separate bowl, sift together the flour, cocoa powder, espresso powder (if using), and salt. Sifting helps avoid lumps and ensures a smooth batter.
- Fold dry into wet: Gradually add the dry ingredients to the wet mixture, folding gently with a spatula to keep the batter light. Don’t overmix—stop as soon as you see no flour streaks. Overmixing can lead to cakey brownies instead of fudgy.
- Add chocolate chips: Fold in the chocolate chips, distributing them evenly. This step takes about 1 minute.
- Pour batter into the pan: Spread the batter evenly with your spatula. The batter will be thick and slightly glossy.
- Bake: Place in the preheated oven and bake for 25–30 minutes. Check at 25 minutes by inserting a toothpick in the center—it should come out with a few moist crumbs but no wet batter.
- Cool: Let the brownies cool in the pan on a wire rack for at least 20 minutes. This step is crucial for cutting clean squares.
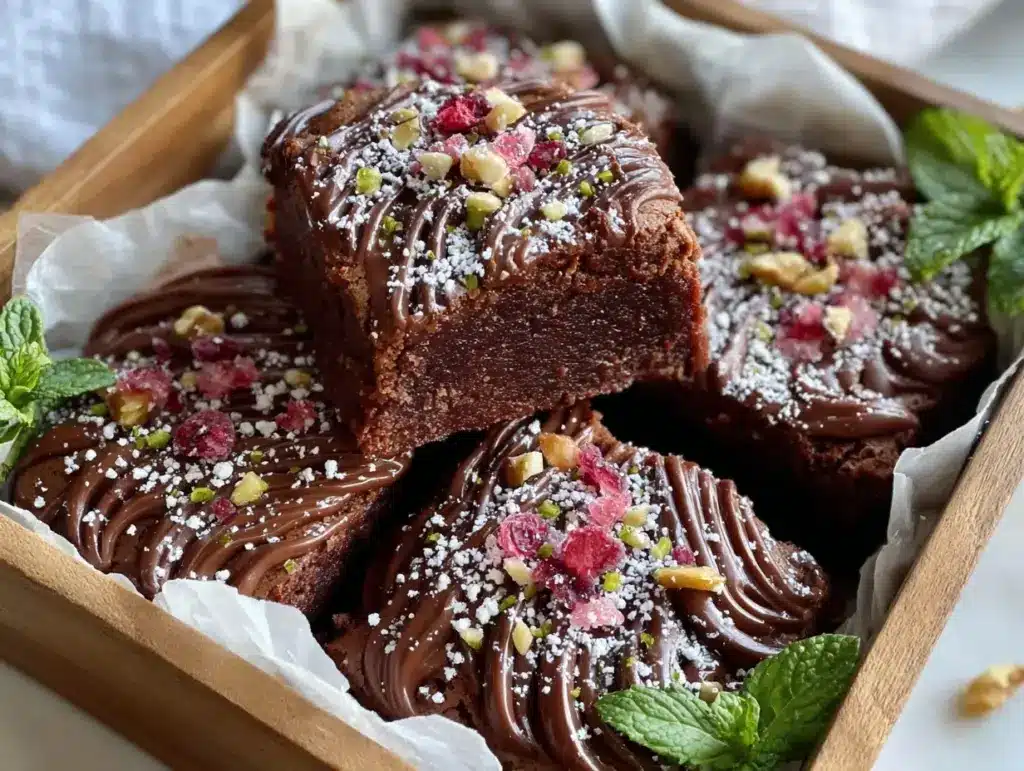
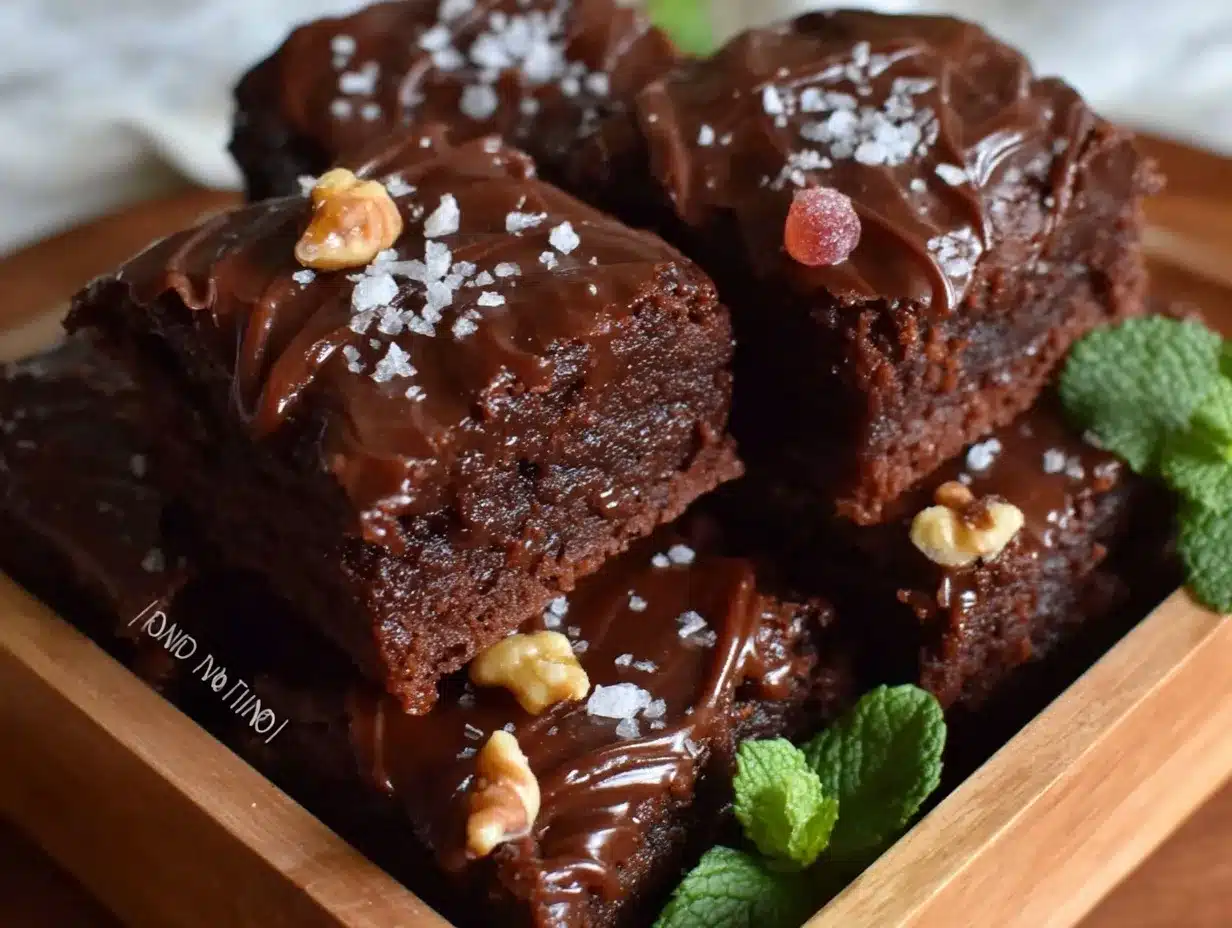
- Cut and package: Use a sharp knife to cut into 16 squares. Arrange them in a gift box with parchment or tissue paper for a charming presentation.
Pro tip: If your brownies bake too long, they’ll lose that fudgy charm. I learned this the hard way once when I got distracted by a phone call. Setting a timer helps avoid overbaking. Also, warm brownies can be tricky to cut—wait until they’re mostly cooled.
Cooking Tips & Techniques
Getting these brownies just right can be surprisingly finicky, but a few tricks can make all the difference. First, trust the sifting—cocoa powder tends to clump, and lumps can ruin the texture. I always sift twice if I’m feeling extra cautious.
Next, melting the butter slowly (either in a microwave in short bursts or gently on the stovetop) prevents it from scorching and gives a smooth base. Another tip—using room temperature eggs helps them blend better with the sugars, supporting the fudgy crumb.
When folding the dry ingredients in, resist the urge to stir vigorously. Overmixing develops gluten, leading to cakey brownies rather than that dense, chewy texture we crave. I remember the first batch I overmixed; they looked fine, but biting into them was like chewing cake, not what I wanted.
Timing is crucial. Take advantage of multitasking by prepping the gift box or cleaning up while the brownies bake. And when cutting, use a sharp knife dipped in hot water and wiped dry between slices for neat edges.
Lastly, don’t skip the espresso powder if you can handle it. It’s subtle but adds a richness that takes these brownies above the usual chocolate bar fare.
Variations & Adaptations
One of the reasons this recipe has stuck around is how easy it is to switch things up depending on your taste or dietary needs. Here are some ways I like to play with it:
- Nutty Twist: Add ½ cup chopped walnuts or pecans to the batter for a crunchy contrast. I always toast them lightly first for extra depth.
- Fruity Flair: Stir in ½ cup dried cherries or cranberries for a pop of tartness against the chocolate.
- Vegan Version: Use flax eggs (1 tablespoon ground flaxseed + 3 tablespoons water per egg), coconut oil instead of butter, and dairy-free chocolate chips. The texture changes slightly but stays satisfyingly fudgy.
- Spice It Up: Add a pinch (¼ teaspoon) of cinnamon or cayenne pepper for a warm or spicy kick. It’s unexpected but delicious.
- Gluten-Free: Swap the flour for a certified gluten-free blend. Baking powder isn’t needed here, so just make sure your cocoa and chocolate chips are GF.
Personally, I once tried adding a swirl of peanut butter on top before baking—it was messy but a total winner at the office potluck!
Serving & Storage Suggestions
These brownies are best served at room temperature or slightly warmed. If you want that just-baked feel, pop a square in the microwave for about 10 seconds—gooey, warm chocolate is a total comfort hug.
For gifting, arrange the brownies in a small box lined with parchment or decorative tissue paper. Add a handwritten note for that personal touch. If you’re serving at home, plate them with a scoop of vanilla ice cream or a dollop of whipped cream for extra indulgence.
Store leftovers in an airtight container at room temperature for up to 3 days. For longer storage, refrigerate for up to a week or freeze the brownies in a sealed bag for up to 3 months. To thaw, leave them out at room temperature or microwave briefly.
Flavors tend to deepen overnight, so sometimes I actually like making these a day ahead. The chocolate and espresso meld beautifully, making each bite even more satisfying.
Nutritional Information & Benefits
Each brownie square (assuming 16 per batch) contains approximately:
| Calories | 220 |
|---|---|
| Fat | 12g |
| Carbohydrates | 28g |
| Protein | 3g |
| Fiber | 2g |
While brownies are an indulgence, these include some nutritional perks. Cocoa powder is rich in antioxidants, and using a mix of sugars adds moisture and chew without overloading on refined sweeteners. The addition of espresso powder boosts flavor without added calories.
For those mindful of dietary needs, this recipe can be adapted to gluten-free and vegan diets as noted earlier. Just be aware that it contains eggs and dairy unless modified. I find these brownies a good treat for sharing, balancing indulgence with quality ingredients.
Conclusion
These Irresistible Thank You Teacher Brownies are not just a recipe—they’re a little box of gratitude wrapped in chocolatey goodness. Whether you’re a last-minute gift giver or someone who loves to bake with intention, this recipe fits the bill. I encourage you to tweak it to your liking, maybe add your own twist, and make it truly yours.
Honestly, I keep coming back to this recipe because it’s reliable, delicious, and carries a warm message in every bite. If you try it, let me know how it goes, or share your favorite variations—I love hearing from fellow brownie enthusiasts!
So go ahead, bake a batch, pack that gift box, and spread some sweet thanks. Your teacher (and maybe your taste buds) will thank you for it.
FAQs
Can I make the brownies ahead of time?
Absolutely! They keep well for a few days at room temperature and even better refrigerated for up to a week. Just warm them slightly before serving.
How do I prevent brownies from being dry or cakey?
Don’t overmix the batter and watch the baking time closely. Pull the brownies out when a toothpick shows moist crumbs, not completely dry.
Can I freeze these brownies?
Yes, once cooled, wrap the brownies tightly and freeze for up to 3 months. Thaw at room temperature or warm briefly before eating.
What’s the purpose of espresso powder in the recipe?
It enhances the chocolate flavor without adding a coffee taste. It’s optional but recommended for richer taste.
Can I add nuts or other mix-ins?
Definitely! Chopped nuts, dried fruit, or even a swirl of peanut butter can add exciting texture and flavor.
Pin This Recipe!
Irresistible Thank You Teacher Brownies Gift Box
A rich, fudgy brownie recipe perfect for gifting to teachers, featuring a subtle espresso powder for enhanced chocolate flavor and a gooey center.
- Prep Time: 10 minutes
- Cook Time: 25-30 minutes
- Total Time: 35-40 minutes
- Yield: 16 brownies 1x
- Category: Dessert
- Cuisine: American
Ingredients
- 1 cup (227 g) unsalted butter, melted
- 1 ½ cups (300 g) granulated sugar
- ½ cup (100 g) brown sugar, packed
- 3 large eggs, room temperature
- 2 teaspoons pure vanilla extract
- 1 cup (125 g) all-purpose flour, sifted
- ¾ cup (75 g) unsweetened cocoa powder, sifted
- 1 teaspoon espresso powder (optional)
- ½ teaspoon salt
- 1 cup (170 g) semi-sweet or dark chocolate chips
Instructions
- Preheat the oven to 350°F (175°C). Grease your 8×8-inch pan or line it with parchment, leaving an overhang for easy removal.
- In a large bowl, whisk together the melted butter, granulated sugar, and brown sugar until combined but not overmixed.
- Add the eggs one at a time, beating well after each addition. Stir in the vanilla extract. This should take about 5 minutes.
- In a separate bowl, sift together the flour, cocoa powder, espresso powder (if using), and salt.
- Gradually add the dry ingredients to the wet mixture, folding gently with a spatula to keep the batter light. Stop as soon as no flour streaks remain.
- Fold in the chocolate chips, distributing them evenly.
- Pour batter into the prepared pan and spread evenly with a spatula.
- Bake for 25–30 minutes. Check at 25 minutes by inserting a toothpick in the center; it should come out with a few moist crumbs but no wet batter.
- Let the brownies cool in the pan on a wire rack for at least 20 minutes.
- Cut into 16 squares and arrange in a gift box lined with parchment or tissue paper.
Notes
Do not overmix the batter to avoid cakey brownies. Use room temperature eggs for better blending. Sift dry ingredients to avoid lumps. Use a sharp knife dipped in hot water and wiped dry between cuts for neat squares. Espresso powder is optional but recommended for richer chocolate flavor. For gluten-free, substitute flour with a 1:1 gluten-free baking blend. For dairy-free, use coconut oil or vegan butter and dairy-free chocolate chips.
Nutrition
- Serving Size: 1 brownie square (1/
- Calories: 220
- Fat: 12
- Carbohydrates: 28
- Fiber: 2
- Protein: 3
Keywords: brownies, teacher gift, chocolate, fudgy brownies, espresso powder, homemade brownies, easy brownies, gift box brownies


