
“Hey, can you bring something sweet but light for the baby shower tomorrow?” my friend texted me late afternoon. Honestly, I was wiped out from a long day, and the idea of standing over a stove or baking for hours was about as appealing as stepping barefoot on a Lego. Then, while rummaging through my fridge, a container of fresh berries caught my eye and an almost accidental idea took shape.
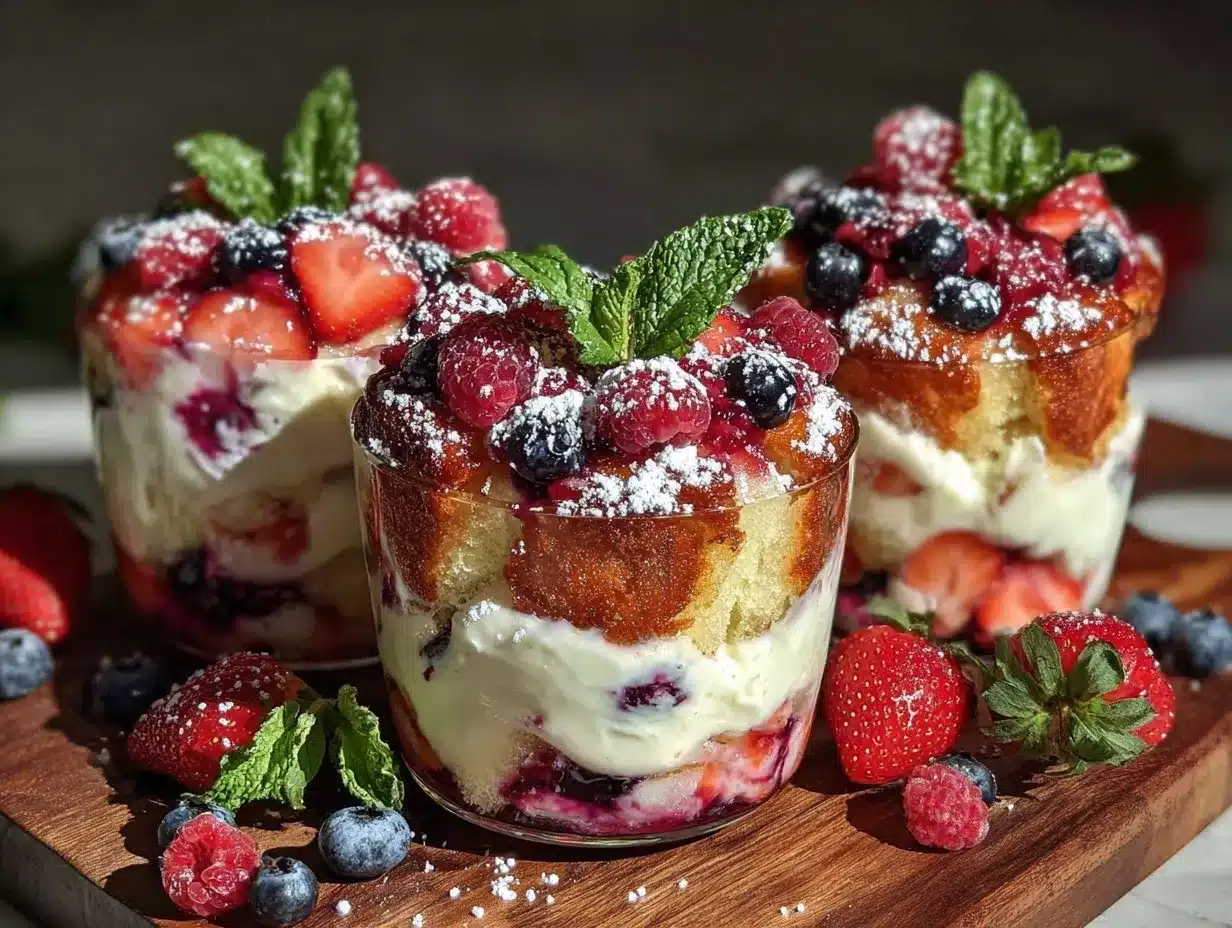
I grabbed some store-bought pound cake, whipped cream, and a few berries, and started layering them in mini cups just for fun. What began as a quick fix turned into a bit of a routine – I made these Fresh Mini Berry Trifle Cups a couple of times that week, tweaking the balance of flavors and textures. Turns out, these little cups became the star of the shower, with guests asking for the recipe and sneaking extra helpings.
There’s something quietly satisfying about these trifles: the sweet, tangy berries mingling with fluffy cake and creamy layers, all in a perfect bite-sized portion. It’s the kind of dessert that doesn’t demand much fuss but still manages to feel thoughtful and festive. I keep coming back to this recipe, especially when I want a dessert that feels special without the usual stress.
So, if you’re looking for a berry sweet treat that’s simple, charming, and just right for a baby shower or any casual gathering, these mini trifle cups might just become your new go-to. They’re easy enough to whip up when time is tight but impressive enough to make a quiet statement—like the perfect little celebration in every spoonful.
Why You’ll Love This Recipe
Having tried many berry desserts, these Fresh Mini Berry Trifle Cups stand out for all the right reasons. From my experience, they’re one of those recipes that manage to be fuss-free yet deliver a wow factor every single time. Here’s why they’ve earned a permanent spot in my recipe box:
- Quick & Easy: You can assemble these in under 20 minutes – no baking required if you use store-bought cake. Perfect for last-minute gatherings or when you’re juggling a busy schedule.
- Simple Ingredients: No need for specialty stores or exotic items. Fresh berries, cake, and whipped cream are all you need — ingredients you probably already have or can grab on a quick trip.
- Perfect for Baby Showers: Their light, fresh profile feels celebratory but not heavy — ideal for a spring or summer baby shower where you want something sweet but not overwhelming.
- Crowd-Pleaser: These trifles get rave reviews from kids to adults. The mini size means everyone can sample a few without feeling guilty.
- Unbelievably Delicious: The texture contrast between juicy berries, soft cake, and fluffy cream is the kind of comfort food you didn’t know you needed.
What makes these trifles truly different is the layering technique I settled on after a few tries — I like to gently macerate a handful of berries with a little sugar and lemon zest to boost their flavor. Plus, using a light vanilla bean whipped cream adds a subtle depth that’s just right. Honestly, these little cups are the kind of dessert that makes you close your eyes after the first bite—pure bliss without any fuss.
What Ingredients You Will Need
This recipe uses simple, wholesome ingredients that work together to create a fresh and flavorful treat. You’ll find that many are pantry staples, and the fresh berries add that seasonal pop. Here’s the breakdown:
- For the Base:
- Store-bought pound cake or angel food cake, cut into 1-inch cubes (I prefer Sara Lee pound cake for consistent texture)
- For the Berry Mixture:
- Fresh strawberries, hulled and sliced (about 1 cup)
- Fresh blueberries (1 cup)
- Fresh raspberries (1 cup)
- Granulated sugar (2 tablespoons, adjust to taste)
- Fresh lemon zest (1 teaspoon, adds a bright note)
- For the Whipped Cream Layer:
- Heavy whipping cream (1 cup, cold)
- Powdered sugar (2 tablespoons)
- Pure vanilla extract (1 teaspoon, or use vanilla bean paste for richer flavor)
- Optional Garnishes:
- Fresh mint leaves (for a pop of color and fresh aroma)
- Toasted sliced almonds or granola (adds crunch)
Seasonally, you can swap in fresh blackberries or even stone fruits like peaches for a summer twist. If you want a gluten-free version, almond flour cake or gluten-free pound cake works well. For dairy-free, coconut whipped cream is a tasty substitute, and coconut-based cakes can replace the traditional pound cake.
Equipment Needed
Making these mini berry trifle cups doesn’t require any fancy gadgets. Here’s what I find most helpful:
- Mixing bowls – a large one for macerating berries and another for whipping cream
- Electric hand mixer or stand mixer – highly recommended for perfectly whipped cream; a whisk works but takes more elbow grease
- Measuring spoons and cups – precision helps balance sweetness and texture
- Small clear plastic or glass cups (4-6 oz size) – these let the layers shine visually; I’ve used disposable cups for easy cleanup and glass ones for a fancy touch
- Spoons or small spatulas for layering
If you don’t have an electric mixer, chilling your bowl and beaters beforehand can help your whipped cream come together smoother. For budget-friendly options, disposable plastic cups from dollar stores work great and add a cute presentation flair without breaking the bank.
Preparation Method
- Macerate the Berries (10 minutes): In a large bowl, combine the sliced strawberries, blueberries, raspberries, granulated sugar, and lemon zest. Gently toss to coat the berries. Set aside for about 10 minutes so the berries release their juices and become sweet and juicy. You’ll notice the vibrant berry juices pooling at the bottom — that’s flavor magic happening.
- Prepare the Whipped Cream (5-7 minutes): Chill your mixing bowl and beaters in the fridge for about 10 minutes before starting. Pour the cold heavy cream into the bowl, add powdered sugar and vanilla extract. Beat on medium-high speed until soft peaks form — this means when you lift your whisk, the cream holds shape but still looks soft and billowy. Be careful not to overbeat, or it will turn grainy.
- Cut the Cake (5 minutes): Cut your pound cake or angel food cake into roughly 1-inch cubes. You want them bite-sized but not too small that they get lost in the layers.
- Assemble the Trifle Cups (10 minutes): Start by placing a layer of cake cubes at the bottom of each cup (about 2-3 cubes). Spoon a generous layer of the macerated berries with some juice over the cake. Next, add a layer of whipped cream, smoothing it gently with the back of a spoon or spatula. Repeat the layers once more, finishing with a dollop of whipped cream and a few fresh berries on top for decoration.
- Garnish and Chill (at least 30 minutes): Add optional mint leaves or toasted almonds on top. Chill the trifles in the fridge until ready to serve. The chilling helps the flavors meld and the cream set slightly for cleaner spoonfuls.
Note: If you want to speed up assembly, prepare the berries and whipped cream ahead of time. Just don’t assemble too early or the cake might soak up too much juice and become soggy.
For the freshest taste, serve within 24 hours of assembly. The contrast of textures is best when the cake still has a little bounce and the berries taste bright and fresh.
Cooking Tips & Techniques
From my kitchen experiments, here are some tips to make your Fresh Mini Berry Trifle Cups consistently fantastic:
- Don’t skip macerating the berries. Tossing berries with a bit of sugar and lemon zest isn’t just for sweetness — it softens them and brings out their natural juices, which soak into the cake beautifully.
- Whip your cream just right. Over-whipping turns it buttery; under-whipping makes it runny. Soft peaks are your sweet spot for light, airy texture.
- Use sturdy cake. Pound cake or angel food cake holds up well without falling apart. Sponge cakes tend to get soggy too fast.
- Layer gently. Pressing too hard when layering can squash the cake and berries, making a messy cup instead of a neat, pretty dessert.
- Chill before serving. It helps the layers meld and the cream firm up, making the trifles easier to eat and more refreshing.
One time, I forgot to chill the cream and ended up with a runny layer that made the cups a bit messy — so don’t underestimate the power of cold tools and ingredients. Also, if you’re short on time, assembling just before guests arrive keeps everything fresh and vibrant. These little things make all the difference between a ‘meh’ trifle and a memorable one.
Variations & Adaptations
You can easily tweak this recipe to suit different tastes or dietary needs:
- Dietary Twist: Use coconut whipped cream or cashew cream for a dairy-free version. Swap pound cake for gluten-free almond flour cake to accommodate gluten sensitivities.
- Seasonal Variations: In fall, try layering with spiced apple slices and cinnamon instead of berries. Summer calls for fresh peaches, nectarines, or cherries for a juicy change.
- Flavor Boost: Add a splash of liqueur like Grand Marnier or amaretto to the berries for an adult-friendly dessert. Or sprinkle chopped pistachios on top for a nutty crunch.
- Different Base: Instead of cake, use crushed graham crackers or ladyfingers for a lighter texture. For a more indulgent version, a brownie base pairs wonderfully with berries and cream.
- Personal Favorite: I once layered these with a thin spread of homemade lemon curd under the berries — it added a tangy surprise that guests loved.
Serving & Storage Suggestions
Serve these Fresh Mini Berry Trifle Cups chilled, straight from the fridge. They look especially pretty in clear cups, letting those vibrant berry colors and creamy layers shine through. For a baby shower, I like to arrange them on a decorated platter with fresh mint sprigs scattered around — simple but elegant.
Pair these trifles with light beverages like sparkling water with lemon or a mild tea to keep the palate fresh. They’re also a nice sweet finish after a savory meal, such as the honey mustard glazed chicken thighs or the lemon garlic butter cod I often make for weeknight dinners.
Store leftovers in an airtight container in the refrigerator for up to 2 days. Keep in mind the cake may absorb more moisture over time, so texture is best on day one. To revive the cream’s fluffiness before serving leftovers, give the top layer a gentle stir or add a fresh spoonful of whipped cream.
Nutritional Information & Benefits
Each mini berry trifle cup contains roughly 180-220 calories depending on portion size and ingredient options. They’re a moderate treat with natural vitamins and antioxidants from the fresh berries, plus calcium and protein from the whipped cream.
The berries offer immune-boosting vitamin C and fiber which help with digestion. Using fresh ingredients without artificial sweeteners keeps this dessert on the lighter side compared to heavier pastries or cakes.
For those watching carbs or gluten, swapping ingredients as suggested can make these trifles lower in carbs or gluten-free, while keeping that satisfying dessert feeling intact.
Personally, I appreciate how this recipe balances indulgence with freshness — a little sweet treat that doesn’t leave you feeling weighed down but still feels like a celebration.
Conclusion
Fresh Mini Berry Trifle Cups have quietly become one of my favorite go-to desserts for celebrations like baby showers. They’re easy to make, use simple ingredients, and look stunning without a ton of effort. Whether you keep them classic or add your own twist, they’re a sweet way to mark special moments.
What I love most is how adaptable they are — you can customize the berries, the cake, or the cream to suit your mood or dietary needs. Plus, they’re great for sharing and always spark happy comments from guests.
So, next time you need a sweet treat that’s both pretty and practical, try these mini trifles. And if you experiment with flavors or presentation, I’d love to hear how you make them your own!
Frequently Asked Questions
- Can I make these trifles ahead of time? Yes, but I recommend assembling them no more than a few hours before serving to keep the cake from getting soggy.
- What if I don’t have fresh berries? Frozen berries can work, but thaw and drain them well first to avoid extra liquid in your cups.
- Can I use a different type of cake? Absolutely! Angel food cake, sponge cake, or even brownies work depending on your taste preference.
- How do I make dairy-free whipped cream? Use chilled coconut cream whipped with a little powdered sugar and vanilla extract for a delicious dairy-free alternative.
- What size cups should I use? Small 4-6 oz cups are ideal for individual servings and pretty presentation.
Pin This Recipe!
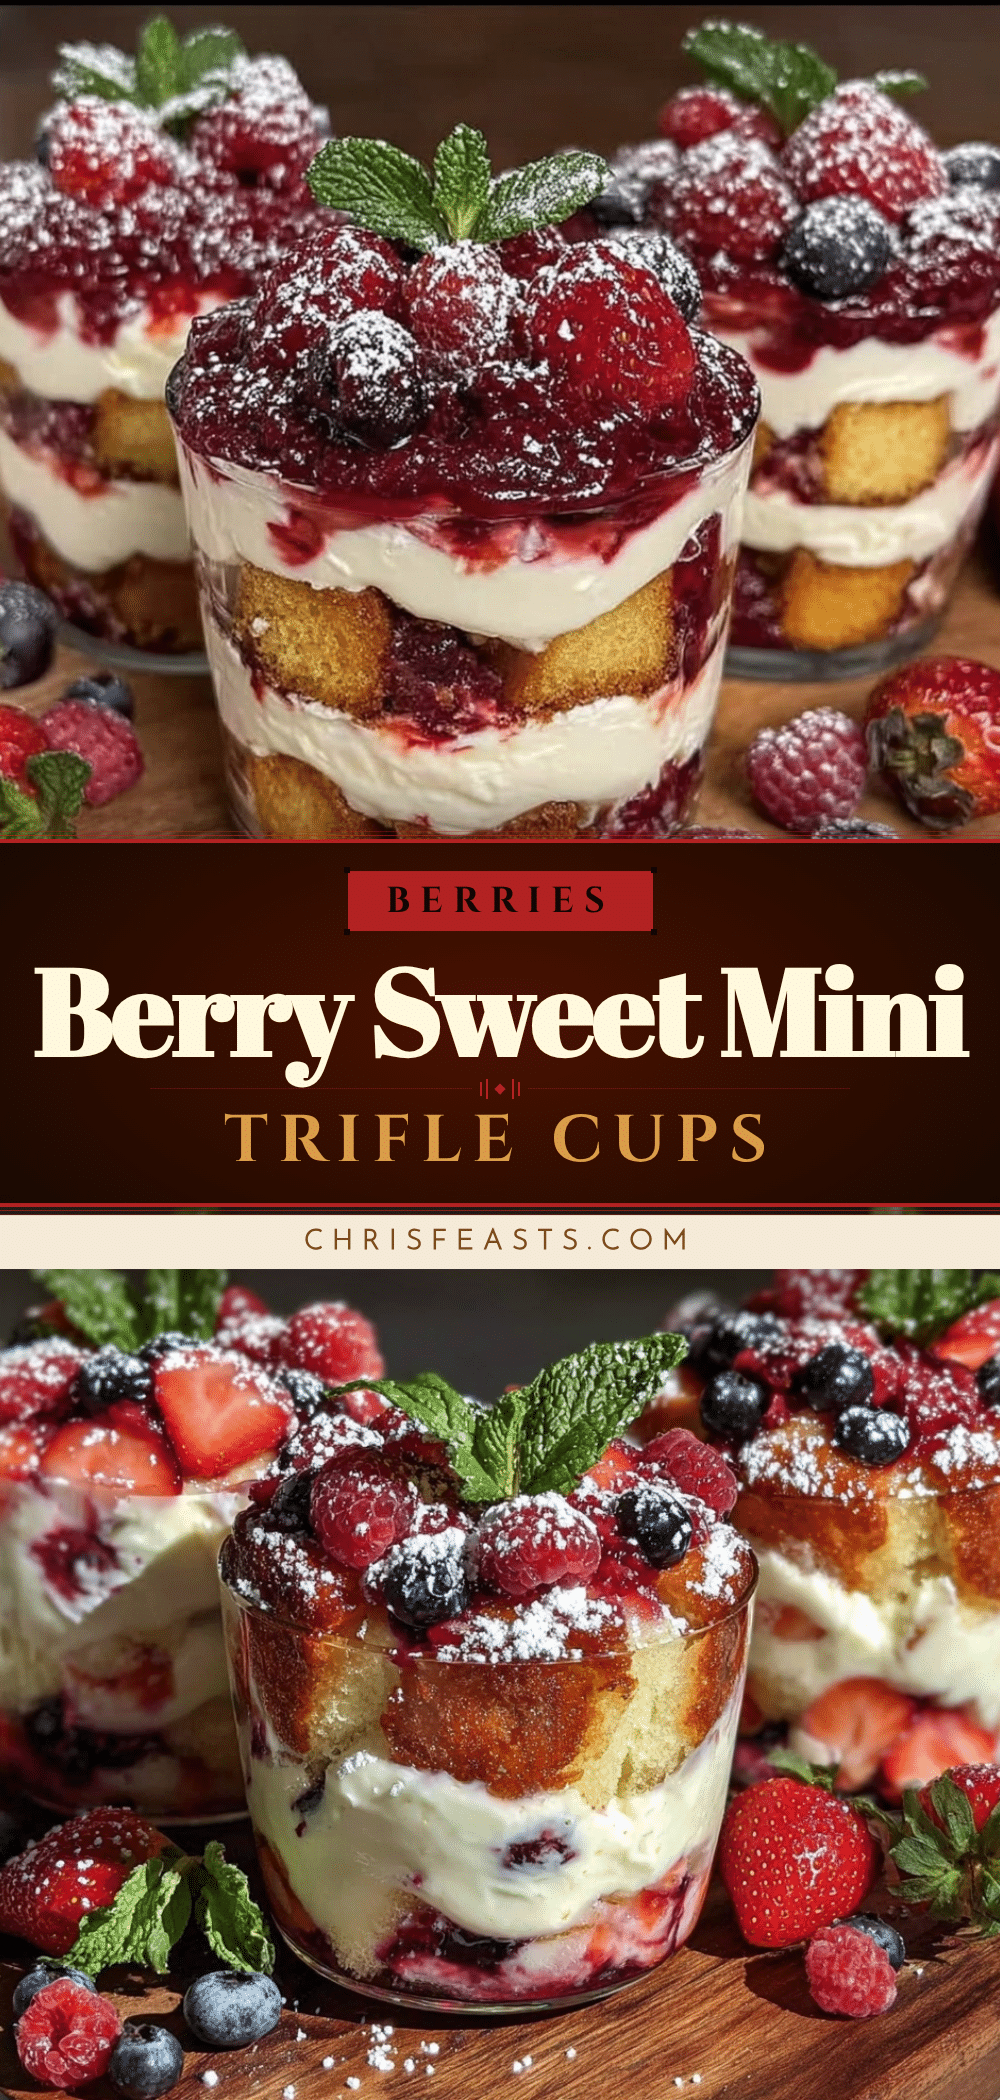
Fresh Mini Berry Trifle Cups

A quick and easy no-bake dessert featuring layers of fresh berries, pound cake, and vanilla whipped cream, perfect for baby showers and casual gatherings.
- Prep Time: 20 minutes
- Cook Time: 0 minutes
- Total Time: 50 minutes
- Yield: 8 servings 1x
- Category: Dessert
- Cuisine: American
Ingredients
- Store-bought pound cake or angel food cake, cut into 1-inch cubes
- 1 cup fresh strawberries, hulled and sliced
- 1 cup fresh blueberries
- 1 cup fresh raspberries
- 2 tablespoons granulated sugar (adjust to taste)
- 1 teaspoon fresh lemon zest
- 1 cup heavy whipping cream, cold
- 2 tablespoons powdered sugar
- 1 teaspoon pure vanilla extract or vanilla bean paste
- Optional garnishes: fresh mint leaves, toasted sliced almonds or granola
Instructions
- Macerate the Berries (10 minutes): In a large bowl, combine sliced strawberries, blueberries, raspberries, granulated sugar, and lemon zest. Gently toss to coat and set aside for about 10 minutes to release juices.
- Prepare the Whipped Cream (5-7 minutes): Chill mixing bowl and beaters for 10 minutes. Pour cold heavy cream into bowl, add powdered sugar and vanilla extract. Beat on medium-high speed until soft peaks form.
- Cut the Cake (5 minutes): Cut pound cake or angel food cake into roughly 1-inch cubes.
- Assemble the Trifle Cups (10 minutes): Place 2-3 cake cubes at the bottom of each 4-6 oz cup. Spoon a generous layer of macerated berries with juice over the cake. Add a layer of whipped cream, smoothing gently. Repeat layers once more, finishing with whipped cream and a few fresh berries on top.
- Garnish and Chill (at least 30 minutes): Add optional mint leaves or toasted almonds on top. Chill in the refrigerator until ready to serve.
Notes
Chill the mixing bowl and beaters before whipping cream for best results. Assemble trifles no more than a few hours before serving to prevent soggy cake. Macerating berries with sugar and lemon zest enhances flavor and juice. Use sturdy cakes like pound cake or angel food cake to maintain texture. For dairy-free, substitute coconut whipped cream and coconut-based cakes. For gluten-free, use almond flour or gluten-free pound cake.
Nutrition
- Serving Size: One mini trifle cup
- Calories: 200
- Sugar: 15
- Sodium: 120
- Fat: 12
- Saturated Fat: 7
- Carbohydrates: 22
- Fiber: 3
- Protein: 3
Keywords: berry trifle, mini trifle cups, baby shower dessert, no bake dessert, fresh berries, pound cake dessert, easy berry dessert


