“Are you seriously making a Death Star cheese ball?” My brother’s voice crackled through the phone, half-laughing, half-incredulous. Honestly, I wasn’t sure what to expect when I first sketched the idea out on a whim one chaotic evening before the holidays. I was knee-deep in juggling last-minute errands and the usual seasonal mayhem when I realized I needed a showstopper appetizer—something fun, festive, and, well, a little bit nerdy. The idea of an Epic Death Star Cheese Ball popped up while I was rummaging through the fridge, trying to salvage whatever cheese and snacks I had on hand. At first, I thought it was a bit silly, but once I got rolling, the concept took on a life of its own.
That night, shaping the cheese mixture into the iconic Death Star sphere felt oddly calming amid the holiday frenzy. The texture was perfect—creamy, flavorful, with that punch of sharp cheddar and cream cheese that hits all the right notes. My friends couldn’t stop talking about it at the party, some even insisting I bring it back next year (and yes, I will). The best part? It’s easy enough that even the busiest hosts can pull it off without breaking a sweat. I guess the combination of Star Wars fandom and a delicious cheese ball was just the right formula for festive entertaining that brings everyone together.
It’s become my go-to recipe when I want something that’s playful but tasty, familiar but a little unexpected. Plus, honestly, who doesn’t love a cheese ball that doubles as a conversation starter? If you’re ready to impress your guests with a touch of galactic fun and a whole lot of cheesy goodness, this Epic Death Star Cheese Ball recipe is your new secret weapon.
Why You’ll Love This Recipe
Over the years of making and tweaking this recipe, I’ve found there’s just something about this Epic Death Star Cheese Ball that nails the party vibe every time. Here’s why it’s become a staple in my festive entertaining arsenal:
- Quick & Easy: The whole process takes under 30 minutes, which means you’re not stuck in the kitchen when guests arrive.
- Simple Ingredients: No need for any fancy or obscure items — most of these are pantry staples or easy to find at your local store.
- Perfect for Festive Gatherings: Whether it’s a holiday party, game night, or themed bash, this cheese ball adds that wow factor.
- Crowd-Pleaser: Kids and adults alike gravitate towards the creamy, cheesy goodness, and the theme just keeps them intrigued.
- Unbelievably Delicious: The sharp cheddar blended with cream cheese, a hint of garlic, and a touch of green onion makes every bite melt in your mouth.
What sets this recipe apart? It’s not just about shaping a cheese ball into a Death Star. It’s the perfect balance of flavors and textures combined with a clever presentation that makes it memorable. Plus, the little details—like using finely chopped chives to mimic the Death Star’s trenches—show you care without making things complicated. Honestly, it’s that perfect blend of fun and flavor that keeps people coming back for more.
What Ingredients You Will Need
This recipe uses simple, wholesome ingredients to deliver bold flavor and satisfying texture without the fuss. Most are pantry staples, and substitutions are easy if you want to tweak things.
- Cheddar Cheese: 16 oz (450 g) sharp cheddar, shredded (I prefer Tillamook for its rich flavor)
- Cream Cheese: 8 oz (225 g), softened (full-fat works best for creaminess)
- Green Onions: 3 stalks, finely chopped (adds a fresh bite and the “Death Star trenches” effect)
- Garlic Powder: 1 tsp (for subtle, savory depth)
- Worcestershire Sauce: 1 tbsp (boosts umami without overpowering)
- Smoked Paprika: 1 tsp (optional, adds a hint of smoky warmth)
- Salt & Black Pepper: To taste (season carefully; the cheese is already flavorful)
- Ritz Crackers or Pretzel Sticks: For decorating the surface and serving (pretzel sticks create cool “Death Star” lines)
- Fresh Parsley or Chives: For garnish (optional, but adds a nice pop of green)
You can swap sharp cheddar with a mix of cheeses like smoked gouda or pepper jack if you want to add a twist. For a dairy-free version, cream cheese alternatives made from coconut or cashews work decently but might change the texture. And if you want to keep things gluten-free, serve with gluten-free crackers or veggie sticks instead of traditional crackers.
Equipment Needed
- Mixing Bowl: A medium to large bowl for combining ingredients comfortably.
- Hand Mixer or Stand Mixer: Makes blending the cream cheese and cheddar easier, but a sturdy wooden spoon works if you don’t have one.
- Plastic Wrap: Essential for shaping and chilling the cheese ball so it holds its form.
- Serving Platter: Choose a round plate to showcase your Death Star masterpiece.
- Sharp Knife: For precise trimming and decorating the cheese ball surface.
If you’re short on specialized tools, don’t worry—hand mixing is totally fine. Just be sure the cream cheese is softened well to avoid lumps. I like to wrap the cheese ball tightly in plastic wrap before chilling to keep it perfectly round, and if you have a silicone spatula, that helps scrape every bit of the mixture from the bowl.
Preparation Method
- Soften the Cream Cheese: Leave the 8 oz (225 g) block of cream cheese out at room temperature for about 30 minutes. It should feel soft to the touch but not melting.
- Mix the Cheeses: In your mixing bowl, combine the softened cream cheese with 16 oz (450 g) shredded sharp cheddar. Use a hand mixer on low speed or a sturdy spoon to blend until smooth and evenly mixed—about 2-3 minutes.
- Add Flavorings: Stir in 3 finely chopped green onions, 1 tsp garlic powder, 1 tbsp Worcestershire sauce, 1 tsp smoked paprika (if using), and salt and pepper to taste. Mix thoroughly. The mixture should be creamy with specks of green onions throughout.
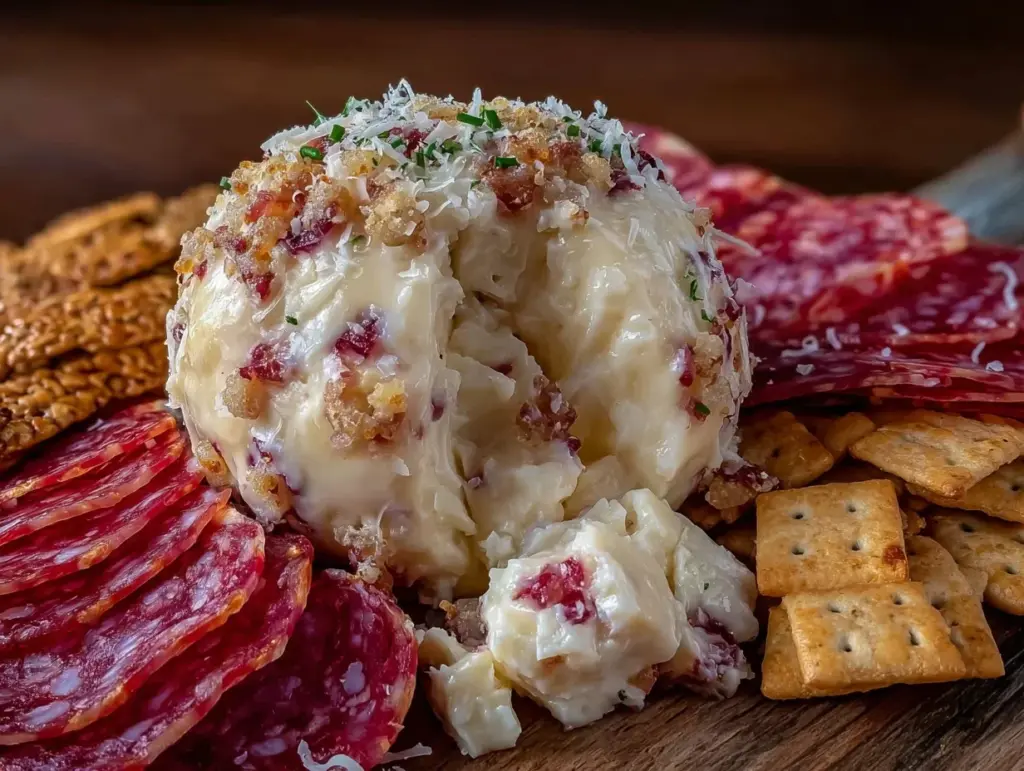
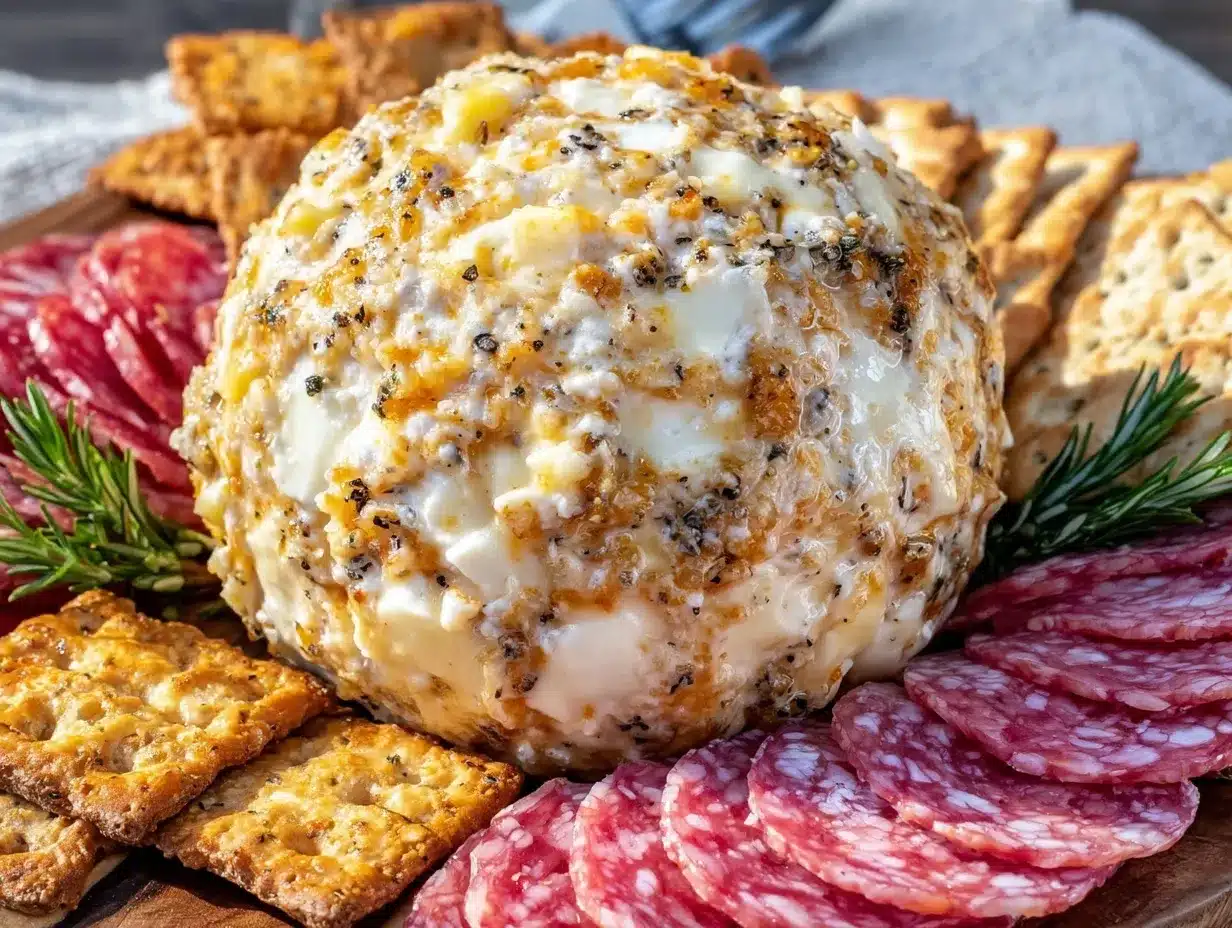
- Shape the Death Star: Lay a large piece of plastic wrap on your countertop. Spoon the cheese mixture onto the center and gather the wrap around it, shaping gently into a smooth sphere about 6 inches (15 cm) in diameter. Press firmly so it holds.
- Chill: Refrigerate the wrapped cheese ball for at least 2 hours, preferably overnight. This helps it firm up and makes decorating easier.
- Decorate Your Death Star: Unwrap carefully and place the sphere on your serving platter. Use pretzel sticks to create the signature trench lines across the sphere’s surface. For the iconic “superlaser” dish, cut a small circle from a cracker or cheese slice and place it on the front part of the ball. Sprinkle finely chopped green onions or parsley to add texture and color.
- Serve: Surround the cheese ball with crackers, pretzels, or fresh veggie sticks for dipping. Let it sit at room temperature for 15 minutes before serving to soften slightly and bring out the flavors.
Pro tip: If the mixture feels too soft while shaping, pop it back in the fridge for 15-20 minutes and try again. The key is to handle it gently but firmly for a clean, round shape. Also, don’t skip the chilling step—trust me, it makes all the difference for that perfect sliceability and flavor meld.
Cooking Tips & Techniques
Making the Epic Death Star Cheese Ball is more about technique than heat, so here are a few tips I’ve picked up over the years to keep it smooth sailing:
- Softening Cream Cheese: Don’t rush this step. Room temperature cream cheese blends easier and prevents lumps. If you’re in a hurry, cut it into cubes and microwave in 10-second bursts, checking frequently.
- Mixing Thoroughly: Use a mixer if possible for a creamier, more uniform texture. Hand mixing can work but be patient to avoid clumps.
- Shaping Tips: Plastic wrap is your friend here. It helps form a smooth surface and keeps the cheese ball neat. For best results, chill in stages if needed to firm up the shape.
- Decorating: Get creative! Pretzel sticks make great trenches, but you can also use thin strips of fresh herbs or sliced olives for extra detail. Just be gentle to avoid breaking the surface.
- Serving Temperature: Let the cheese ball rest at room temp for a bit to soften—it enhances flavor and makes spreading easier.
One thing I learned the hard way was not chilling the cheese ball long enough. It ended up too soft to decorate properly, and the shape was a disaster. Lesson learned: patience is key. Also, I recommend pairing this cheese ball with a crisp white wine or a classic cocktail for the full festive experience (and that’s coming from someone who usually sticks to water at parties!).
Variations & Adaptations
If you want to switch things up or cater to different dietary needs, this Epic Death Star Cheese Ball can be quite versatile:
- Spicy Version: Add 1-2 finely chopped jalapeños or a dash of cayenne pepper to the cheese mixture for a kick.
- Herb Lover’s: Mix in fresh chopped dill, parsley, or chives to amp up the green and fresh notes—perfect for spring or summer gatherings.
- Gluten-Free: Serve with gluten-free crackers or sliced veggies instead of traditional crackers or pretzels.
- Dairy-Free: Use vegan cream cheese and a dairy-free shredded cheese alternative. The texture will differ but still tasty.
- Meaty Twist: Stir in crumbled cooked bacon or finely diced ham for extra richness and smoky flavor (think of pairing it with the savory notes from a sausage and peppers skillet dish).
Personally, I once made a version with smoked gouda and added caramelized onions for a deeper flavor profile. It was a hit, especially with fellow Star Wars fans who appreciate a little culinary creativity. Feel free to experiment with your favorite cheeses or mix-ins to make the Death Star truly yours.
Serving & Storage Suggestions
Serving this cheese ball is all about letting it shine as the centerpiece. Bring it out about 15 minutes before guests dig in so it softens slightly. Place it on a large platter surrounded by an assortment of crackers, pretzels, and sliced vegetables like cucumbers, bell peppers, and carrots for variety and crunch.
For drinks, a crisp Sauvignon Blanc or a light lager complements the cheese’s richness beautifully. If you’re into cocktails, a classic gin and tonic or a citrusy spritz pairs nicely.
If you have leftovers (and you probably will), wrap the cheese ball tightly in plastic wrap and refrigerate for up to 4 days. The flavors actually meld more over time, so it can taste even better the next day. When reheating, just bring it back to room temperature before serving again.
Don’t forget: this cheese ball pairs nicely with hearty mains like a honey mustard glazed chicken thighs or a rich creamy ground beef stroganoff, making it a flexible party starter or snack.
Nutritional Information & Benefits
Here’s a rough estimate per serving (assuming 12 servings):
| Calories | 220 |
|---|---|
| Fat | 18 g |
| Protein | 7 g |
| Carbohydrates | 3 g |
| Fiber | 0.5 g |
| Sodium | 350 mg |
The cheddar and cream cheese bring plenty of protein and calcium, while green onions add a small boost of vitamins and antioxidants. This recipe is naturally gluten-free if you skip the crackers or use gluten-free options. Just watch the sodium if you’re sensitive, as cheese and Worcestershire sauce can add up. Overall, it’s a satisfying, indulgent snack that fits well into balanced festive eating.
Conclusion
The Epic Death Star Cheese Ball isn’t just a fun nod to Star Wars fandom—it’s a genuinely delicious, easy-to-make crowd-pleaser that turns any party into an event. I love how it combines simple ingredients with a playful twist that sparks conversation and smiles. Whether you’re a longtime cheese ball fan or a first-timer looking to surprise your guests, this recipe offers something special without the stress.
Feel free to get creative with your own touches or pair it with your favorite dishes from the blog. I’d love to hear how your cheese ball turns out or any unique spins you try—drop a comment below or share your pics! Here’s to festive entertaining with a bit of galactic fun and a lot of cheesy joy.
FAQs
Can I make the Epic Death Star Cheese Ball ahead of time?
Absolutely! In fact, chilling it overnight helps the flavors meld and makes shaping easier. Just keep it wrapped tightly in plastic wrap until ready to decorate and serve.
What’s the best way to store leftovers?
Wrap the cheese ball securely in plastic wrap and refrigerate. It will keep well for up to 4 days. Bring to room temperature before serving again.
Can I use other cheeses besides cheddar?
Yes! Feel free to experiment with gouda, pepper jack, or even a mix of cheeses for different flavor profiles. Just keep the total amount the same.
How do I keep the cheese ball from sticking to my hands when shaping?
Chilling the cheese mixture briefly or lightly wetting your hands with cold water helps prevent sticking and makes shaping smoother.
Is this recipe suitable for kids?
Definitely! The creamy, mild flavors and fun presentation make it a hit with kids. Just watch any spicy add-ins if you make variations.
Pin This Recipe!
Epic Death Star Cheese Ball Recipe Easy for Festive Entertaining Fun

A fun and festive cheese ball shaped like the Death Star, combining sharp cheddar and cream cheese with flavorful seasonings. Perfect for holiday parties and gatherings, this easy recipe is a crowd-pleaser that doubles as a conversation starter.
- Prep Time: 10 minutes
- Cook Time: 0 minutes
- Total Time: 2 hours 10 minutes
- Yield: 12 servings 1x
- Category: Appetizer
- Cuisine: American
Ingredients
- 16 oz sharp cheddar cheese, shredded
- 8 oz cream cheese, softened (full-fat preferred)
- 3 stalks green onions, finely chopped
- 1 tsp garlic powder
- 1 tbsp Worcestershire sauce
- 1 tsp smoked paprika (optional)
- Salt and black pepper to taste
- Ritz crackers or pretzel sticks for decorating and serving
- Fresh parsley or chives for garnish (optional)
Instructions
- Soften the cream cheese by leaving it out at room temperature for about 30 minutes until soft but not melting.
- In a mixing bowl, combine the softened cream cheese with shredded sharp cheddar. Blend using a hand mixer on low speed or a sturdy spoon until smooth and evenly mixed, about 2-3 minutes.
- Stir in finely chopped green onions, garlic powder, Worcestershire sauce, smoked paprika (if using), and salt and pepper to taste. Mix thoroughly.
- Lay a large piece of plastic wrap on the countertop. Spoon the cheese mixture onto the center and gather the wrap around it, shaping gently into a smooth sphere about 6 inches in diameter. Press firmly to hold the shape.
- Refrigerate the wrapped cheese ball for at least 2 hours, preferably overnight, to firm up.
- Unwrap and place the sphere on a serving platter. Use pretzel sticks to create trench lines across the surface. For the ‘superlaser’ dish, cut a small circle from a cracker or cheese slice and place it on the front. Sprinkle finely chopped green onions or parsley for texture and color.
- Surround the cheese ball with crackers, pretzels, or fresh veggie sticks for dipping. Let it sit at room temperature for 15 minutes before serving to soften and enhance flavors.
Notes
Softening the cream cheese properly is key to a smooth texture. Chill the cheese ball thoroughly to make shaping and decorating easier. Let the cheese ball rest at room temperature before serving to enhance flavor and spreadability. For gluten-free, serve with gluten-free crackers or veggie sticks. Variations include adding jalapeños for spice or mixing in fresh herbs for extra flavor.
Nutrition
- Serving Size: Approximately 1/12th
- Calories: 220
- Sodium: 350
- Fat: 18
- Carbohydrates: 3
- Fiber: 0.5
- Protein: 7
Keywords: cheese ball, Death Star, holiday appetizer, party snack, festive entertaining, Star Wars, cheddar cheese, cream cheese, easy appetizer


