“You know, I wasn’t expecting my weekend backyard hangout to turn into a full-blown pizza fest,” I said, laughing as I wiped flour off my hands. It was last Saturday afternoon, the sun just starting to dip, when my neighbor Tim popped over. He’s usually the quiet type, but that day he was armed with a tip: “Forget the store-bought crusts—homemade dough on the grill is where it’s at.” I was skeptical, honestly. I mean, outdoor pizza? On the grill? But Tim showed me his secret dough recipe scribbled on a crumpled napkin, and the aroma of fresh basil and melting mozzarella quickly won me over. The dough was a little sticky, and yes, I accidentally dropped the flour bag mid-knead (classic me), but the crispy crust that came out was nothing short of magic.
Maybe you’ve been there—wanting to throw a simple party but ending up with something unexpectedly unforgettable. That’s what this crispy outdoor pizza party is about. It’s not just a recipe; it’s an experience that turns your backyard into the coziest, tastiest gathering spot. And the best part? You don’t need a fancy pizza oven, just your grill and a handful of fresh ingredients.
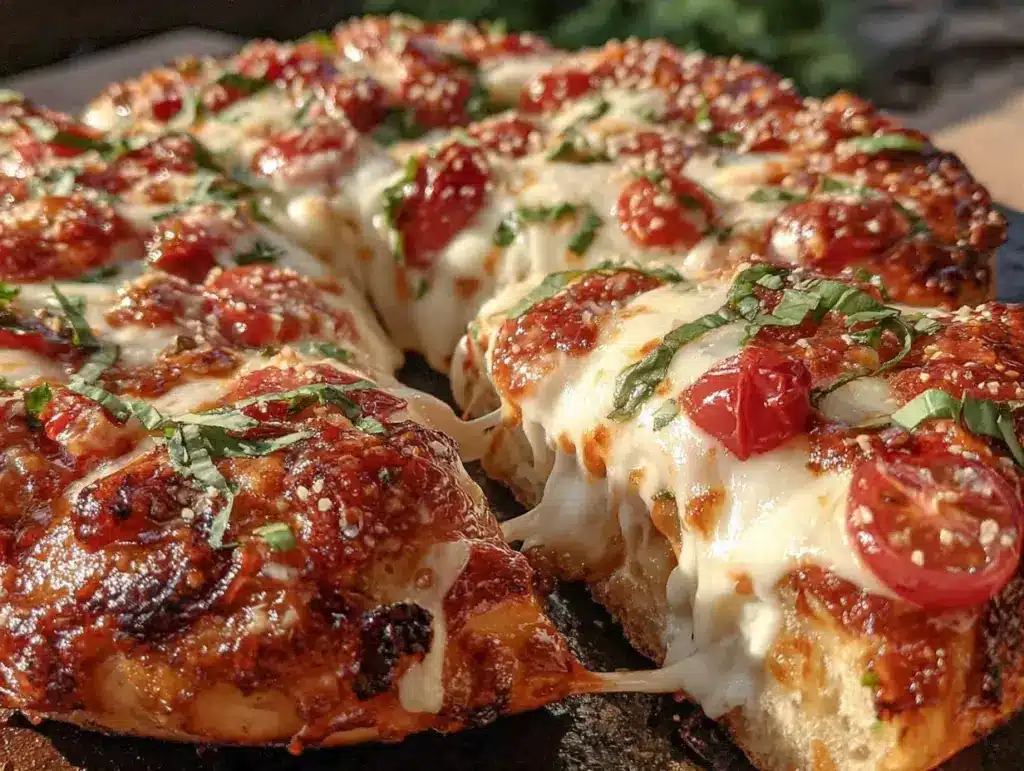
So why does this recipe stick with me? Because it’s the kind of meal that brings everyone together, gets hands messy, and leaves you with that perfect crispy crust that’s somehow chewy inside. Oh, and the toppings? Fresh, bright, and packed with flavor—no preservatives, no mystery ingredients, just honest to goodness good food. Honestly, it’s the kind of pizza that makes you close your eyes after the first bite and smile. Tim’s little napkin may have been crumpled, but this recipe is a gem I keep coming back to—especially when the weekend feels like it needs a little extra something.
Why You’ll Love This Recipe
Having tested this crispy outdoor pizza party recipe more times than I can count, I can confidently say it’s a winner for so many reasons. Whether you’re new to homemade dough or a seasoned pizza lover, this recipe balances ease and flavor beautifully. Here’s why it’s worth a spot in your recipe rotation:
- Quick & Easy: The dough comes together in under 15 minutes, with a simple rise time, making it perfect for last-minute gatherings or spontaneous pizza cravings.
- Simple Ingredients: You likely have everything in your pantry already—flour, yeast, olive oil, and salt. No fancy flour blends or hard-to-find toppings needed.
- Perfect for Outdoor Parties: Grilling pizzas adds a smoky crispness you just can’t get indoors, making it an ideal choice for backyard cookouts or casual get-togethers.
- Crowd-Pleaser: Kids and adults alike rave about the perfectly crispy crust and fresh toppings combo. You can customize toppings easily for picky eaters too.
- Unbelievably Delicious: The combination of homemade dough with fresh herbs and quality cheese creates a flavor profile that’s satisfying and soulful.
This isn’t just another pizza recipe floating around. The secret lies in the dough’s hydration level and a quick rest that helps develop those perfect little air pockets. Plus, grilling rather than oven-baking means you get that irresistible char without drying out the crust. I’ve tried countless dough recipes, but this one strikes the best balance between crispy and chewy every time. It’s the kind of pizza you’ll want to make again and again, especially when friends and family are around.
What Ingredients You Will Need
This recipe uses simple, wholesome ingredients to deliver bold flavor and satisfying texture without the fuss. Most are pantry staples, with a few fresh toppings to brighten things up. Feel free to swap or customize as you like!
- For the Dough:
- All-purpose flour – 3 cups (360g) (I prefer King Arthur flour for consistent texture)
- Active dry yeast – 2 ¼ teaspoons (one packet)
- Warm water – 1 ¼ cups (300ml), around 110°F (43°C) to activate yeast properly
- Extra-virgin olive oil – 2 tablespoons (adds richness and helps with crispiness)
- Granulated sugar – 1 teaspoon (feeds the yeast for better rise)
- Salt – 1 ½ teaspoons (balances flavor)
- For the Sauce:
- Canned crushed tomatoes – 1 cup (240ml)
- Garlic – 2 cloves, minced
- Dried oregano – 1 teaspoon
- Salt and black pepper to taste
- Fresh basil leaves – a handful, chopped (adds a bright, fresh aroma)
- Fresh Toppings:
- Mozzarella cheese – 8 ounces (225g), shredded or sliced (fresh mozzarella works beautifully, but shredded melts faster)
- Cherry tomatoes – halved, about 1 cup (150g)
- Red onion – thinly sliced, ⅓ cup (optional, adds a subtle sweetness)
- Fresh basil leaves – for garnish
- Olive oil – for drizzling
- Optional: sliced bell peppers, mushrooms, or pepperoni for variety
Substitution tips: Use bread flour if you want a chewier crust or gluten-free flour blend for dietary needs (expect slight texture differences). Swap canned crushed tomatoes for your favorite marinara sauce if you prefer a smoother base. Dairy-free cheese works fine for a vegan option, too.
Equipment Needed
- Large mixing bowl – for combining your dough ingredients. A glass or stainless steel bowl works best to avoid sticking.
- Measuring cups and spoons – precise measurements matter, especially for yeast and salt.
- Kitchen towel or plastic wrap – to cover the dough while it rises and keep it from drying out.
- Rolling pin or your hands – I usually go hands-on for a rustic feel, but a rolling pin helps for a more uniform crust.
- Grill (gas or charcoal) – the star of the show! A grill with a lid is ideal to help melt cheese evenly.
- Pizza stone or heavy-duty baking sheet – optional, but placing your dough on a preheated stone can boost crust crispness.
- Pizza peel or large spatula – for transferring pizza on and off the grill safely.
- Small saucepan – for simmering your homemade sauce.
If you don’t have a pizza stone, a cast iron skillet or even a sturdy baking sheet flipped upside down on the grill works well. When it comes to maintenance, keep your grill grates clean and lightly oiled to prevent sticking. Budget-wise, a simple handheld pizza cutter or sharp knife suffices for slicing.
Preparation Method

- Activate the yeast: In your large mixing bowl, combine 1 ¼ cups (300ml) warm water with 1 teaspoon sugar and 2 ¼ teaspoons active dry yeast. Stir gently and let it sit for 5-10 minutes until foamy. If it doesn’t foam, your yeast might be old—start again with fresh yeast.
- Mix the dough: Add 3 cups (360g) all-purpose flour, 1 ½ teaspoons salt, and 2 tablespoons olive oil to the yeast mixture. Stir using a wooden spoon until a shaggy dough forms.
- Knead: Turn the dough onto a lightly floured surface. Knead by hand for about 8-10 minutes until smooth and elastic. If the dough feels too sticky, sprinkle a little more flour—but be careful not to add too much, or your crust may turn dense.
- First rise: Lightly oil the mixing bowl and place the dough back inside. Cover with a damp cloth or plastic wrap, then let it rise in a warm place for 1 to 1 ½ hours, or until doubled in size.
- Prepare the sauce: While the dough rises, simmer crushed tomatoes, minced garlic, oregano, salt, and pepper in a small saucepan over medium heat for 10-15 minutes. Stir occasionally until thickened. Stir in chopped fresh basil at the end, remove from heat, and set aside.
- Preheat your grill: When the dough has risen, preheat your grill to medium-high (about 450°F / 230°C). If you have a pizza stone, place it on the grill to heat up as well.
- Shape the dough: Punch down the dough gently, then divide it into two equal portions for easier handling. Roll or stretch each portion into a 12-inch (30cm) circle on a floured surface. Don’t worry if it’s not perfect; rustic shapes add character!
- Grill the crust: Lightly oil one side of the dough and place it oil-side down on the grill or pizza stone. Close the lid and cook for 2-3 minutes until grill marks appear and the crust firms up.
- Add toppings: Flip the dough carefully using a pizza peel or spatula. Quickly spread a thin layer of your sauce, then add mozzarella, cherry tomatoes, red onion slices, and any other toppings. Close the grill lid and cook for another 4-5 minutes until cheese melts and edges crisp.
- Finish and serve: Remove pizza from the grill and drizzle with a little olive oil and fresh basil leaves. Let it rest for a minute before slicing. Repeat the process with the second dough ball.
Pro tip: Keep a spray bottle of water nearby to control flare-ups on a charcoal grill. Also, timing is key—don’t leave the pizza unattended, or it might burn. I learned this the hard way one windy afternoon!
Cooking Tips & Techniques
Grilling pizza outdoors is an art, but it’s not as intimidating as it sounds. Here are some tips I’ve picked up to make your crispy outdoor pizza party a breeze:
- Temperature Control: Medium-high heat (around 450°F/230°C) is ideal. Too low, and your crust won’t crisp; too high, and toppings will burn before the crust cooks through.
- Oil Those Grates: Prevent sticking by brushing the grill grates with olive oil before placing dough on them. A well-oiled grill means easier flipping and cleaner slices.
- Use a Pizza Stone if Possible: It mimics a brick oven’s heat distribution, giving you that coveted blistered crust.
- Don’t Overload Toppings: Too many wet ingredients can make the dough soggy. Keep toppings light and balanced for the perfect crisp-chewy combo.
- Rest Your Dough: The resting time helps gluten relax and develop flavor, resulting in a better texture.
- Practice the Flip: Flipping the dough on the grill can be tricky at first. Use a wide spatula or pizza peel and take your time to avoid tears.
- Personal Lesson: I once forgot to preheat the grill properly and ended up with a sad, undercooked crust. Lesson learned—patience with heat pays off.
- Multi-tasking: While one pizza cooks, shape and prep the next to keep the party flowing smoothly.
Variations & Adaptations
This crispy outdoor pizza party recipe is a flexible canvas—feel free to adjust it to your taste or dietary needs. Here are some ideas I’ve tried or recommend:
- Gluten-Free Dough: Swap all-purpose flour for a gluten-free blend. Add a teaspoon of xanthan gum if your blend lacks it, to help with dough elasticity.
- Vegan Version: Use dairy-free cheese alternatives like cashew mozzarella and skip olive oil in dough if preferred. Pile on veggies like grilled zucchini, mushrooms, and spinach.
- Seasonal Toppings: In summer, fresh basil and heirloom tomatoes shine. In fall, try caramelized onions and roasted butternut squash for a cozy twist.
- Spicy Kick: Add red pepper flakes into the sauce or sprinkle on top for some heat. I once added thinly sliced jalapeños, and it was a hit.
- Stuffed Crust: Before grilling, fold the edges over a string of mozzarella for a cheesy crust surprise.
Don’t hesitate to mix and match toppings based on what’s fresh in your fridge or local market. The dough and grilling technique stay the same, so your pizza will always turn out crispy and delicious!
Serving & Storage Suggestions
Serve your grilled pizzas hot off the grill for best texture and flavor. Letting the pizza rest just a minute or two helps the cheese set slightly for cleaner slices. Garnish with fresh basil and a drizzle of good olive oil for that final touch.
Pair your pizzas with a fresh green salad or a crisp glass of white wine or sparkling water with lemon. For casual gatherings, a cold beer complements the smoky grilled flavors beautifully.
If you have leftovers (and sometimes there are few!), store them in an airtight container in the refrigerator for up to 2 days. Reheat gently in a skillet over medium heat or back on the grill for a few minutes to revive that crispy crust. Avoid the microwave—it tends to make the crust soggy.
Flavors often deepen after a day, especially if you used fresh herbs and quality sauce. So, if you can wait, the next-day pizza is a real treat.
Nutritional Information & Benefits
This homemade dough-based pizza offers a balanced meal with carbohydrates for energy, protein from cheese, and vitamins from fresh toppings. Here’s a rough estimate per serving (1/4 of a pizza):
| Calories | 320 kcal |
|---|---|
| Protein | 14 g |
| Carbohydrates | 38 g |
| Fat | 10 g |
| Fiber | 3 g |
Using fresh tomatoes and basil boosts antioxidants like lycopene and vitamin K, while olive oil provides heart-healthy fats. This recipe can be made gluten-free or vegan to accommodate dietary restrictions. Just be mindful of allergens like dairy or gluten if serving guests.
From a wellness standpoint, I love that this recipe encourages cooking fresh and simple food outdoors, which always feels more mindful and satisfying. It’s a treat that doesn’t lean on processed ingredients or shortcuts.
Conclusion
If you’re looking for a recipe that brings people together with minimal fuss and maximum flavor, this crispy outdoor pizza party formula is your new go-to. It’s flexible, approachable, and packed with that smoky, crisp charm that only grilling can offer. Plus, making your dough from scratch adds a personal touch that store-bought just can’t match.
Don’t be afraid to tweak toppings or try new combinations—this recipe welcomes creativity and welcomes you to make it your own. Honestly, I keep coming back to this recipe because it turns simple ingredients into a joyful experience every time, whether it’s a quiet night or a lively gathering.
I’d love to hear how your outdoor pizza party goes—share your favorite toppings or any fun variations you try in the comments below. Let’s keep the pizza love rolling!
FAQs
Can I make the dough ahead of time?
Yes! You can prepare the dough the night before and refrigerate it. Just bring it to room temperature before shaping and grilling.
What if I don’t have a grill?
No worries! You can bake the pizzas on a preheated pizza stone or baking sheet in a 475°F (245°C) oven for 10-12 minutes instead.
How do I prevent the dough from sticking to the grill?
Brush your grill grates lightly with olive oil before placing the dough. Also, oil one side of the dough before grilling.
Can I freeze the dough?
Absolutely. Wrap the dough tightly in plastic wrap and freeze for up to 3 months. Thaw overnight in the fridge before use.
What’s the best cheese to use?
Mozzarella is classic, but fresh mozzarella offers a creamier texture. For faster melting, shredded low-moisture mozzarella works well. Feel free to mix in parmesan for extra flavor!
Pin This Recipe!
Crispy Outdoor Pizza Party Recipe Easy Homemade Dough and Fresh Toppings

A simple and delicious recipe for homemade pizza dough grilled outdoors, featuring fresh toppings and a crispy yet chewy crust perfect for backyard gatherings.
- Prep Time: 15 minutes
- Cook Time: 10 minutes
- Total Time: 1 hour 25 minutes
- Yield: 2 pizzas (8 servings total, 4 servings per pizza) 1x
- Category: Main Course
- Cuisine: Italian
Ingredients
- 3 cups (360g) all-purpose flour
- 2 ¼ teaspoons active dry yeast (one packet)
- 1 ¼ cups (300ml) warm water (around 110°F / 43°C)
- 2 tablespoons extra-virgin olive oil
- 1 teaspoon granulated sugar
- 1 ½ teaspoons salt
- 1 cup (240ml) canned crushed tomatoes
- 2 cloves garlic, minced
- 1 teaspoon dried oregano
- Salt and black pepper to taste
- A handful fresh basil leaves, chopped
- 8 ounces (225g) mozzarella cheese, shredded or sliced
- 1 cup (150g) cherry tomatoes, halved
- ⅓ cup thinly sliced red onion (optional)
- Fresh basil leaves for garnish
- Olive oil for drizzling
- Optional toppings: sliced bell peppers, mushrooms, pepperoni
Instructions
- Activate the yeast by combining warm water, sugar, and active dry yeast in a large mixing bowl. Stir gently and let sit for 5-10 minutes until foamy.
- Add all-purpose flour, salt, and olive oil to the yeast mixture. Stir until a shaggy dough forms.
- Turn dough onto a lightly floured surface and knead by hand for 8-10 minutes until smooth and elastic. Add flour sparingly if dough is too sticky.
- Lightly oil the mixing bowl, place dough inside, cover with a damp cloth or plastic wrap, and let rise in a warm place for 1 to 1 ½ hours until doubled in size.
- While dough rises, simmer crushed tomatoes, minced garlic, oregano, salt, and pepper in a small saucepan over medium heat for 10-15 minutes until thickened. Stir in chopped fresh basil and remove from heat.
- Preheat grill to medium-high heat (about 450°F / 230°C). Place pizza stone on grill if using.
- Punch down dough and divide into two equal portions. Roll or stretch each into a 12-inch (30cm) circle on a floured surface.
- Lightly oil one side of dough and place oil-side down on grill or pizza stone. Close lid and cook for 2-3 minutes until grill marks appear and crust firms.
- Flip dough carefully, spread a thin layer of sauce, add mozzarella, cherry tomatoes, red onion slices, and other toppings. Close lid and cook for 4-5 minutes until cheese melts and edges crisp.
- Remove pizza from grill, drizzle with olive oil and fresh basil leaves. Let rest for a minute before slicing. Repeat with second dough ball.
Notes
Keep grill grates lightly oiled to prevent sticking. Use a spray bottle of water to control flare-ups on charcoal grills. Don’t overload toppings to avoid soggy dough. Dough can be made ahead and refrigerated or frozen. If no grill is available, bake pizzas on a preheated pizza stone or baking sheet in a 475°F (245°C) oven for 10-12 minutes.
Nutrition
- Serving Size: 1/4 of a pizza
- Calories: 320
- Fat: 10
- Carbohydrates: 38
- Fiber: 3
- Protein: 14
Keywords: outdoor pizza, grilled pizza, homemade pizza dough, backyard party, fresh toppings, easy pizza recipe, crispy crust pizza


