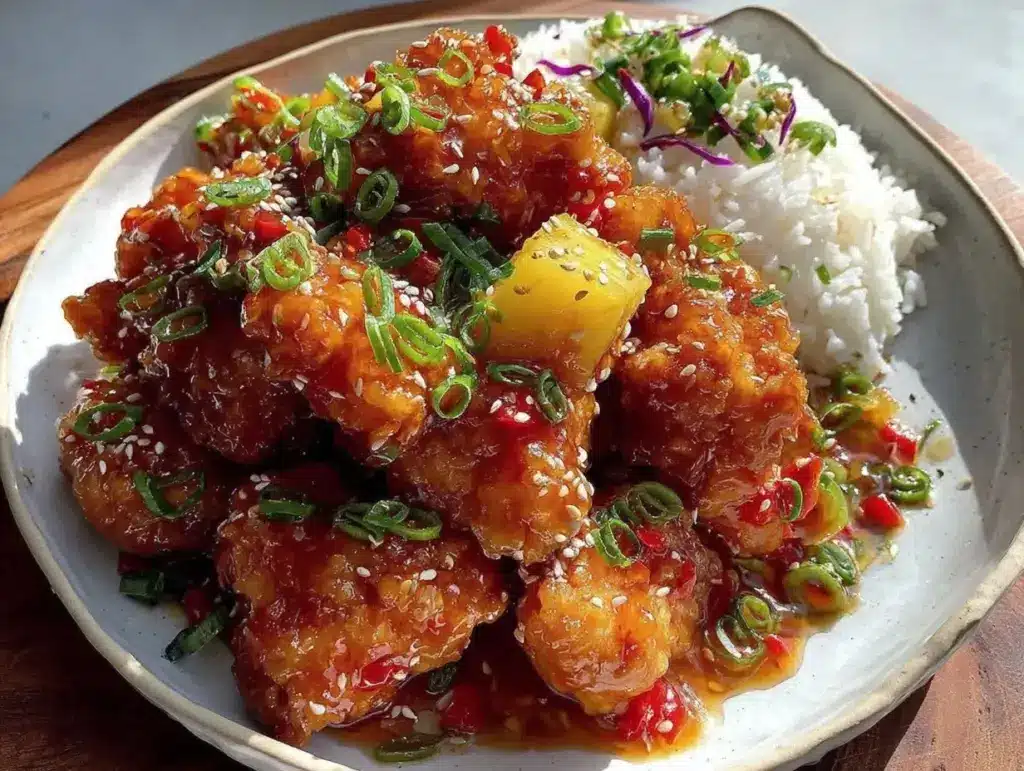
Imagine stepping into your kitchen, the air already humming with that unmistakable aroma—crispy chicken mingling with a bright, tangy sauce. The first time I pulled my batch of crispy baked sweet and sour chicken from the oven, I swear my mouth started watering before I even plated it. The golden crust crackled under my fork, and that sweet-and-sour glaze shimmered just so. You know, the kind of moment where you pause, take a deep breath, and just smile because you know you’re onto something truly special.
Back when I was knee-high to a grasshopper, my grandma used to whip up her own version of sweet and sour chicken (though, let’s face it, hers was fried and loaded with oil). Years ago, I started playing with a baked version—less mess, less guilt, same delicious payoff. I stumbled onto this recipe on a rainy Saturday, trying to recreate those nostalgic, tangy flavors with a crispiness you can actually hear when you bite in. I wish I’d found this trick years ago!
My family couldn’t stop sneaking pieces off the baking sheet while the sauce was simmering (and honestly, I can’t blame them). The chicken is dangerously easy to make and the sauce gives you pure, comforting flavor—sweet, sour, and just a little sticky. This is the kind of recipe you’ll want for potlucks, weeknight dinners, or just brightening up your Pinterest board. I’ve tested it more times than I can count (in the name of research, of course) and it’s become a staple for gatherings, gifting, and those days you just need a warm hug from your food. Trust me—you’re going to want to bookmark this one!
Why You’ll Love This Crispy Baked Sweet and Sour Chicken Recipe
- Quick & Easy: Comes together in under an hour—perfect for busy nights or when takeout just isn’t in the cards.
- Simple Ingredients: No fancy grocery trips required; you probably have everything in your kitchen right now.
- Perfect for Any Occasion: Great for family dinners, casual brunches, meal prepping, or even holiday gatherings.
- Crowd-Pleaser: Both kids and adults rave about it. I’ve seen picky eaters ask for seconds!
- Unbelievably Delicious: The chicken is crisp outside, tender inside, and that sauce—oh, it’s just the right balance of sweet and tangy.
What sets this recipe apart? First off, it’s baked, not fried—so you get all the crispiness without the heavy grease. My secret is tossing the chicken in a light cornstarch coating and then baking it at high heat for major crunch. The homemade tangy sauce is miles better than bottle stuff—real pineapple juice, a splash of vinegar, and just enough sugar to keep it lively.
Honestly, this isn’t just another sweet and sour chicken recipe. It’s the version I dreamed about: fast, healthier, and still loaded with flavor. I’ve tweaked the method so you get maximum crunch and a sauce that actually clings to every piece. It’s comfort food, reimagined for real life—no deep fryer, no guilt, and no compromise on taste. You know that moment when you close your eyes after the first bite? This is that kind of recipe.
Whether you want to impress guests, feed the family, or just treat yourself after a long day, this crispy baked sweet and sour chicken delivers every time. It’s the sort of dish that makes dinner feel special, even if it’s just a Tuesday night.
What Ingredients You Will Need for Crispy Baked Sweet and Sour Chicken
This recipe uses simple, wholesome ingredients to deliver bold flavor and satisfying texture—no fuss, no fancy stuff. Most of these are pantry staples, and I’ll share a few tips for swapping things out if you need.
For the Chicken
- 2 lbs (900g) boneless, skinless chicken breasts or thighs, cut into 1-inch (2.5 cm) pieces
- 1 cup (120g) cornstarch (gives that crispy coating—don’t skip it!)
- 2 large eggs
- 2 tbsp (30ml) milk (any kind; dairy-free works too)
- 1/2 tsp salt
- 1/2 tsp black pepper
- 2 tbsp (30ml) vegetable oil (for drizzling or spraying—helps crisp things up)
For the Sweet and Sour Sauce

- 1 cup (240ml) pineapple juice (100% juice—trust me, it makes all the difference)
- 1/3 cup (80ml) rice vinegar (or apple cider vinegar in a pinch)
- 1/2 cup (100g) granulated sugar
- 1/4 cup (60ml) ketchup (adds color and tang)
- 2 tbsp (30ml) soy sauce (low sodium works fine)
- 1 tbsp (8g) cornstarch (for thickening)
- 2 tbsp (30ml) water (to mix with cornstarch)
Optional Garnishes
- 1/2 cup (75g) diced bell peppers (red and green look pretty)
- 1/4 cup (40g) chopped pineapple chunks (for extra sweetness)
- Sliced green onions and sesame seeds for topping
Ingredient Tips:
- For extra crunch, I recommend Argo cornstarch or Bob’s Red Mill.
- Chicken thighs are juicier, but breasts work just as well (especially if you’re watching fat).
- Swap gluten-free soy sauce for allergies, or use coconut aminos if you’re avoiding soy.
- Fresh pineapple juice gives the tangiest sauce—canned works, but I taste the difference.
- For a lower-sugar version, try coconut sugar or reduce the amount to taste.
- You can use almond flour instead of cornstarch for a twist, but texture will be softer.
Honestly, this ingredient list is as flexible as your fridge allows. Don’t be afraid to make it yours!
Equipment Needed
- Baking Sheet: Large and rimmed is best to keep everything contained. I use my trusty Nordic Ware—it never warps.
- Wire Rack: Optional, but elevating chicken on a rack makes it crispier. If you don’t have one, parchment paper works.
- Mixing Bowls: One for dredging chicken, one for mixing sauce.
- Whisk: For smoothing out that tangy homemade sauce.
- Tongs: For flipping chicken pieces (I’ve tried forks, but tongs work best for keeping fingers clean).
- Small Saucepan: For simmering the sweet and sour sauce.
- Measuring Cups & Spoons: Precision matters for the sauce balance.
If you don’t have a wire rack, just flip the chicken halfway through baking for even crisping. I’ve used silicone baking mats and parchment—both work, though parchment gives a slightly crisper bottom. Cleaning a wire rack isn’t my favorite chore, but soaking it right after use makes it much easier.
On a budget? Most tools can be found at your local dollar store or borrowed from a neighbor (I’ve been there!). No need for fancy gadgets here.
How to Make Crispy Baked Sweet and Sour Chicken
- Prep the Chicken: Preheat your oven to 425°F (220°C). Line a large baking sheet with parchment or foil. If you have a wire rack, set it on top. Pat chicken pieces dry with paper towels—this helps the coating stick.
- Make the Dredge: In a shallow bowl, whisk together eggs and milk. In another bowl, mix cornstarch, salt, and pepper. Working in batches, dip each piece of chicken into the egg mixture, then roll in the cornstarch mixture until well coated.
- Arrange & Oil: Place coated chicken pieces on the baking sheet (or rack), spacing them apart. Drizzle with vegetable oil or use a spray bottle to lightly coat each piece. This step is key for crispiness!
- Bake the Chicken: Bake for 18–22 minutes, flipping halfway through. Chicken should be golden brown and feel crisp to the touch. If pieces seem pale, broil for 2–3 minutes at the end—but keep a close eye to avoid burning.
- Make the Sauce: While chicken bakes, combine pineapple juice, vinegar, sugar, ketchup, and soy sauce in a small saucepan. Bring to a boil over medium-high heat, stirring often. In a small bowl, mix cornstarch and water until smooth, then whisk into the saucepan.
- Simmer & Thicken: Reduce heat to low, simmer for 3–5 minutes, stirring often. Sauce is ready when glossy and thick enough to coat a spoon. If too thin, simmer another minute; if too thick, add a splash of water.
- Combine & Finish: When chicken is done, transfer to a large bowl. Pour warm sweet and sour sauce over chicken, tossing gently to coat. Add bell peppers and pineapple chunks if using.
- Serve: Plate immediately, topped with green onions and sesame seeds.
Prep Notes:
- If chicken sticks to parchment, let it cool a few minutes before removing.
- For extra crunch, let chicken rest on the rack after baking for 2–3 minutes before saucing.
- If sauce splits, whisk in a splash of hot water to bring it back together.
Troubleshooting:
- If chicken is soggy, oven may not be hot enough. Preheat fully and avoid overcrowding.
- Too much sauce? Save leftover for dipping!
Efficiency tip: Prep the sauce while chicken bakes—it’s a time saver and keeps things moving. I like to chop veggies for garnish while sauce simmers. Multitasking is your friend here!
Cooking Tips & Techniques
Baking crispy chicken can be a little tricky, but I’ve picked up some tricks after testing this recipe more times than I’ll admit. First, make sure your chicken pieces are uniform—uneven sizes mean some will dry out while others are undercooked. I learned the hard way (those tiny bits turn into chicken jerky, trust me).
Don’t skimp on the cornstarch coating. It’s what gives that signature crunch without deep frying. If you’re worried about mess, use a ziplock bag to toss chicken with cornstarch—less cleanup, more even coating.
Avoid crowding the pan; air needs to circulate for true crispiness. If your oven runs cool, crank it up for the last few minutes or use convection mode if you’ve got it.
When making the sauce, keep stirring—sugar can scorch fast. Once, I walked away for “just a minute” and ended up with caramelized bits that weren’t exactly what I was going for.
If you want extra sticky sauce, let it cool for a minute before tossing with the chicken. The sauce thickens as it cools, so don’t rush.
My favorite multitasking trick: chop garnishes while sauce simmers and chicken bakes. Keeps you ahead of the game and makes plating a breeze. Consistency really comes down to temperature—hot oven, hot sauce, and don’t let chicken sit too long before serving.
And hey, if something goes sideways (like chicken sticking), just scoop it up and call it “rustic.” Nobody’s judging!
Variations & Adaptations
- Gluten-Free: Swap cornstarch with potato starch and use tamari or coconut aminos instead of soy sauce. I’ve tried this and the results are just as crispy—promise.
- Low-Sugar: Replace sugar with monk fruit sweetener or reduce the amount by half. Pineapple juice still brings plenty of natural sweetness.
- Vegetarian: Use firm tofu instead of chicken. Press and cube, then follow the same coating and baking steps. The sauce is already veggie-friendly!
- Seasonal Flavors: Add fresh mango or swap bell peppers for snap peas in summer. During winter, toss in a pinch of smoked paprika for extra warmth.
- Spicy Twist: Stir in 1–2 tbsp sriracha or chili flakes to the sauce if you like heat.
For air fryer fans, cook coated chicken at 400°F (200°C) for 12–15 minutes, shaking halfway. You’ll get ultra-crispy results without turning on the oven.
Personally, my favorite is the gluten-free version with coconut aminos. It’s a hit with my friends who have dietary restrictions, and you’d never guess it’s “special.” Whatever your needs, don’t be afraid to adapt this recipe to fit!
Serving & Storage Suggestions
This crispy baked sweet and sour chicken is best served hot, straight from the oven—trust me, the crunch is unbeatable. Plate it on a big platter, drizzle extra sauce, and sprinkle green onions and sesame seeds for that classic restaurant look.
Pair with steamed jasmine rice, coconut rice, or cauliflower rice for a lighter option. It also goes great alongside simple sautéed veggies or a crisp Asian slaw. For drinks, a cold ginger ale or light white wine is perfect—refreshing and not too sweet.
Leftovers keep in the fridge for up to 3 days. Store chicken and sauce separately if you want to preserve crispiness; otherwise, toss together for easier reheating. Reheat chicken in a hot oven (400°F/200°C) for 8–10 minutes, or in an air fryer for 5 minutes. Microwave works, but you’ll lose some crunch (still tasty though).
If you freeze, lay chicken pieces flat on a tray before transferring to a bag—this keeps them from sticking. Thaw overnight in the fridge and reheat as above. Honestly, the flavors get even better after a day in the fridge; the sauce soaks in and the taste deepens. Just don’t expect leftovers to last long—they disappear fast!
Nutritional Information & Benefits
Per serving (about 1/4 of the recipe):
- Calories: ~350
- Protein: 28g
- Carbs: 35g
- Fat: 10g
- Fiber: 2g
- Sodium: 700mg (using low-sodium soy sauce)
Chicken breast brings lean protein, while pineapple juice adds vitamin C and natural sweetness. Cornstarch keeps this dish gluten-free if you use tamari. The sauce is lower in sugar than restaurant versions, and baking means less oil—hello, lighter comfort food!
Watch for soy and egg if you have allergies. I love that this recipe fits into low-carb, high-protein, and gluten-free diets with just a couple tweaks. For me, it’s a feel-good meal I can serve to almost anyone—super satisfying, but not heavy.
Conclusion
If you’re searching for a dinner that’s crispy, tangy, and totally fuss-free, this crispy baked sweet and sour chicken recipe is the one to try. The homemade tangy sauce sets it apart—every bite is packed with flavor and texture that rivals your favorite takeout. Whether you stick to the classic or add your own twist, this recipe is made for sharing and enjoying.
Honestly, I love this dish because it’s nostalgic but new—comforting and easy, with just enough wow to impress. Don’t be afraid to customize for your family’s tastes or dietary needs. Leave a comment below with your favorite variation, share your photos on Pinterest, or tag me if you try it—I’d love to see how it turns out in your kitchen!
So go ahead—bookmark, share, and make this crispy baked sweet and sour chicken your new favorite. Here’s to dinners that make you smile!
Frequently Asked Questions
Can I use chicken thighs instead of breasts?
Absolutely! Chicken thighs are juicier and work perfectly. Just cut them into similar-sized pieces for even cooking.
Can I make crispy baked sweet and sour chicken ahead of time?
You can prep and bake the chicken ahead, then store it separately from the sauce. Reheat in the oven and toss with warm sauce before serving.
Is this recipe gluten-free?
It can be! Use gluten-free soy sauce (or coconut aminos) and double-check your cornstarch brand. Easy swap for anyone avoiding gluten.
What if I don’t have pineapple juice?
You can use orange juice or even apple juice in a pinch. The flavor will be a little different, but still tasty and tangy.
Can I air fry the chicken instead of baking?
Yes—you’ll get an even crispier result. Air fry at 400°F (200°C) for 12–15 minutes, shaking halfway. Works great!
Pin This Recipe!
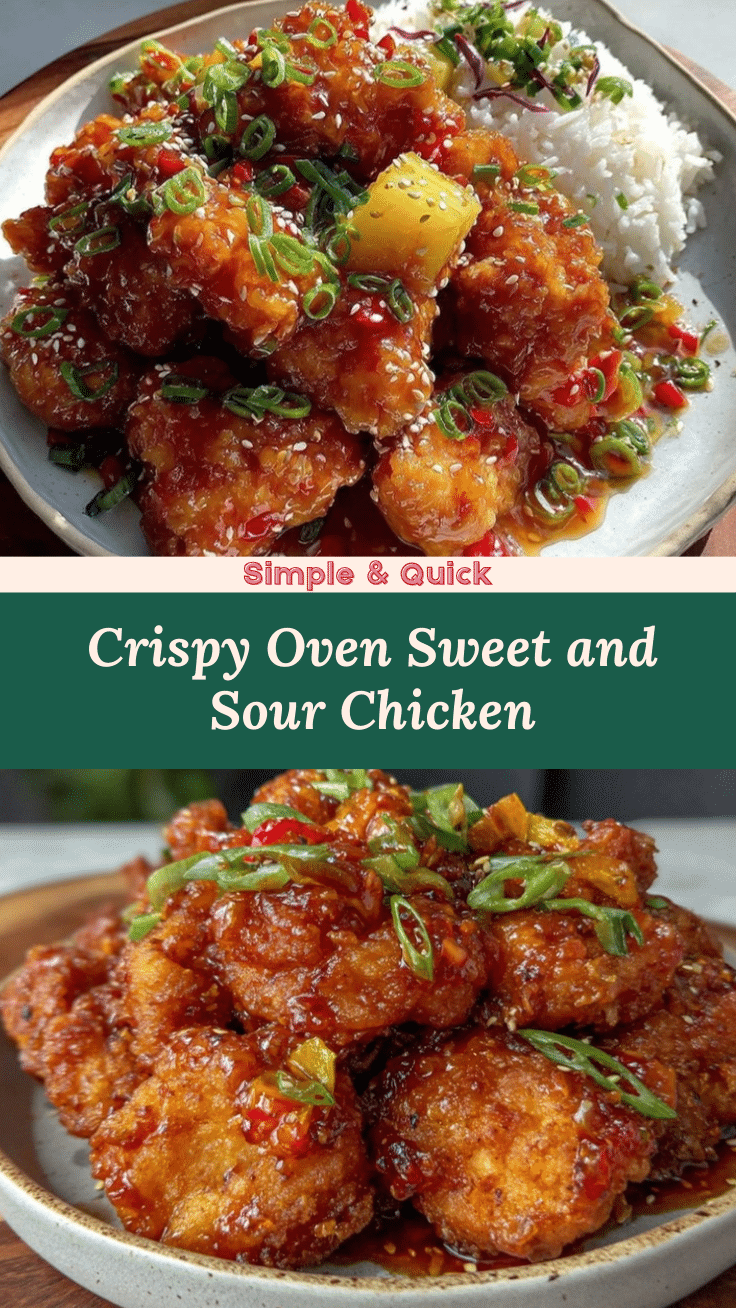
Crispy Baked Sweet and Sour Chicken

This healthier take on classic sweet and sour chicken features crispy baked chicken pieces tossed in a homemade tangy sauce. Perfect for weeknight dinners or potlucks, it delivers bold flavor and satisfying crunch without deep frying.
- Prep Time: 20 minutes
- Cook Time: 25 minutes
- Total Time: 45 minutes
- Yield: 4 servings 1x
- Category: Main Course
- Cuisine: Chinese-American
Ingredients
- 2 lbs boneless, skinless chicken breasts or thighs, cut into 1-inch pieces
- 1 cup cornstarch
- 2 large eggs
- 2 tbsp milk
- 1/2 tsp salt
- 1/2 tsp black pepper
- 2 tbsp vegetable oil
- 1 cup pineapple juice
- 1/3 cup rice vinegar (or apple cider vinegar)
- 1/2 cup granulated sugar
- 1/4 cup ketchup
- 2 tbsp soy sauce (low sodium)
- 1 tbsp cornstarch (for sauce)
- 2 tbsp water (for sauce)
- 1/2 cup diced bell peppers (optional garnish)
- 1/4 cup chopped pineapple chunks (optional garnish)
- Sliced green onions (optional garnish)
- Sesame seeds (optional garnish)
Instructions
- Preheat oven to 425°F (220°C). Line a large baking sheet with parchment or foil. If using, set a wire rack on top.
- Pat chicken pieces dry with paper towels.
- In a shallow bowl, whisk together eggs and milk. In another bowl, mix cornstarch, salt, and pepper.
- Dip each chicken piece into the egg mixture, then roll in the cornstarch mixture until well coated.
- Arrange coated chicken pieces on the baking sheet or rack, spacing apart. Drizzle or spray with vegetable oil.
- Bake for 18–22 minutes, flipping halfway through, until golden brown and crisp. Broil for 2–3 minutes at the end if needed for extra color.
- While chicken bakes, combine pineapple juice, vinegar, sugar, ketchup, and soy sauce in a small saucepan. Bring to a boil over medium-high heat, stirring often.
- Mix 1 tbsp cornstarch and 2 tbsp water until smooth, then whisk into the saucepan.
- Reduce heat to low and simmer for 3–5 minutes, stirring often, until sauce is glossy and thick enough to coat a spoon.
- Transfer baked chicken to a large bowl. Pour warm sweet and sour sauce over chicken, tossing gently to coat. Add bell peppers and pineapple chunks if using.
- Serve immediately, topped with green onions and sesame seeds.
Notes
For gluten-free, use potato starch and tamari or coconut aminos. Chicken thighs are juicier, but breasts work well. Air fryer method: cook coated chicken at 400°F for 12–15 minutes, shaking halfway. Let chicken rest on rack after baking for extra crunch. Sauce thickens as it cools. Store leftovers separately for best texture.
Nutrition
- Serving Size: About 1/4 of the rec
- Calories: 350
- Sugar: 15
- Sodium: 700
- Fat: 10
- Saturated Fat: 2
- Carbohydrates: 35
- Fiber: 2
- Protein: 28
Keywords: sweet and sour chicken, baked chicken, crispy chicken, homemade sauce, weeknight dinner, Asian-inspired, gluten-free option, healthier takeout, easy chicken recipe


