Let me paint you a picture—the sweet, almost cocoa-like aroma of red velvet cake mingling with the unmistakable scent of crushed Oreos, all swirling together in my kitchen. There’s a moment, right as the melted chocolate sets and the truffles glisten under the kitchen light, that honestly feels like magic. I still remember the first time I rolled these Red Velvet Oreo Truffles with a creamy center. It was a blustery Saturday, and I was knee-high to a grasshopper, watching my grandma blend cake crumbs and cookies for her famous holiday treats. That day, I snuck one (okay, maybe two) off the tray before they even cooled.
Years later, I stumbled upon a forgotten box of red velvet cake mix and a lonely package of Oreos after a bake sale. That’s when the idea hit me—why not mash the best of both worlds into one dangerously easy dessert? The result was so good, I paused mid-bite, closed my eyes, and just smiled. You know you’ve made something special when your family can’t stop sneaking truffles off the rack (even my dad, who claims he doesn’t like sweets, asked for seconds). These Red Velvet Oreo Truffles have become a staple for birthday parties, holiday gifting, and, let’s face it, late-night cravings.
Honestly, if you’re looking for the kind of treat that brings pure, nostalgic comfort and makes your Pinterest board pop, this is it. The creamy center melts in your mouth, the velvety cake and Oreo combo is just the right amount of rich, and they’re so simple you’ll wonder why you didn’t try them years ago. I’ve tested this recipe more times than I care to admit (in the name of research, of course), and every batch feels like a little celebration. You’re going to want to bookmark this one—trust me!
Why You’ll Love This Recipe
After countless kitchen experiments (and a few late-night truffle disasters), I can say these Red Velvet Oreo Truffles with Creamy Center are a game-changer for home bakers and dessert lovers. Here’s why this recipe stands out from the crowd:
- Quick & Easy: Comes together in under 40 minutes—perfect for busy weeknights or when you need a last-minute treat.
- Simple Ingredients: No fancy grocery trips! You probably have everything you need tucked away in your pantry or fridge.
- Perfect for Any Occasion: These truffles fit right in at birthday parties, potlucks, holiday gatherings, or cozy movie nights.
- Crowd-Pleaser: Kids go wild for them, adults sneak extras—don’t be surprised if they vanish before you can snap a photo.
- Unbelievably Delicious: The creamy center and red velvet Oreo shell create a texture combo that’s pure, melt-in-your-mouth comfort.
What sets my Red Velvet Oreo Truffles apart? It’s the way the red velvet cake mix blends seamlessly with the classic Oreo crunch, then gets hugged by a silky cream cheese center. Unlike other recipes, I use a touch of heavy cream for that ultra-smooth texture (and trust me, it makes all the difference). There’s no need to fuss with complicated steps—just crush, mix, roll, dip, and you’re on your way to dessert glory.
This recipe isn’t just good—it’s the kind that makes you close your eyes after the first bite and sigh with happiness. It’s comfort food, but with a little twist that keeps things fun and fresh. Plus, you can whip up a batch without breaking a sweat or your wallet. It’s honestly perfect for impressing guests or treating yourself to a sweet moment of indulgence. I’ve made these for friends and family, and they always ask for the recipe (and a second helping). If you want a homemade dessert that’s easy, beautiful, and downright irresistible, this is the one!
What Ingredients You Will Need
Let’s talk about the stars of the show—these Red Velvet Oreo Truffles use a handful of everyday ingredients that pack serious flavor and texture. You don’t need anything fancy, just a few pantry staples and a hint of creativity. Here’s what you’ll need:
- For the Truffle Base:
- 24 Red Velvet Oreos, crushed (or substitute with regular Oreos plus 2 tbsp red velvet cake mix for color and flavor)
- 1 cup (100g) Red Velvet Cake Mix (dry, not prepared—adds that classic flavor and color)
- 6 oz (170g) Cream Cheese, softened (full-fat for best results, but you can use reduced-fat if you prefer)
- 2 tbsp (30ml) Heavy Cream (for extra creaminess—optional, but highly recommended)
- For the Coating:
- 12 oz (340g) White Chocolate Melting Wafers (I like Ghirardelli or Baker’s—smooth and easy to work with)
- 1 tbsp (14g) Coconut Oil (helps the coating set with a glossy finish)
- For Decoration (Optional):
- Red Velvet Cake Crumbs (from leftover cake mix, baked and cooled)
- Mini Oreo pieces (for a cute topping)
- Sprinkles (choose reds, whites, or hearts for a festive look)
Ingredient Tips: If you can’t find Red Velvet Oreos, use regular Oreos and mix in a spoonful of red velvet cake mix. For a gluten-free option, swap in gluten-free chocolate sandwich cookies and gluten-free cake mix. If you’re dairy-free, use vegan cream cheese and dairy-free chocolate melts. I always reach for Philadelphia cream cheese—tried and true for that ultra-creamy center. And if you want to get extra, bake a small red velvet cake and crumble it over the truffles as a finishing touch.
Honestly, you can tweak this recipe with whatever you have on hand. Just make sure your cream cheese is soft and your chocolate is good quality for the best texture. In summer, I sometimes swap in pink velvet cake mix for a lighter flavor. The possibilities are endless—don’t be afraid to experiment!
Equipment Needed
You don’t need a fancy kitchen to make these Red Velvet Oreo Truffles, but a few trusty tools make the process a breeze. Here’s what I use (and a couple of budget-friendly tips):
- Food Processor or Blender: For crushing Oreos quickly. If you don’t have one, a sturdy zip-top bag and rolling pin work just fine—just a bit more elbow grease!
- Mixing Bowls: One large bowl for the base, one small for melting chocolate. I stick with glass bowls since they don’t absorb odors.
- Hand Mixer or Stand Mixer: To blend the cream cheese and Oreo mixture smooth. A sturdy spatula also works if you’re feeling old-school.
- Baking Sheet: For chilling the truffles before dipping. Any flat tray will do.
- Wax Paper or Parchment Paper: Keeps the truffles from sticking and makes cleanup a cinch.
- Forks or Dipping Tools: For coating the truffles in chocolate. I prefer a regular dinner fork—simple and effective.
- Refrigerator or Freezer: For chilling and setting the truffles. No special settings needed.
If you’re working with specialty equipment (like a chocolate melting pot), remember to wipe it down thoroughly before and after use—chocolate residue is sneaky! I’ve also used a microwave for melting chocolate in a pinch. For those on a budget, thrift stores are goldmines for sturdy baking sheets and mixing bowls. No need for anything fancy—these truffles are all about the flavor!
Preparation Method
Ready to whip up a batch of Red Velvet Oreo Truffles with creamy centers? Follow these step-by-step instructions for foolproof success (and a few personal tips along the way):
- Crush the Oreos: Place 24 Red Velvet Oreos (or regular Oreos plus cake mix) in a food processor. Pulse until you get fine crumbs. If you’re using a rolling pin, seal cookies in a zip-top bag and crush until sandy.
- Prepare the Truffle Mixture: In a large mixing bowl, combine Oreo crumbs, 1 cup (100g) red velvet cake mix, and 6 oz (170g) softened cream cheese. Add 2 tbsp (30ml) heavy cream for extra smoothness. Beat with a hand mixer or spatula until the mixture is thick and evenly blended. It should feel slightly sticky but hold together when pressed.
- Form the Truffles: Scoop out 1 tablespoon portions and roll into balls (about 1 inch/2.5 cm diameter). If the mixture sticks to your hands, chill it for 10 minutes—trust me, makes rolling easier. Place balls onto a baking sheet lined with wax or parchment paper.
- Chill the Truffles: Refrigerate truffle balls for 30 minutes, or freeze for 15 minutes if you’re in a hurry. This helps them hold their shape when dipped in chocolate (don’t skip this step!).
- Melt the Chocolate Coating: In a microwave-safe bowl, combine 12 oz (340g) white chocolate melting wafers and 1 tbsp (14g) coconut oil. Microwave in 30-second bursts, stirring after each, until smooth and glossy. Alternatively, melt over a double boiler on the stove. If the chocolate seizes, add a tiny splash of coconut oil and stir.
- Dip the Truffles: Remove chilled truffle balls from the fridge. Using a fork, dip each ball into melted chocolate, turning to coat. Tap off excess chocolate and place back on the lined tray.
- Decorate: While the coating is still soft, sprinkle with red velvet cake crumbs, mini Oreo pieces, or festive sprinkles. For a Pinterest-worthy finish, drizzle a little extra melted chocolate on top in zig-zags.
- Set and Serve: Allow coated truffles to set in the refrigerator for 20 minutes, or until firm and glossy. Serve chilled or at room temperature for a creamy bite.
Troubleshooting Tips: If the truffle mixture is too soft, add more cake mix (1 tbsp at a time) until firm. If the chocolate seizes or thickens, stir in a bit more coconut oil. For perfectly round truffles, use a cookie scoop. And don’t stress if your coating isn’t flawless—imperfections just mean they’re homemade!
Personal tip: I usually double the batch and freeze half for emergencies. The creamy center stays dreamy even after thawing. Oh, and always taste-test one before serving—quality control is serious business!
Cooking Tips & Techniques
Let’s be real—making Red Velvet Oreo Truffles isn’t rocket science, but a few pro tips will save you from rookie mistakes (trust me, I learned the hard way!).
- Chill, Chill, Chill: Chilling the truffle balls before dipping is key. If you skip, the balls can fall apart in the chocolate. I once tried dipping warm truffles—big mistake, chocolate everywhere!
- Use Good Chocolate: Cheap chocolate can be gritty or too thick. I stick with Ghirardelli or Baker’s melting wafers for a smooth, glossy finish. If you’re melting in the microwave, go slow and stir often.
- Consistent Size: Use a cookie scoop for even truffle sizing. That way, every bite has the same creamy-to-crunchy ratio.
- Multitask Like a Boss: While the truffles chill, melt your chocolate and prep decorations. It’s a great way to save time (and keep little helpers entertained).
- Prevent Sticky Hands: Lightly coat your palms with coconut oil before rolling the mixture. Sounds weird, but it totally works!
- Don’t Overmix: Overbeating the cream cheese can make the center too runny. Mix just until combined for that perfect creamy texture.
- Quality Control: Always taste a test truffle before finishing the batch. Sometimes the cake mix or Oreos need a pinch more cream cheese for balance.
- Decorating Drama: If your sprinkles slide off, wait until the chocolate is just starting to set, then add toppings. They’ll stick better and look prettier.
I’ve ruined a few batches by trying to rush the chilling step (impatience is my weakness), but now I set a timer and distract myself with a cup of tea. Consistency and a little patience make all the difference. And if they turn out a little wonky, just call them “rustic”—your friends will still gobble them up!
Variations & Adaptations
One of my favorite things about these Red Velvet Oreo Truffles is how easy they are to customize. Whether you’re tweaking for dietary needs, swapping flavors, or just experimenting, there’s a version for everyone. Here are some tried-and-true adaptations:
- Gluten-Free: Use gluten-free sandwich cookies and gluten-free cake mix. The texture stays nearly identical, and the flavor is just as rich.
- Dairy-Free: Substitute vegan cream cheese and dairy-free chocolate melts. Coconut cream works well in place of heavy cream if you need an extra creamy center.
- Seasonal Twist: Swap the red velvet cake mix for pumpkin spice or gingerbread cake mix during the holidays. Top with crushed gingersnaps or festive sprinkles for a seasonal look.
- Chocolate Lover’s Dream: Use chocolate Oreos and chocolate melting wafers for a double-chocolate version. Add a pinch of espresso powder for depth.
- Flavor Boost: Add 1 tsp of vanilla or almond extract to the truffle mixture. It intensifies the creamy center and adds a subtle aroma.
- Nutty Crunch: Stir in chopped pecans or walnuts for texture (just make sure no one’s allergic!).
Personal favorite? Last summer, I mixed in freeze-dried raspberries for a tart pop—so good! If you’re making these for a crowd, consider making two batches with different coatings (white chocolate and dark chocolate) so everyone gets a surprise. Don’t be afraid to play around—sometimes the “mistakes” end up being the best version yet!
Serving & Storage Suggestions
These Red Velvet Oreo Truffles shine whether you’re serving them at a fancy party or sneaking one straight from the fridge. Here’s how I like to present and store them:
- Serving Temperature: Best enjoyed chilled or at cool room temp for that creamy center. If you’re hosting, arrange them on a cake stand or a rustic wooden board—looks dreamy in photos!
- Presentation Tips: Add a sprinkle of extra crumbs or a drizzle of colored chocolate for a Pinterest-worthy finish. For gifting, tuck them into mini cupcake liners in a pretty box.
- Pairing Ideas: These truffles pair perfectly with coffee, milk, or a sparkling dessert wine. For parties, offer alongside fresh berries or a scoop of vanilla ice cream.
- Storage Instructions: Store in an airtight container in the refrigerator for up to 5 days. They’ll keep in the freezer (well-sealed) for up to 2 months—just thaw before serving.
- Reheating Tips: If you prefer a softer center, let truffles sit at room temperature for 10-15 minutes before serving. Avoid microwaving, as the chocolate coating can melt unevenly.
- Flavor Development: The flavors actually deepen after a day or two in the fridge—the creamy center gets even smoother, and the red velvet notes really pop!
Honestly, my family rarely lets them last more than a day. But if you manage to hide a batch, they’re just as dreamy after a week. Perfect for prepping ahead and pulling out for surprise guests or sweet cravings.
Nutritional Information & Benefits
Here’s the scoop on what you’re biting into (approximate values per truffle):
- Calories: 120
- Fat: 7g
- Carbohydrates: 15g
- Protein: 2g
- Sugar: 10g
Red velvet cake mix brings a touch of cocoa and buttermilk flavor, while cream cheese adds calcium and a little bit of protein. Oreos and white chocolate provide that indulgent sweetness—this dessert is definitely a treat, but not over-the-top. For gluten-free or dairy-free adaptations, nutritional values may vary slightly.
Allergens: Contains wheat, dairy, and soy (from Oreos and chocolate). If you’re sensitive, see the adaptations above for swaps. From a wellness perspective, I love that these truffles are portion-sized—it’s easy to enjoy a sweet treat without going overboard. And, hey, sometimes a little dessert is good for the soul!
Conclusion
If you’re searching for a homemade dessert that’s easy, beautiful, and absolutely scrumptious, these Red Velvet Oreo Truffles with creamy center deserve a spot in your recipe box. From the rich, velvety cake flavor to the irresistible Oreo crunch and dreamy creamy core, every bite feels like a celebration. They’re perfect for parties, gifts, or a solo treat (I won’t judge!).
Don’t be afraid to tweak the recipe—swap in seasonal flavors, play with decorations, or try out different coatings. That’s part of the fun! Personally, I love how these truffles bring a smile to anyone who tries them. They’re a reminder that simple, homemade treats can be the best kind of comfort food.
If you try this Red Velvet Oreo Truffles recipe, let me know in the comments! Share your photos, adaptations, or any fun twists you discover. Bookmark this for your next sweet tooth moment—you’re going to love it!
FAQs
Can I make Red Velvet Oreo Truffles ahead of time?
Absolutely! Make them up to 3 days in advance and store in an airtight container in the fridge. The flavor actually gets better after a day or two.
What if I can’t find Red Velvet Oreos?
No problem—use regular Oreos plus 2 tablespoons of red velvet cake mix for color and flavor. Works like a charm!
How do I prevent the truffles from falling apart when dipping?
Chill the truffle balls well before dipping in chocolate. If they’re too soft, pop them in the freezer for 10 more minutes.
Can I use dark chocolate instead of white chocolate for coating?
Definitely! Dark chocolate creates a richer flavor and looks gorgeous against the red velvet filling.
Are these truffles safe for kids with nut allergies?
Yes, as long as you don’t add nuts. Always check ingredient labels for cross-contamination warnings, especially in Oreos and cake mix.
Pin This Recipe!

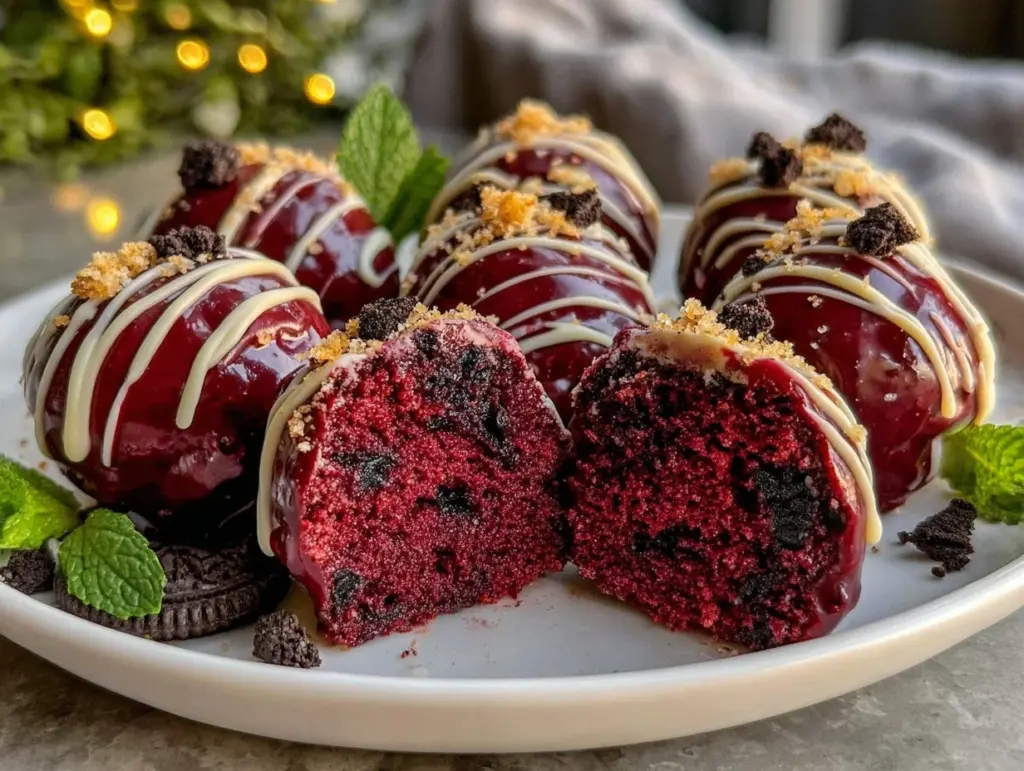
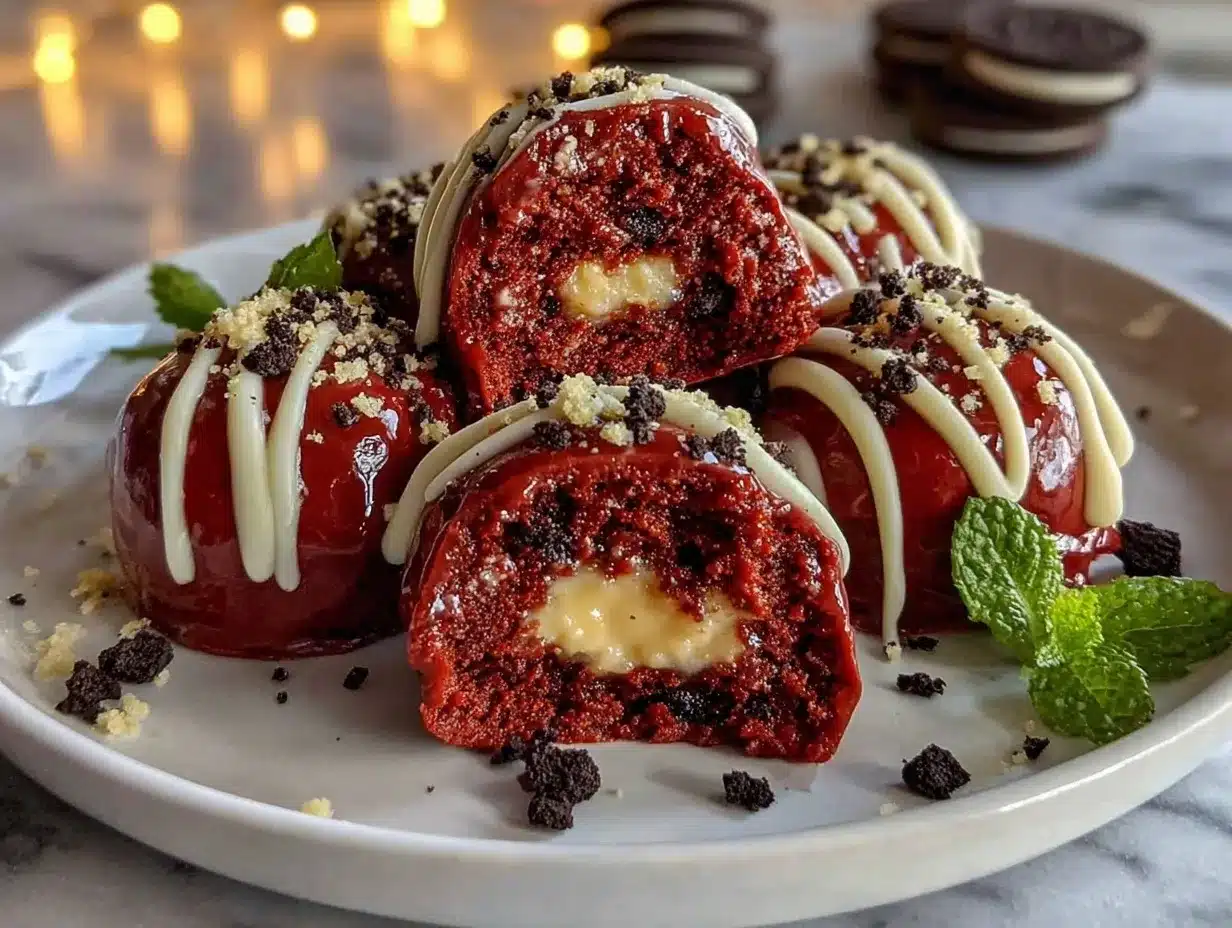
Red Velvet Oreo Truffles Recipe – Easy Homemade Dessert with Creamy Center

These Red Velvet Oreo Truffles feature a creamy center wrapped in a rich blend of red velvet cake mix and crushed Oreos, all coated in smooth white chocolate. Perfect for parties, gifting, or a sweet treat, they come together quickly and deliver melt-in-your-mouth comfort.
- Prep Time: 15 minutes
- Cook Time: 5 minutes
- Total Time: 40 minutes
- Yield: 24 truffles 1x
- Category: Dessert
- Cuisine: American
Ingredients
- 24 Red Velvet Oreos, crushed (or substitute with regular Oreos plus 2 tbsp red velvet cake mix)
- 1 cup (100g) red velvet cake mix (dry, not prepared)
- 6 oz (170g) cream cheese, softened
- 2 tbsp (30ml) heavy cream (optional, for extra creaminess)
- 12 oz (340g) white chocolate melting wafers
- 1 tbsp (14g) coconut oil
- Red velvet cake crumbs (optional, for decoration)
- Mini Oreo pieces (optional, for decoration)
- Sprinkles (optional, for decoration)
Instructions
- Place 24 Red Velvet Oreos (or regular Oreos plus cake mix) in a food processor and pulse until fine crumbs form. Alternatively, crush cookies in a zip-top bag with a rolling pin.
- In a large mixing bowl, combine Oreo crumbs, 1 cup red velvet cake mix, and 6 oz softened cream cheese. Add 2 tbsp heavy cream if desired. Beat until thick and evenly blended.
- Scoop out 1 tablespoon portions and roll into balls (about 1 inch diameter). If mixture is sticky, chill for 10 minutes before rolling. Place balls on a baking sheet lined with wax or parchment paper.
- Refrigerate truffle balls for 30 minutes, or freeze for 15 minutes to help them hold shape.
- In a microwave-safe bowl, combine 12 oz white chocolate melting wafers and 1 tbsp coconut oil. Microwave in 30-second bursts, stirring after each, until smooth and glossy. Alternatively, melt over a double boiler.
- Using a fork, dip each chilled truffle ball into melted chocolate, turning to coat. Tap off excess chocolate and place back on the lined tray.
- While coating is still soft, decorate with red velvet cake crumbs, mini Oreo pieces, or sprinkles. Optionally, drizzle extra melted chocolate on top.
- Allow coated truffles to set in the refrigerator for 20 minutes, or until firm and glossy. Serve chilled or at room temperature.
Notes
Chill truffle balls well before dipping to prevent them from falling apart. Use high-quality chocolate for a smooth finish. For gluten-free or dairy-free adaptations, substitute cookies, cake mix, and cream cheese accordingly. Truffles can be made ahead and stored in the fridge for up to 5 days or frozen for up to 2 months. Decorate with sprinkles or cake crumbs for a festive look.
Nutrition
- Serving Size: 1 truffle
- Calories: 120
- Sugar: 10
- Sodium: 80
- Fat: 7
- Saturated Fat: 4
- Carbohydrates: 15
- Fiber: 1
- Protein: 2
Keywords: red velvet, oreo truffles, easy dessert, creamy center, party treats, homemade truffles, holiday sweets, no bake, chocolate truffles