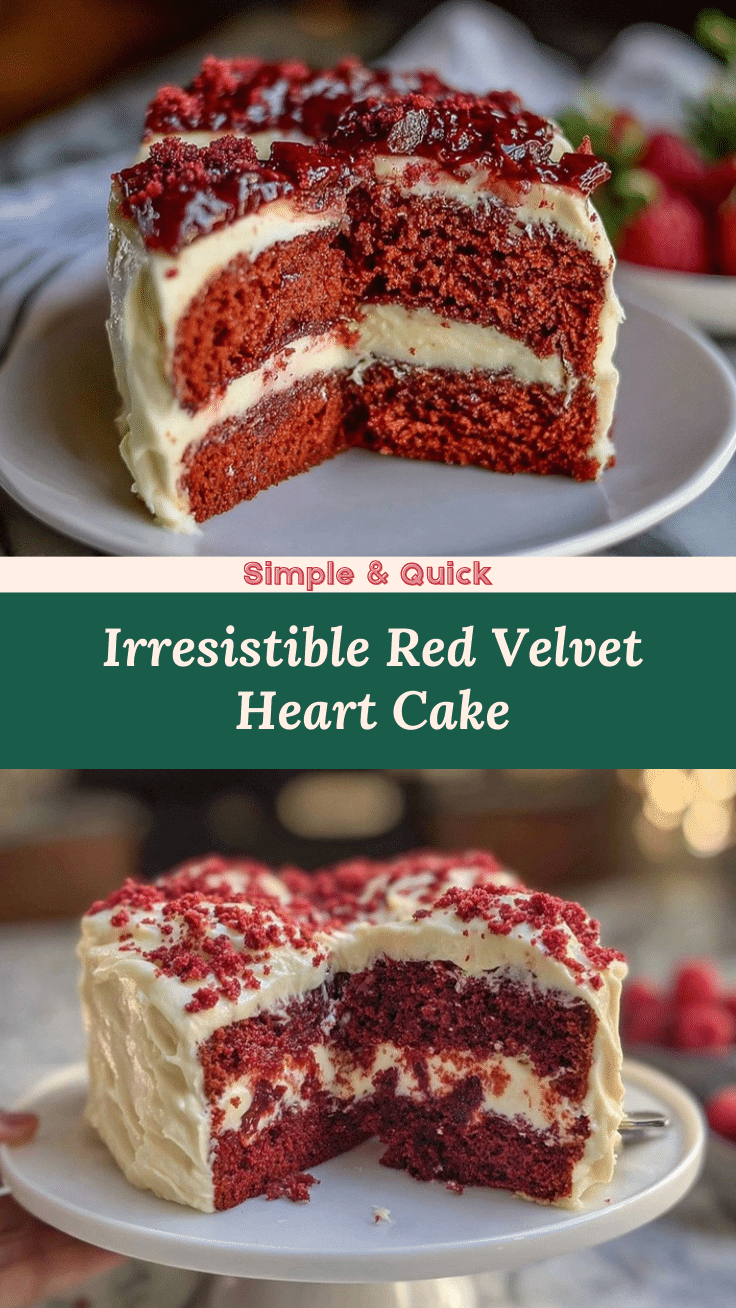
Introduction
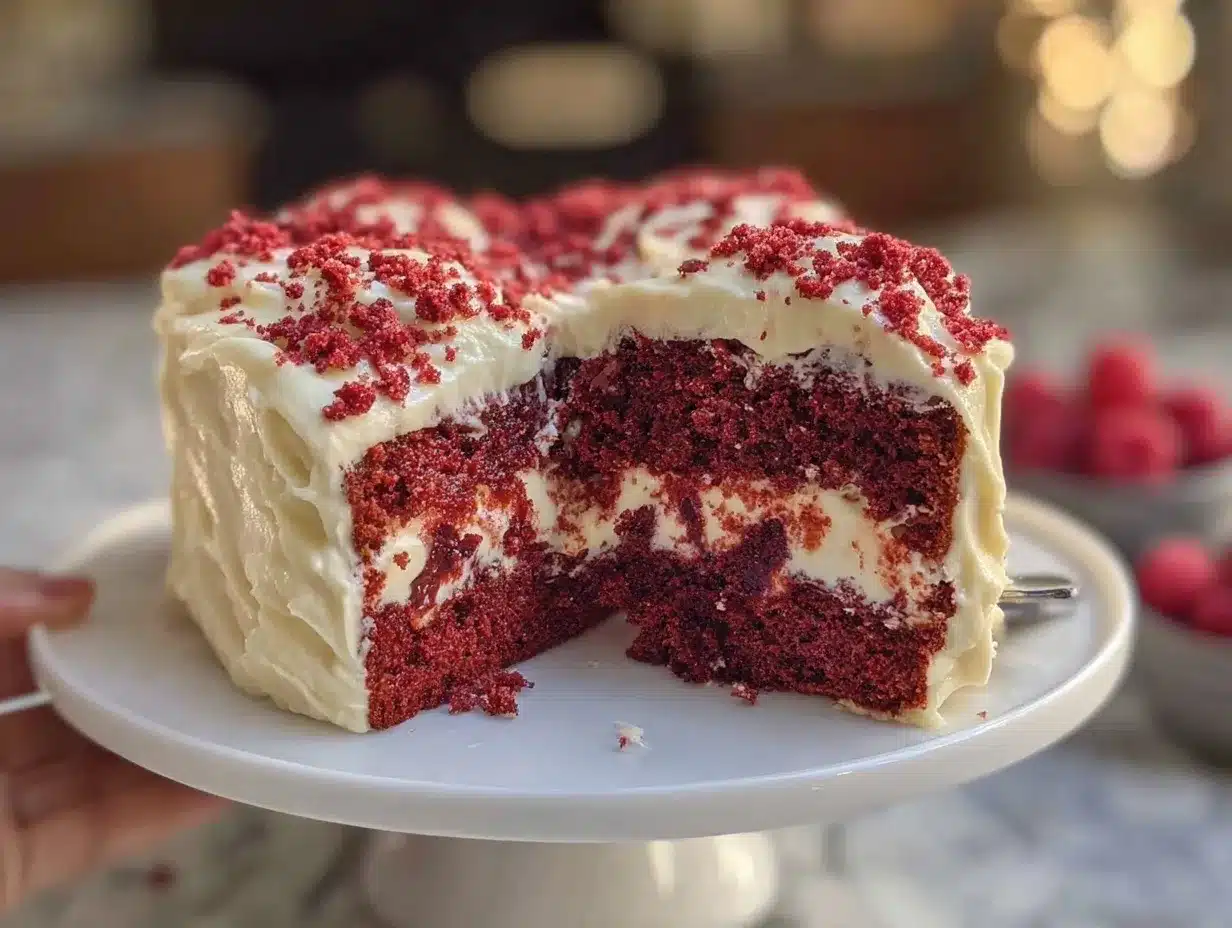
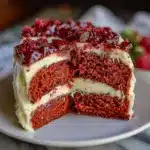
There’s something absolutely magical about slicing into a Red Velvet Heart Layer Cake—the deep crimson color, the sweet tang of cocoa, and that dreamy cream cheese frosting. Picture this: the scent of vanilla and butter swirling through your kitchen as the cake bakes, warm notes of chocolate wafting through the air. The first time I made this cake, it was for my parents’ anniversary, and honestly, I remember standing by the oven, practically counting down the seconds until I could taste a slice. It was the kind of moment where you pause, take a deep breath, and just smile because you know you’re onto something truly special.
Growing up, my grandma used to whip up classic red velvet cake for nearly every family gathering. It was her way of celebrating love—big and small. I was knee-high to a grasshopper, perched on a stool, watching her measure out flour with practiced hands. But I’ll admit, the first time I tried shaping it into hearts, it was a total mess! Now, years later, after a few (okay, a dozen) trial runs, this Red Velvet Heart Layer Cake has become a staple for birthdays, Valentine’s Day, and, let’s face it, any day I need a little extra comfort.
My family couldn’t stop sneaking bites off the cooling rack (“just checking for poison,” as my brother claims), and the cake disappears faster than I can snap a photo for Pinterest. It’s dangerously easy, pure nostalgia, and looks stunning enough to brighten up any dessert table. Honestly, I wish I’d stumbled on this heart-shaped trick ages ago—it’s perfect for gifting, sharing with friends, or making your kids squeal with delight. You’re going to want to bookmark this one for every special occasion (in the name of research, I’ve tested it more times than I can count). Feels like a warm hug in cake form!
Why You’ll Love This Recipe
When it comes to Red Velvet Heart Layer Cake, I’ve tried it every which way—boxed mixes, from-scratch, you name it. But this version? It’s the real deal. The combination of tender red velvet layers and silky cream cheese frosting is pure comfort, and the heart shape brings an extra dash of love.
- Quick & Easy: Comes together in under 90 minutes (including cooling time!), so you’re not stuck in the kitchen all day.
- Simple Ingredients: No fancy grocery trips needed; you probably have most of these staples on hand already.
- Perfect for Valentine’s Day: The heart layers make it ideal for romantic celebrations, anniversaries, or just surprising someone you care about.
- Crowd-Pleaser: Kids and adults alike rave about this cake—trust me, there’s never any leftovers.
- Unbelievably Delicious: The moist crumb, subtle cocoa flavor, and rich cream cheese frosting are next-level comfort food.
What sets this Red Velvet Heart Layer Cake apart? For starters, the trick of using parchment paper and a simple heart template (not some expensive pan!) makes it accessible for everyone. The cocoa is perfectly balanced—not too dark, not too sweet. And that frosting? I use a touch of lemon juice for a little zing, learned from my years in pastry school. It’s not just about looks; it’s about flavor and texture that make you close your eyes with that first bite.
This isn’t just a pretty cake—it’s a memory-maker. Whether you’re impressing your sweetheart, treating your kids, or bringing something special to a potluck, this cake fits the bill. It’s comfort food reimagined, with all the joy and none of the fuss. I’ve handed out slices to neighbors and friends, and every time, someone asks for the recipe. So, go ahead—make it your own and turn an ordinary day into something sweet and unforgettable!
What Ingredients You Will Need
This Red Velvet Heart Layer Cake uses simple pantry staples and a handful of easy-to-find ingredients to deliver bold flavor and gorgeous color. You’ll notice there’s nothing fancy here—just real, honest baking. Let’s break it down:
- For the Cake Batter:
- 2 ½ cups (320g) all-purpose flour (I swear by King Arthur for the lightest crumb)
- 2 tbsp (15g) unsweetened cocoa powder (Dutch-process for best color)
- 1 ½ cups (300g) granulated sugar
- 1 tsp baking soda
- ½ tsp salt
- 2 large eggs, room temperature
- 1 cup (240ml) buttermilk, room temperature (adds tang and tenderness)
- ½ cup (120ml) vegetable oil (can swap for melted butter, but oil keeps it extra moist)
- 2 tsp pure vanilla extract
- 1 tsp distilled white vinegar (reacts with baking soda for that classic rise)
- 1 tbsp (10ml) liquid red food coloring (or gel—use a good brand for vibrant color)
- For the Cream Cheese Frosting:
- 8 oz (225g) cream cheese, softened (I like Philadelphia for consistency)
- ½ cup (115g) unsalted butter, softened
- 3 ½ cups (420g) powdered sugar (sifted for smoothness)
- 1 tsp vanilla extract
- 1 tbsp lemon juice (optional, but it adds a lovely brightness)
- Pinch of salt
- For Decoration (Optional):
- Fresh berries (raspberries or strawberries look beautiful)
- Heart-shaped sprinkles
- Chocolate shavings
If you need a gluten-free option, swap the flour for a 1:1 gluten-free blend (I’ve had good luck with Bob’s Red Mill). For dairy-free, use plant-based milk and vegan cream cheese—but expect a slightly softer frosting. In summer, add a layer of sliced strawberries between the cake layers for a fresh twist. The ingredients are forgiving, so don’t stress if you’re missing a little—this recipe is all about making it work with what you have.
Equipment Needed
To make this Red Velvet Heart Layer Cake, you really don’t need much fancy gear. Here’s what I use every time:
- Two 9-inch (23cm) round cake pans (or one pan, baked in batches if needed)
- Parchment paper (for easy cake removal and shaping hearts)
- Heart template (just trace a heart shape on paper and cut it out!)
- Mixing bowls—one large and one medium
- Electric mixer (stand or hand-held both work; a whisk and elbow grease will do in a pinch)
- Spatula (silicone is best for scraping every last bit)
- Wire cooling rack
- Offset spatula or butter knife (for frosting)
- Sharp serrated knife (for trimming layers into hearts)
If you don’t have two pans, just bake one layer at a time. I’ve made this cake with just a whisk when my mixer was acting up, and it turned out great (though my arm got a workout!). Keep your pans in good shape by lining with parchment and washing gently. If you’re on a budget, dollar store mixing bowls and knives work just fine. Honestly, the only “specialty” item here is the heart template, and you can DIY that in seconds.
Preparation Method
- Preheat and Prep: Preheat your oven to 350°F (175°C). Grease the cake pans and line the bottoms with parchment paper. Trace a heart shape onto parchment, cut it out, and set aside for shaping later.
- Mix Dry Ingredients: In a large bowl, whisk together flour, cocoa powder, sugar, baking soda, and salt. The cocoa should look evenly distributed, with no streaks.
- Combine Wet Ingredients: In a medium bowl, whisk eggs, buttermilk, vegetable oil, vanilla, vinegar, and food coloring. (Warning: the red color will stain, so wear an apron!) The mixture should be a deep, bright red.
- Make the Batter: Add wet ingredients to the dry ingredients. Mix gently with an electric mixer on low speed until just combined, about 1 minute. Don’t overmix—stop when you don’t see any dry flour. Batter will be thick and vibrant.
- Bake: Divide the batter evenly between the pans—about 2 ½ cups (600g) per pan. Smooth the tops with a spatula. Bake for 25-30 minutes, until a toothpick inserted in the center comes out clean. Cakes should spring back lightly when pressed.
- Cool: Let cakes cool in the pans for 10 minutes, then turn out onto wire racks. Peel off parchment and let cool completely. If you rush this, the frosting can melt—just trust me, patience pays off.
- Shape into Hearts: Once cool, lay your heart template on each cake layer. Using a sharp knife, carefully trim around the template to create heart-shaped cakes. (If you’re nervous, go slow—better to trim twice than to lose half your cake!) Save the scraps for snacking or cake pops.
- Make the Frosting: In a large bowl, beat cream cheese and butter together until smooth, about 2 minutes. Add powdered sugar one cup at a time, mixing on low. Add vanilla, lemon juice, and salt. Beat until fluffy, about 2 more minutes. Frosting should be thick but spreadable.
- Assemble the Cake: Place one heart layer on your serving plate. Spread a generous layer of frosting on top. Add the second heart layer and cover the cake with remaining frosting, smoothing the sides and top. Use an offset spatula for clean edges.
- Decorate: Add berries, sprinkles, or chocolate shavings as desired. Let the cake set for 10-15 minutes before slicing to help the frosting firm up.
Tip: If your cake layers dome up, trim them flat before shaping the hearts. If the frosting seems runny, chill it for 10 minutes and it’ll firm right up. The heart shape doesn’t have to be perfect—imperfections just mean it’s homemade!
Cooking Tips & Techniques
After baking this Red Velvet Heart Layer Cake more times than I can count, I’ve picked up a few tricks (and learned from some kitchen disasters along the way):
- Don’t Overmix: Overmixing leads to dense cake. Mix until just combined—some lumps are okay.
- Color Matters: Use a gel or high-quality liquid food coloring for a vibrant red. Cheap brands sometimes turn brownish (ask me how I know!).
- Room Temperature Ingredients: Buttermilk, eggs, and butter should be at room temp. Cold ingredients can cause the batter to seize or bake unevenly.
- Frosting Consistency: If the frosting is too stiff, add a teaspoon of milk. Too runny? Add a bit more powdered sugar or chill briefly.
- Shaping Hearts: Don’t worry if your hearts aren’t perfect. I’ve had lopsided cakes that tasted just as good—embrace the homemade charm!
- Multitasking: While the cakes bake, prep your frosting and decorations. This keeps things moving and cuts down on wait time.
- Layering: For extra stability, chill the cake layers for 20 minutes before frosting. Less crumb, less mess.
- Troubleshooting: If your cake sticks, gently run a knife around the edge before turning out. And if all else fails—cake pops or trifle, anyone?
I’ve had cakes crack, frosting split, and hearts that looked more like blobs. It’s all part of the fun. Every time, I learn something new, and honestly, that’s half the joy of baking!
Variations & Adaptations
One of my favorite things about this Red Velvet Heart Layer Cake is how easy it is to change things up. Here are some tried-and-true variations:
- Gluten-Free Version: Use a 1:1 gluten-free flour blend and double-check that your baking soda and cocoa are certified GF. The texture will be a bit softer, but still delicious.
- Dairy-Free Adaptation: Swap out buttermilk for almond milk with a teaspoon of vinegar, and use vegan cream cheese and plant-based butter. The frosting will be a little lighter but still tangy.
- Seasonal Twist: Add 1 cup of chopped strawberries or raspberries between the layers in summer, or a sprinkle of cinnamon in fall for a cozy vibe.
- Flavor Boost: Mix in ½ cup mini chocolate chips to the batter for an extra hit of chocolate (my kids’ favorite!).
- Different Shapes: Don’t want hearts? Use a round template or make cupcakes instead—bake for 18-20 minutes.
- Nut-Free Option: This recipe is naturally nut-free, but always check labels on your cocoa and decorations.
I once made a version with orange zest in the frosting for a bright kick—and it was a hit at a summer barbecue. Don’t be afraid to make this cake your own; swap, add, or subtract based on your family’s favorites or dietary needs.
Serving & Storage Suggestions
Red Velvet Heart Layer Cake is best served at room temperature—the flavors of the cake and frosting really shine. Present on a pretty cake stand, with fresh berries or heart-shaped sprinkles for a Pinterest-worthy finish. Pair with coffee, tea, or even a glass of cold milk for a classic touch.
If you’re making ahead, store the frosted cake in an airtight container in the refrigerator for up to 4 days. Just let it sit out for 30 minutes before serving so the frosting softens. Leftovers freeze beautifully—slice and wrap individual pieces in plastic, then store in a zip-top bag for up to 2 months. To reheat, let thaw at room temp (never microwave, or the frosting melts into a puddle!).
Honestly, the flavor gets even better after a day or two—the tang of the cream cheese melds with the cocoa and vanilla, and the texture stays moist. If you plan to travel with the cake, chill it first to firm up the frosting, then pack carefully. And yes, sneaking a slice straight from the fridge is totally allowed!
Nutritional Information & Benefits
Here’s a quick look at what you’re getting with each slice of Red Velvet Heart Layer Cake (based on 12 servings):
- Calories: About 450
- Fat: 24g
- Carbohydrates: 56g
- Protein: 5g
- Dietary Fiber: 2g
Key ingredients like cocoa powder deliver a touch of antioxidants, and buttermilk brings calcium and protein. The cake is nut-free by default, and can easily be made gluten-free or dairy-free as needed. Just watch for allergens in your decorative toppings.
From a wellness perspective, I see this as a “sometimes treat”—it’s rich, but made with real ingredients. Enjoy in moderation, and savor every bite (I always say, joy is part of a healthy lifestyle!).
Conclusion
This Red Velvet Heart Layer Cake with Cream Cheese Frosting isn’t just a recipe—it’s a celebration of love, comfort, and everyday magic. Whether you’re baking for Valentine’s Day, a birthday, or just because, it’s the kind of cake that brings people together and makes any moment feel special.
Customize it to your heart’s content—swap in your favorite flavors, play around with shapes, or add a personal touch to the frosting. That’s the beauty of homemade baking. For me, this cake means laughter around the table and sweet memories made in the kitchen.
So, grab your mixing bowl and give it a try! I’d love to hear about your heart cake adventures in the comments below—share your twists, tag me on Pinterest, or let me know what special occasion you made it for. Happy baking, and may your kitchen be filled with sweetness and smiles!
FAQs
How do I get a vibrant red color in my Red Velvet Heart Layer Cake?
Use high-quality gel or liquid food coloring. Cheap brands sometimes turn brown during baking. I always go for Wilton or Americolor for the brightest hue.
Can I make this cake ahead of time?
Absolutely! Bake and frost the cake a day in advance. Store in the fridge, and let it come to room temp before serving for best texture and flavor.
What’s the best way to shape the cake into hearts?
Use a parchment paper template. Lay it over your cooled cake layers and trim with a sharp knife. Don’t worry about perfection—homemade charm is part of the fun!
Can I freeze Red Velvet Heart Layer Cake?
Yes! Slice and wrap individual pieces in plastic, then store in a zip-top bag for up to 2 months. Thaw at room temperature before enjoying.
Is this recipe suitable for people with nut allergies?
Yes, the base recipe is nut-free. Just check your cocoa powder, food coloring, and decorations to be sure they’re safe for your needs.
Pin This Recipe!
Red Velvet Heart Layer Cake: Easy Valentine’s Recipe with Cream Cheese Frosting
This stunning Red Velvet Heart Layer Cake features tender, vibrant layers of classic red velvet cake shaped into hearts and frosted with silky cream cheese frosting. Perfect for Valentine’s Day, birthdays, or any special occasion, it’s a crowd-pleaser that’s easy to make and guaranteed to impress.
- Prep Time: 30 minutes
- Cook Time: 30 minutes
- Total Time: 1 hour 30 minutes
- Yield: 12 servings 1x
- Category: Dessert
- Cuisine: American
Ingredients
- 2 ½ cups all-purpose flour
- 2 tbsp unsweetened cocoa powder (Dutch-process preferred)
- 1 ½ cups granulated sugar
- 1 tsp baking soda
- ½ tsp salt
- 2 large eggs, room temperature
- 1 cup buttermilk, room temperature
- ½ cup vegetable oil
- 2 tsp pure vanilla extract
- 1 tsp distilled white vinegar
- 1 tbsp liquid red food coloring (or gel)
- 8 oz cream cheese, softened
- ½ cup unsalted butter, softened
- 3 ½ cups powdered sugar, sifted
- 1 tsp vanilla extract
- 1 tbsp lemon juice (optional)
- Pinch of salt
- Fresh berries (optional, for decoration)
- Heart-shaped sprinkles (optional)
- Chocolate shavings (optional)
Instructions
- Preheat oven to 350°F (175°C). Grease two 9-inch round cake pans and line bottoms with parchment paper. Trace and cut out a heart template from parchment for shaping later.
- In a large bowl, whisk together flour, cocoa powder, sugar, baking soda, and salt until well combined.
- In a medium bowl, whisk eggs, buttermilk, vegetable oil, vanilla, vinegar, and food coloring until mixture is a deep red.
- Add wet ingredients to dry ingredients. Mix gently with an electric mixer on low speed until just combined, about 1 minute. Do not overmix.
- Divide batter evenly between prepared pans (about 2 ½ cups per pan). Smooth tops with a spatula.
- Bake for 25-30 minutes, until a toothpick inserted in the center comes out clean and cakes spring back lightly when pressed.
- Cool cakes in pans for 10 minutes, then turn out onto wire racks. Peel off parchment and let cool completely.
- Lay heart template on each cooled cake layer. Using a sharp knife, trim around the template to create heart-shaped cakes. Save scraps for snacking or cake pops.
- In a large bowl, beat cream cheese and butter together until smooth, about 2 minutes. Add powdered sugar one cup at a time, mixing on low. Add vanilla, lemon juice, and salt. Beat until fluffy, about 2 more minutes.
- Place one heart layer on serving plate. Spread a generous layer of frosting on top. Add second heart layer and cover cake with remaining frosting, smoothing sides and top.
- Decorate with berries, sprinkles, or chocolate shavings as desired. Let cake set for 10-15 minutes before slicing.
Notes
For best results, use high-quality gel or liquid food coloring for a vibrant red. Room temperature ingredients help ensure a smooth batter and frosting. If making gluten-free or dairy-free, substitute flour and dairy products as needed. Chill cake layers before frosting for easier assembly. Imperfect heart shapes add homemade charm!
Nutrition
- Serving Size: 1 slice (1/12 of cak
- Calories: 450
- Sugar: 40
- Sodium: 350
- Fat: 24
- Saturated Fat: 12
- Carbohydrates: 56
- Fiber: 2
- Protein: 5
Keywords: red velvet cake, heart cake, Valentine’s dessert, cream cheese frosting, easy cake recipe, homemade cake, special occasion cake, nut-free dessert, crowd-pleaser, classic cake