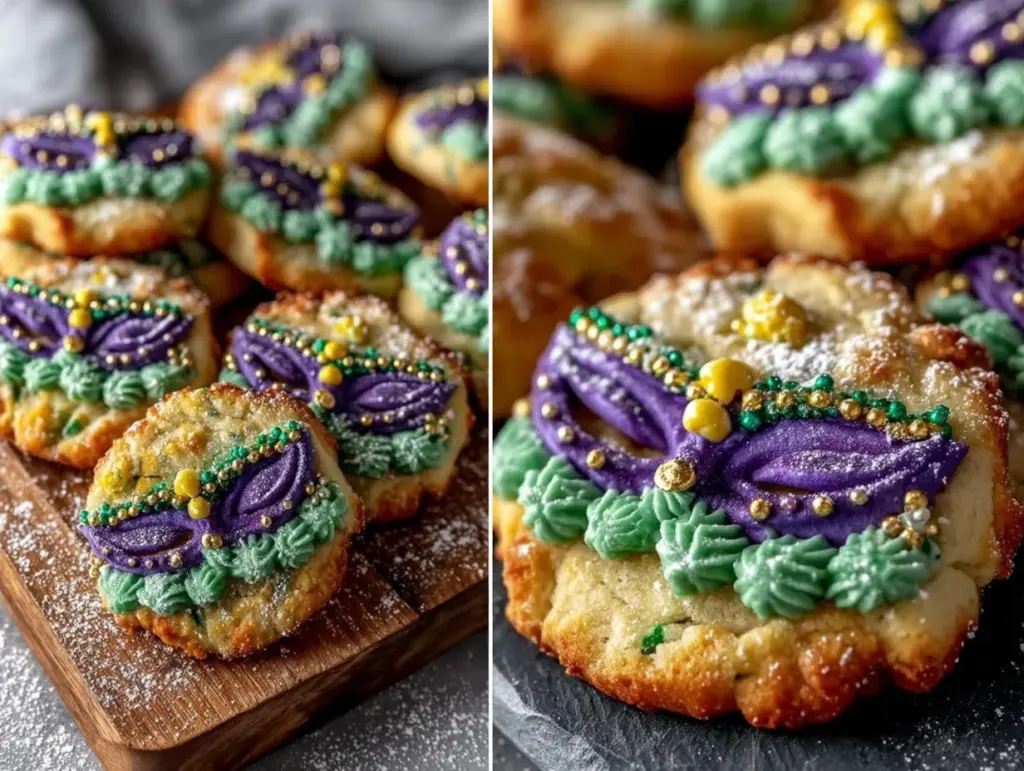
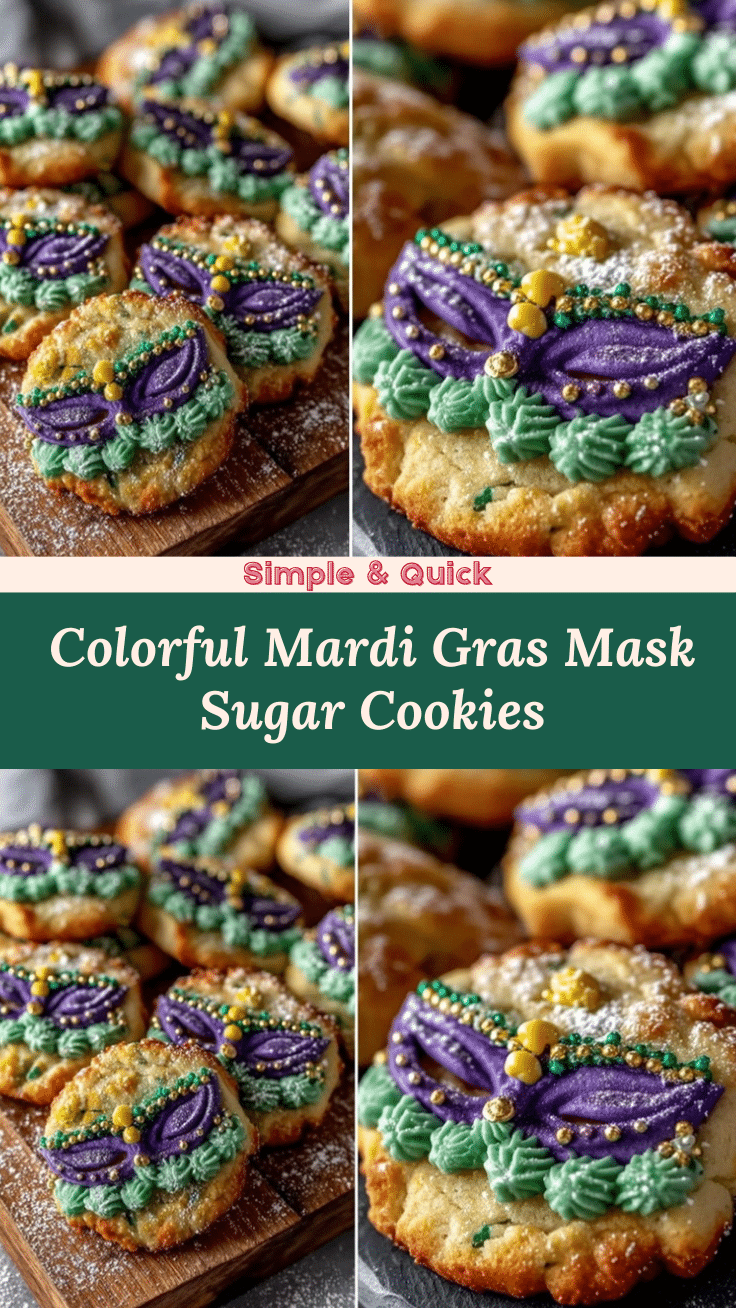
“I never thought a simple sugar cookie could pull me into the heart of Mardi Gras, but there I was, elbow-deep in flour and royal icing, trying to recreate that carnival magic on a little mask-shaped cookie,” I confessed to my friend Lisa last February. It all started when I stumbled upon an old recipe tucked inside a dusty binder at a local antique shop, scribbled in the margins by someone who must have adored the festivities as much as I do. Honestly, baking these Perfect Mardi Gras Mask Sugar Cookies with Vibrant Royal Icing felt like catching a second line parade in my kitchen.
At first, I fumbled with the dough—forgot to chill it properly, and my first batch spread more than a jazz band’s trumpet blare on Bourbon Street. But after a few attempts, I nailed the texture: crisp edges with a tender bite inside, perfect for showcasing those vivid, glossy icings that mimic the city’s purple, green, and gold hues. Maybe you’ve been there, trying to capture that festival spirit with your own hands, only to end up with something that looks more like a sad paper mask than a Mardi Gras masterpiece.
What keeps bringing me back to this recipe is that little moment of joy when the cookie’s cool and the icing sets, and suddenly the kitchen smells like a celebration. It’s not just about the sweetness — it’s about the ritual, the colors, the memories packed into each bite. I mean, who wouldn’t want a taste of Mardi Gras magic, right? So, pull up a chair, and let me walk you through making these festive cookies that are as fun to decorate as they are to eat.
Why You’ll Love This Recipe
After countless test runs and a few icing disasters (I won’t lie, the royal icing can be a bit tricky), this recipe has become my go-to for Mardi Gras celebrations. Here’s what makes these Perfect Mardi Gras Mask Sugar Cookies stand out:
- Quick & Easy: The dough comes together in under 20 minutes, making it great for last-minute party plans or a fun weekend project.
- Simple Ingredients: No need for specialty stores — basic pantry items like butter, sugar, and eggs are all you need, plus a few colors of icing.
- Perfect for Celebrations: Whether it’s Mardi Gras, a themed party, or just a colorful baking day, these mask cookies bring instant festive vibes.
- Crowd-Pleaser: Kids and adults alike rave about the crisp texture and the burst of sweet, smooth royal icing on top.
- Unbelievably Delicious: The balance between buttery cookie and tangy, sweet icing is honestly addictive — you might find yourself sneaking a few before the party starts.
What really sets this recipe apart is the royal icing technique. It dries with a smooth, glossy finish that’s perfect for detailed Mardi Gras mask designs. Plus, the dough is sturdy enough to hold its shape but tender enough to melt in your mouth. It’s like wearing your Mardi Gras mask and tasting the celebration at the same time. Honestly, it’s that kind of recipe that makes you pause, savor, and maybe even do a little happy dance in the kitchen.
What Ingredients You Will Need
This recipe uses simple, wholesome ingredients to deliver bold flavor and a satisfying texture without the fuss. Most are pantry staples, and the royal icing colors can be customized or swapped as you like.
- For the Sugar Cookie Dough:
- 2 ¾ cups (345 g) all-purpose flour, sifted (for best results, I like King Arthur Flour)
- 1 teaspoon baking powder
- ½ teaspoon salt
- 1 cup (227 g) unsalted butter, softened (I use Land O’Lakes for creaminess)
- 1 ½ cups (300 g) granulated sugar
- 1 large egg, room temperature
- 1 teaspoon pure vanilla extract
- 1 teaspoon almond extract (optional, adds a lovely depth)
- For the Vibrant Royal Icing:
- 3 cups (360 g) powdered sugar, sifted
- 2 large egg whites or 4 tablespoons meringue powder + 6 tablespoons water (safer and lasts longer)
- ¼ teaspoon cream of tartar
- Food coloring gels in purple, green, and gold (I recommend AmeriColor gels for bright, consistent colors)
- 1 teaspoon lemon juice or vanilla extract (for flavor)
If you want to swap out ingredients, you can use gluten-free flour blends instead of all-purpose, but the texture might be a tad different. For dairy-free or vegan options, coconut oil can replace butter, and aquafaba works in place of egg whites in the royal icing, though it might not dry quite as firm. In summer, I sometimes add a drop of orange oil to the dough as a fresh twist.
Equipment Needed
- Mixing bowls (preferably glass or stainless steel for the icing)
- Electric stand mixer or hand mixer (makes the icing preparation much easier)
- Rolling pin (a non-stick one is handy to keep the dough from sticking)
- Mardi Gras mask-shaped cookie cutters (if you don’t have one, small oval or eye-shaped cutters work too)
- Baking sheets lined with parchment paper or silicone mats (prevents sticking and helps even baking)
- Cooling racks (essential for letting the cookies cool before icing)
- Piping bags and small round tips (#1 or #2) for detailed icing work (or use zip-top bags with a tiny corner snipped)
- Food-safe brushes for blending and smoothing icing (optional but helpful for delicate designs)
If you’re on a budget, you can skip the stand mixer and mix by hand — it takes a bit more elbow grease but gets the job done. Also, a simple rolling pin substitute could be a clean wine bottle in a pinch! Just be sure to chill the dough well to make rolling easier. Keep your piping tips clean for crisp lines — I learned that the hard way after a messy first batch!
Preparation Method

- Prep the Dough (15-20 minutes): In a medium bowl, whisk together the all-purpose flour, baking powder, and salt. Set aside. In a large bowl, beat the softened butter and granulated sugar with your mixer on medium speed until light and fluffy, about 3 to 5 minutes. This step is key for tender cookies.
- Add the Eggs and Extracts (2-3 minutes): Beat in the egg, vanilla, and almond extract until combined. Scrape down the sides if needed to ensure even mixing.
- Combine Dry and Wet Ingredients (1-2 minutes): Gradually add the flour mixture to the butter mixture, mixing on low speed until a smooth dough forms. Avoid overmixing — stop as soon as the flour disappears.
- Chill the Dough (at least 1 hour): Flatten the dough into a disk, wrap in plastic wrap, and chill in the fridge. Chilling prevents spreading and helps with rolling. I sometimes forget this step and end up with cookie puddles, so trust me here!
- Roll and Cut (10-15 minutes): Preheat your oven to 350°F (175°C). Lightly flour your work surface and rolling pin, then roll out the dough to about ¼ inch (6 mm) thickness. Cut out mask shapes using the cookie cutter, and place them on a parchment-lined baking sheet about 1 inch apart.
- Bake (10-12 minutes): Bake cookies until edges just start to turn golden, about 10 to 12 minutes. Rotate the pan halfway through for even baking. The centers should be set but still soft — they firm up as they cool.
- Cool Completely (at least 30 minutes): Transfer cookies to wire racks to cool fully before icing. I’ve learned the hard way that icing warm cookies leads to runny, sad designs.
- Prepare Royal Icing (10-15 minutes): In a clean bowl, beat egg whites or meringue powder with cream of tartar until foamy. Gradually add powdered sugar, beating on low until combined, then increase speed to medium-high until stiff peaks form. Add lemon juice or vanilla for flavor. Adjust consistency: thinner for flooding (add water a few drops at a time), thicker for outlining (less water).
- Color and Decorate (30-45 minutes): Divide icing into separate bowls and tint each with your purple, green, and gold gels. Use piping bags to outline each mask and flood the inside with thinner icing. Once dry (1-2 hours), add details like feathers, dots, or swirls with thicker icing. Patience here pays off — your cookies will shine!
Cooking Tips & Techniques
Royal icing can be intimidating, but a few tricks make all the difference. Always sift powdered sugar to avoid grainy icing. When mixing, don’t rush; stiff peaks are your goal to keep details crisp. If icing cracks while drying, it’s usually because it was too thick, so tweak the water carefully.
One mistake I made early on was trying to ice warm cookies — the icing slid right off! Cooling completely is non-negotiable. Also, when rolling dough, chill it well; warmer dough sticks and warps shapes. For consistent thickness, I use rolling pin rings — these magic little tools keep the dough evenly rolled without guesswork.
Multitasking helps: while cookies bake, get icing ready and colors mixed. And don’t stress if your first few masks look a little wonky — the charm is in the handmade feel. Practice on parchment paper before piping on cookies, and if you get a blob, scrape it off and start again. Remember, royal icing dries fast, so work in small sections.
Variations & Adaptations
- Dietary Swap: Replace all-purpose flour with a gluten-free blend for sensitive tummies. Use aquafaba instead of egg whites in royal icing for vegan-friendly cookies.
- Seasonal Twist: Add a pinch of cinnamon or nutmeg to the dough for a warm, spicy note perfect for cooler Mardi Gras nights.
- Flavorful Fillings: Try sandwiching two cookies with a layer of lemon curd or raspberry jam for a surprise inside. I once added a thin layer of cream cheese frosting instead of royal icing — decadent!
- Alternative Decorating: Instead of royal icing, coat cookies with colored sugar crystals or edible glitter for a sparkling effect.
- Cooking Method: These cookies can be baked on a pizza stone for crisper bottoms or in convection ovens for even browning. Just adjust baking time slightly.
Serving & Storage Suggestions
Serve these Mardi Gras mask cookies at room temperature so the icing is perfectly set and not sticky. They pair wonderfully with a cup of strong coffee or a sparkling lemonade for a festive treat.
Store cookies in an airtight container at room temperature for up to 5 days. If you want to keep them longer, freeze un-iced cookies wrapped tightly in plastic wrap and foil for up to 3 months. Icing is best fresh, but decorated cookies can be frozen if placed carefully with parchment between layers.
Reheat gently by bringing to room temp after freezing; icing may soften but will firm up again when cooled. Over time, the cookie’s flavor deepens, and the icing hardens beautifully, so they actually taste better after a day or two — perfect for prepping ahead of Mardi Gras parties.
Nutritional Information & Benefits
Each cookie (approximately 3-inch mask) contains roughly 150-180 calories, depending on icing thickness. They provide a moderate amount of carbohydrates for quick energy and small amounts of fat from butter.
Key ingredients like real butter add richness and vitamin A, while egg whites in icing offer protein without fat. Though these cookies aren’t a health food per se, they’re a joyful treat that fits nicely within a balanced diet when enjoyed in moderation.
For those watching gluten or dairy, the recipe adapts well with gluten-free flour and dairy-free butter substitutes, keeping the festive spirit intact. I always appreciate how this recipe strikes a balance between indulgence and simplicity — just the kind of treat that feels like a reward after a busy day.
Conclusion
So, why make these Perfect Mardi Gras Mask Sugar Cookies with Vibrant Royal Icing? Because they bring the colors, the joy, and the sweet celebration of Mardi Gras right into your kitchen. Whether you’re a seasoned baker or just someone wanting a fun project, these cookies invite you to get creative and savor each colorful bite.
Feel free to tweak the colors, the flavors, or even the shapes — make it your own Mardi Gras moment. Honestly, I keep coming back to this recipe year after year because it never fails to bring smiles and a little sparkle to the table.
If you give it a try, I’d love to hear how your cookies turn out! Share your decorating stories, your favorite color combos, or any fun twists you add. Let’s keep the Mardi Gras spirit alive — one sweet, vibrant mask at a time.
FAQs
Can I make the cookie dough ahead of time?
Yes! You can prepare the dough and refrigerate it for up to 3 days or freeze it for up to 3 months. Just let it thaw and chill again before rolling.
How do I fix royal icing that’s too runny or too thick?
Add powdered sugar a teaspoon at a time to thicken, or a few drops of water to thin it. Mix thoroughly and test the consistency on parchment paper.
Can I use store-bought royal icing instead of making my own?
You can, but homemade royal icing offers better control over texture, flavor, and drying time, making it easier to create crisp, vibrant designs.
What if I don’t have Mardi Gras mask cookie cutters?
Use any oval or eye-shaped cookie cutter and decorate with icing to mimic a mask’s look. You can also cut shapes freehand with a knife if you’re feeling creative!
How long does the icing take to dry completely?
Royal icing usually dries to the touch within 1-2 hours, but for fully hardened decorations, allow 6-8 hours or overnight in a dry environment.
Pin This Recipe!
Perfect Mardi Gras Mask Sugar Cookies Recipe with Vibrant Royal Icing Tutorial

Celebrate Mardi Gras with these festive mask-shaped sugar cookies featuring crisp edges and tender centers, decorated with vibrant royal icing in traditional purple, green, and gold colors.
- Prep Time: 20 minutes
- Cook Time: 12 minutes
- Total Time: 2 hours 2 minutes
- Yield: 24 cookies 1x
- Category: Dessert
- Cuisine: American
Ingredients
- 2 ¾ cups (345 g) all-purpose flour, sifted
- 1 teaspoon baking powder
- ½ teaspoon salt
- 1 cup (227 g) unsalted butter, softened
- 1 ½ cups (300 g) granulated sugar
- 1 large egg, room temperature
- 1 teaspoon pure vanilla extract
- 1 teaspoon almond extract (optional)
- 3 cups (360 g) powdered sugar, sifted
- 2 large egg whites or 4 tablespoons meringue powder + 6 tablespoons water
- ¼ teaspoon cream of tartar
- Food coloring gels in purple, green, and gold
- 1 teaspoon lemon juice or vanilla extract
Instructions
- In a medium bowl, whisk together the all-purpose flour, baking powder, and salt. Set aside.
- In a large bowl, beat the softened butter and granulated sugar with a mixer on medium speed until light and fluffy, about 3 to 5 minutes.
- Beat in the egg, vanilla, and almond extract until combined. Scrape down the sides if needed.
- Gradually add the flour mixture to the butter mixture, mixing on low speed until a smooth dough forms. Avoid overmixing.
- Flatten the dough into a disk, wrap in plastic wrap, and chill in the fridge for at least 1 hour.
- Preheat oven to 350°F (175°C). Lightly flour your work surface and rolling pin, roll out dough to ¼ inch (6 mm) thickness.
- Cut out mask shapes using cookie cutters and place on parchment-lined baking sheets about 1 inch apart.
- Bake for 10 to 12 minutes until edges start to turn golden. Rotate pan halfway through baking.
- Transfer cookies to wire racks to cool completely, at least 30 minutes.
- Prepare royal icing by beating egg whites or meringue powder with cream of tartar until foamy.
- Gradually add powdered sugar, beating on low until combined, then increase speed until stiff peaks form.
- Add lemon juice or vanilla for flavor. Adjust consistency with water for flooding or outlining.
- Divide icing into bowls and tint with purple, green, and gold gels.
- Use piping bags to outline masks and flood inside with thinner icing. Let dry 1-2 hours.
- Add details with thicker icing once base is dry. Allow decorations to dry fully before serving.
Notes
Chill dough well to prevent spreading. Cool cookies completely before icing to avoid runny designs. Sift powdered sugar for smooth icing. Adjust icing consistency carefully to avoid cracking or sliding. Practice piping on parchment paper before decorating cookies.
Nutrition
- Serving Size: 1 cookie (approximat
- Calories: 165
- Sugar: 18
- Sodium: 90
- Fat: 7
- Saturated Fat: 4
- Carbohydrates: 25
- Protein: 2
Keywords: Mardi Gras, sugar cookies, royal icing, festive cookies, mask cookies, colorful cookies, holiday baking