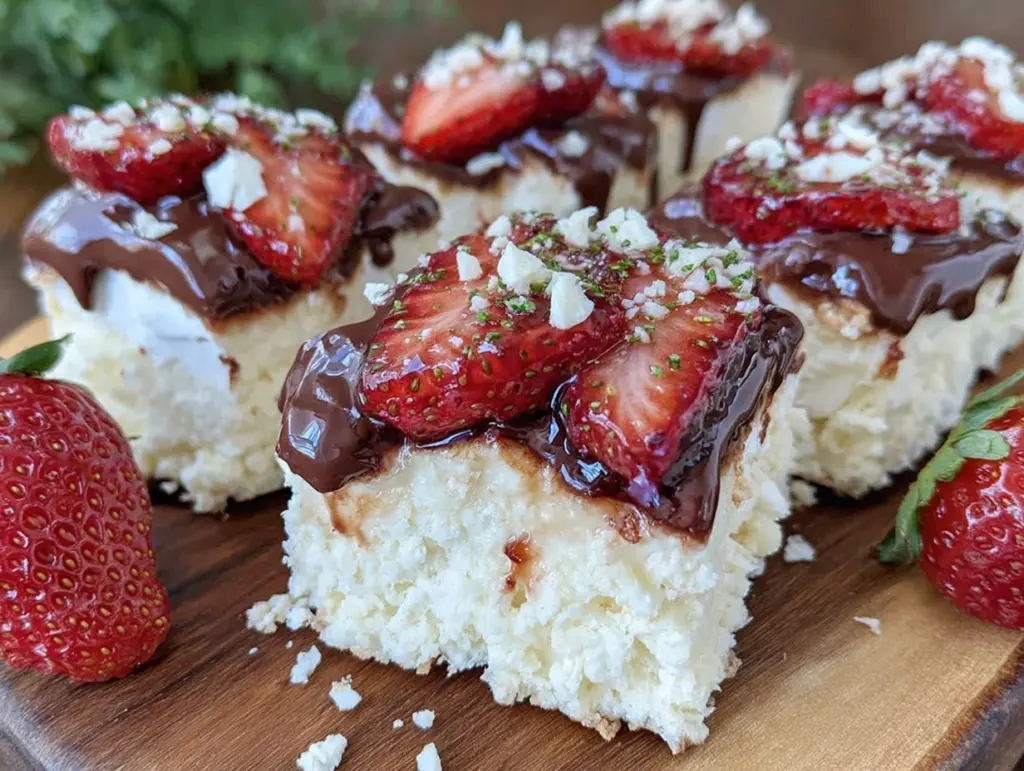
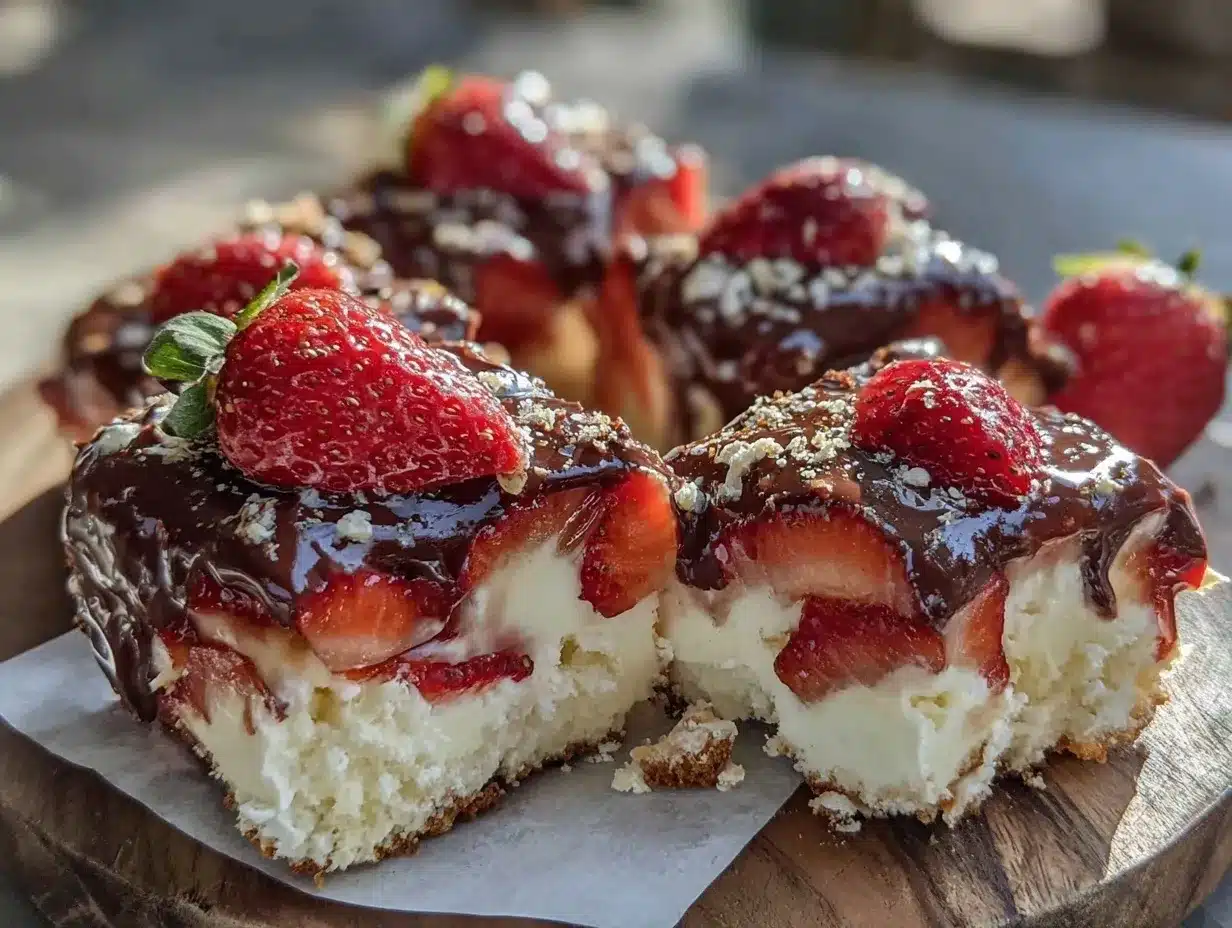
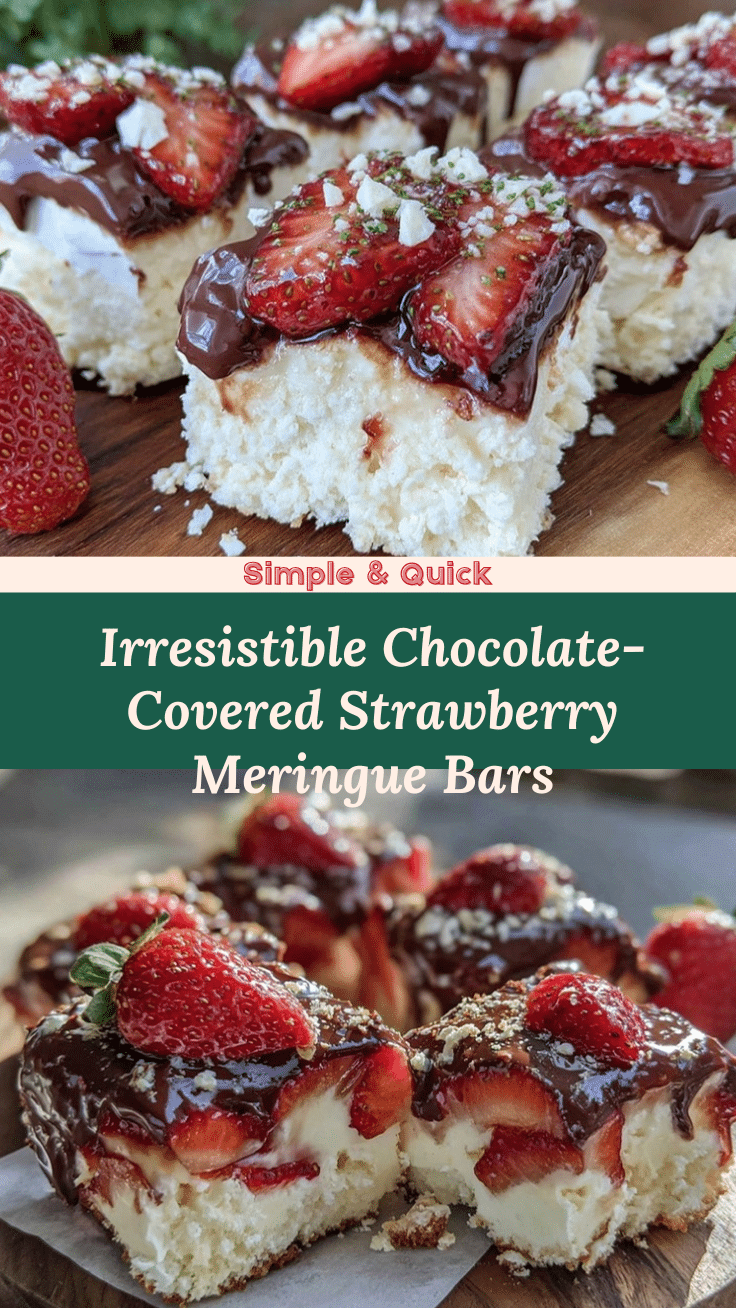
Let me tell you, the moment you bite into these Chocolate-Covered Strawberry Meringue Bars, you’re hit with a symphony of textures and flavors that’s honestly hard to forget. The delicate crunch of airy meringue combined with the juicy burst of fresh strawberries, all wrapped in a luscious chocolate coating—well, it’s the kind of treat that makes your taste buds sit up and say, “Hey, this is something special.”
The first time I whipped up these bars, it was on a lazy Sunday afternoon, the kitchen filled with the sweet scent of melting chocolate and roasting strawberries. I was instantly hooked—the kind of moment where you pause, take a deep breath, and just smile because you know you’re onto something truly special. Years ago, when I was knee-high to a grasshopper, my grandma used to make simple meringues, but adding strawberries and chocolate? That was a game-changer I wish I’d discovered sooner.
My family couldn’t stop sneaking these bars off the cooling rack (and I can’t really blame them). Honestly, they’re dangerously easy to make, and the combination of crisp meringue, fresh fruit, and silky chocolate feels like pure, nostalgic comfort. Perfect for potlucks, a sweet treat for your kids, or just to brighten up your Pinterest cookie board, these bars have become a staple for family gatherings and gifting—tested multiple times in the name of research, of course!
Why You’ll Love This Recipe
Here’s why these Chocolate-Covered Strawberry Meringue Bars stand out from the crowd:
- Quick & Easy: Comes together in under an hour, perfect for busy weeknights or last-minute cravings.
- Simple Ingredients: No fancy grocery trips needed; you likely already have everything in your kitchen.
- Perfect for Any Occasion: Great for brunch, potlucks, cozy dinners, or a spontaneous sweet snack.
- Crowd-Pleaser: Always gets rave reviews from kids and adults alike—there’s just something magical about this combo.
- Unbelievably Delicious: The texture and flavor combo is next-level comfort food—crispy, sweet, juicy, and chocolatey all at once.
What really makes this recipe different is the attention to the meringue’s texture—light as a feather but sturdy enough to hold the strawberry and chocolate layers without sogginess. Using fresh, ripe strawberries adds a natural sweetness and a pop of juiciness that pairs perfectly with the bittersweet chocolate. Plus, the chocolate coating isn’t just slapped on; it’s carefully melted and tempered to give you that satisfying snap every time. This isn’t just another dessert—it’s the best version you’ll find, made with love and a pinch of kitchen wisdom.
Once you try these bars, you’ll close your eyes after the first bite, savoring the perfect balance of flavors. Whether you want to impress guests without stress or treat yourself to a moment of pure indulgence, these bars deliver every time.
What Ingredients You Will Need
This recipe uses simple, wholesome ingredients to deliver bold flavor and satisfying texture without any fuss. Most of these are pantry staples, with the star ingredient being fresh strawberries for that bright, juicy kick.
- For the Meringue Base:
- 4 large egg whites, room temperature (for best volume and stability)
- 1 cup (200g) granulated sugar (helps create that crisp, glossy meringue)
- ½ teaspoon cream of tartar (stabilizes the egg whites and prevents weeping)
- 1 teaspoon pure vanilla extract (adds subtle warmth and depth)
- Pinch of salt (balances sweetness)
- For the Strawberry Layer:
- 1 ½ cups (225g) fresh strawberries, hulled and sliced (choose firm, ripe berries for best texture)
- 2 tablespoons granulated sugar (to macerate and bring out natural juices)
- 1 teaspoon lemon juice (brightens the flavor)
- For the Chocolate Coating:
- 6 ounces (170g) high-quality dark chocolate (I recommend Ghirardelli or Lindt for a smooth finish)
- 1 teaspoon coconut oil or unsalted butter (optional, for glossy shine and easier spreading)
Substitution tips: Use aquafaba (chickpea water) for a vegan meringue alternative, and swap dark chocolate with dairy-free chocolate if needed. If strawberries aren’t in season, fresh raspberries or blueberries work beautifully as well. For a gluten-free treat, this recipe is naturally safe since it contains no flour.
Equipment Needed
- Mixing bowls (preferably glass or metal for whipping egg whites)
- Electric mixer or stand mixer (to whip the meringue to stiff peaks)
- Baking pan (8×8 inches / 20×20 cm recommended for even thickness)
- Parchment paper (for easy removal and cleanup)
- Spatula (silicone preferred for gentle folding and spreading)
- Sharp knife (to slice strawberries and bars cleanly)
- Double boiler or microwave-safe bowl (for melting chocolate)
If you don’t have a stand mixer, no worries—an electric hand mixer works just fine. For melting chocolate, a microwave is perfectly acceptable, just use short bursts and stir frequently to avoid burning. When it comes to parchment paper, I keep a roll handy because it’s a kitchen lifesaver for delicate treats like these bars.
Preparation Method
- Preheat the oven: Set your oven to 250°F (120°C). Line an 8×8 inch (20×20 cm) baking pan with parchment paper, allowing some overhang for easy removal later.
- Prepare the strawberries: In a small bowl, toss the sliced strawberries with 2 tablespoons sugar and 1 teaspoon lemon juice. Set aside to macerate while you prepare the meringue. This step helps soften the berries and bring out their natural juices, making them juicier and more flavorful.
- Whip the meringue: In a clean, dry mixing bowl, add the egg whites and pinch of salt. Using an electric mixer, beat on medium speed until foamy. Add cream of tartar, then gradually add sugar, one tablespoon at a time, beating on high speed until stiff, glossy peaks form (about 7-10 minutes). The meringue should hold firm peaks without any graininess when rubbed between fingers.
- Add vanilla extract: Gently fold in the vanilla extract using a spatula, being careful not to deflate the meringue.
- Spread the meringue: Pour the meringue into the prepared pan and spread evenly with the spatula. Use swirling motions to create soft peaks and texture on top—this helps it crisp up nicely in the oven.
- Bake the meringue: Place the pan in the oven and bake for 60-70 minutes. The meringue should be dry to the touch and just starting to turn golden. Turn off the oven and leave the meringue inside with the door slightly ajar for an additional 30 minutes to dry out further—this prevents sogginess.
- Cool completely: Remove the meringue from the oven and let it cool completely in the pan. This step is crucial to maintain that crisp texture.
- Arrange strawberries: Once cooled, drain any excess juice from the strawberries and spread them evenly over the meringue layer.
- Melt the chocolate: Using a double boiler or microwave, gently melt the dark chocolate with coconut oil or butter (if using). Stir until smooth and glossy.
- Coat the berries: Pour the melted chocolate over the strawberries, spreading evenly to cover them. Work quickly as the chocolate sets fast.
- Chill: Place the bars in the refrigerator for at least 30 minutes to allow the chocolate to harden.
- Slice and serve: Use a sharp knife to cut into squares or bars. For cleaner cuts, warm the knife under hot water and dry between slices.
Pro tip: If your meringue starts to weep or get sticky, it’s usually from humidity. Baking in a low-temp oven and cooling slowly helps avoid that problem. Also, be patient—rushing cooling or cutting can cause the bars to crumble.
Cooking Tips & Techniques
Getting the meringue just right is the trickiest part of this recipe. Here are some tips I picked up the hard way:
- Room temperature eggs: Egg whites whip better when not cold straight from the fridge. I usually separate eggs the night before and leave whites covered in the fridge to warm up slightly.
- Clean bowls only: Any grease or yolk traces can prevent the whites from whipping properly. Give your bowl a quick wipe with lemon juice or vinegar if you’re unsure.
- Add sugar slowly: Dumping sugar in all at once can deflate the meringue. Gradual addition helps stabilize it and achieve that glossy finish.
- Don’t rush baking: Low and slow is the key to crisp meringue. High heat will brown too fast and leave the center sticky.
- Chocolate tempering: Adding a bit of coconut oil or butter to the chocolate makes it smoother and easier to spread. I learned this after battling with too-thick chocolate layers.
- Timing your layers: Make sure the meringue is completely cool before adding strawberries and chocolate. Adding them too soon can create sogginess and ruin the crunch.
These bars require a little patience, but honestly, the results are worth every minute. Multitasking helps—while the meringue bakes, you can prep strawberries, melt chocolate, or tidy up the kitchen.
Variations & Adaptations
Here are some ways to make these Chocolate-Covered Strawberry Meringue Bars your own:
- Berry swap: Use raspberries, blueberries, or blackberries instead of strawberries for a seasonal twist. Just adjust sugar slightly for tartness.
- Nut topping: Sprinkle chopped toasted almonds, pistachios, or hazelnuts over the melted chocolate before chilling for added crunch and flavor.
- Vegan version: Replace egg whites with aquafaba (chickpea water), whipped up like egg whites. Use dairy-free chocolate and coconut oil for coating.
- Flavor infusion: Add a teaspoon of rose water or orange blossom water to the meringue for a floral note, or a pinch of cinnamon for warmth.
- Chocolate variety: Swap dark chocolate for milk or white chocolate, or make a marbled effect by swirling two chocolates together.
Personally, I once tried these bars with a drizzle of salted caramel on top of the chocolate layer—talk about next-level indulgence! Feel free to experiment and find your perfect combo.
Serving & Storage Suggestions
These bars are best served chilled or at room temperature. The chocolate layer is firm but melts beautifully in your mouth, while the strawberries offer a juicy contrast to the crunchy meringue.
Pair them with a cup of strong coffee or a glass of chilled rosé for a delightful snack or dessert. They also make a lovely addition to any dessert platter or afternoon tea.
To store, keep the bars in an airtight container in the refrigerator for up to 3 days. Avoid storing at room temperature for long periods, as the strawberries may release moisture and soften the meringue. They freeze well too—wrap tightly and freeze for up to a month. Thaw in the fridge before serving.
Reheating isn’t necessary, but if you prefer a slightly softer chocolate top, let them sit at room temperature for 10-15 minutes before serving. Over time, flavors meld and deepen, making leftovers just as tempting.
Nutritional Information & Benefits
These Chocolate-Covered Strawberry Meringue Bars offer a lighter dessert option compared to traditional cakes or brownies. One serving (approx. one bar) contains roughly:
| Calories | 150-180 |
|---|---|
| Fat | 8-10g (mostly from chocolate) |
| Carbohydrates | 18-22g |
| Protein | 2-3g |
| Fiber | 2g (from strawberries and dark chocolate) |
Key health perks include antioxidants from dark chocolate and vitamin C from fresh strawberries. This recipe is naturally gluten-free and can be adapted for vegan diets with simple swaps. Just keep in mind egg allergies if serving to guests.
From a wellness perspective, I love that these bars satisfy sweet cravings without feeling heavy or overly rich. They’re a great treat that feels indulgent but leaves you energized rather than weighed down.
Conclusion
In a nutshell, these Chocolate-Covered Strawberry Meringue Bars are a delightful mix of crisp, sweet, juicy, and chocolatey that you’re going to want to bookmark and make again and again. They’re simple enough for beginners but impressive enough to wow guests.
Feel free to customize them with your favorite berries, nuts, or chocolate types. And trust me, once you try this recipe, it’ll become one of those go-to desserts you turn to when you want something special without a fuss.
I absolutely love how these bars bring a little sunshine and joy to any day—perfect for sharing or sneaking a quiet moment to yourself. If you give the recipe a try, please drop a comment or share your own twist. I’m always excited to hear how you make this recipe your own!
Happy baking, friends!
FAQs
Can I use frozen strawberries instead of fresh?
Frozen strawberries can work, but they tend to release more liquid, which might make the meringue soggy. If you use frozen, thaw and drain them well before layering.
How do I store leftover bars without the chocolate melting?
Keep leftovers in an airtight container in the refrigerator to prevent chocolate from melting and strawberries from softening the meringue.
Can I make the meringue base ahead of time?
Yes! You can bake the meringue up to a day in advance and store it in an airtight container at room temperature before adding strawberries and chocolate.
What if my meringue is sticky after baking?
Sticky meringue usually means it needs longer drying time. Try leaving it in the turned-off oven with the door slightly open to dry out completely.
Is there a way to make these bars nut-free?
Absolutely! This recipe is naturally nut-free unless you add nuts as a topping. Just skip that step to keep it safe for nut allergies.
Pin This Recipe!
Chocolate-Covered Strawberry Meringue Bars

Delightful bars featuring a crisp meringue base topped with juicy fresh strawberries and a luscious dark chocolate coating. Perfect for a light, sweet treat with a satisfying crunch and burst of flavor.
- Prep Time: 15 minutes
- Cook Time: 1 hour 40 minutes
- Total Time: 1 hour 55 minutes
- Yield: 9 servings 1x
- Category: Dessert
- Cuisine: American
Ingredients
- 4 large egg whites, room temperature
- 1 cup (200g) granulated sugar
- ½ teaspoon cream of tartar
- 1 teaspoon pure vanilla extract
- Pinch of salt
- 1 ½ cups (225g) fresh strawberries, hulled and sliced
- 2 tablespoons granulated sugar
- 1 teaspoon lemon juice
- 6 ounces (170g) high-quality dark chocolate
- 1 teaspoon coconut oil or unsalted butter (optional)
Instructions
- Preheat the oven to 250°F (120°C). Line an 8×8 inch (20×20 cm) baking pan with parchment paper, allowing some overhang for easy removal.
- In a small bowl, toss the sliced strawberries with 2 tablespoons sugar and 1 teaspoon lemon juice. Set aside to macerate.
- In a clean, dry mixing bowl, add the egg whites and pinch of salt. Beat on medium speed until foamy using an electric mixer.
- Add cream of tartar, then gradually add sugar one tablespoon at a time, beating on high speed until stiff, glossy peaks form (7-10 minutes).
- Gently fold in the vanilla extract using a spatula without deflating the meringue.
- Pour the meringue into the prepared pan and spread evenly with a spatula, creating soft peaks and texture on top.
- Bake for 60-70 minutes until dry to the touch and starting to turn golden. Turn off oven and leave meringue inside with door slightly ajar for 30 minutes.
- Remove from oven and let cool completely in the pan.
- Drain excess juice from strawberries and spread evenly over the cooled meringue layer.
- Melt the dark chocolate with coconut oil or butter using a double boiler or microwave, stirring until smooth and glossy.
- Pour melted chocolate over the strawberries, spreading evenly to cover them.
- Chill in the refrigerator for at least 30 minutes to allow chocolate to harden.
- Slice into bars using a sharp knife warmed under hot water and dried between cuts for clean slices.
Notes
Use room temperature egg whites for best volume. Add sugar gradually to stabilize meringue. Bake low and slow to avoid sogginess. Cool meringue completely before adding toppings. Use coconut oil or butter in chocolate for easier spreading. Warm knife between cuts for clean slices. Store bars in airtight container in refrigerator up to 3 days or freeze up to 1 month.
Nutrition
- Serving Size: 1 bar (approximate)
- Calories: 165
- Sugar: 18
- Sodium: 35
- Fat: 9
- Saturated Fat: 5
- Carbohydrates: 20
- Fiber: 2
- Protein: 2.5
Keywords: chocolate, strawberry, meringue, dessert bars, easy recipe, homemade, gluten-free, vegan option