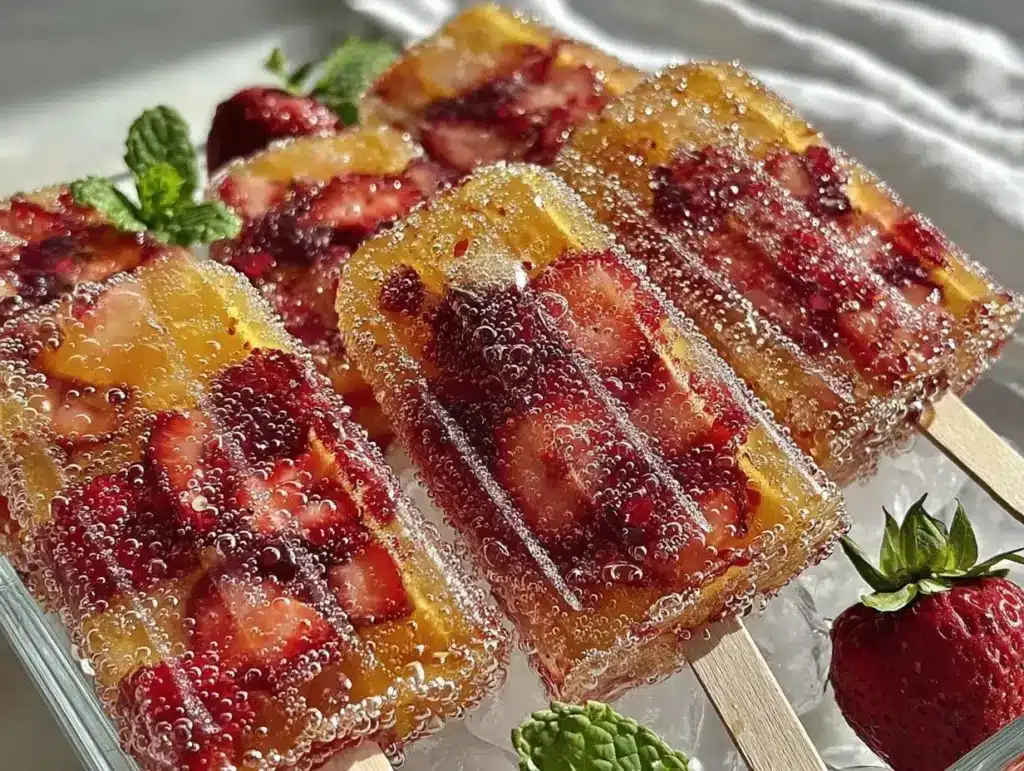
Let me just say: the first whiff of fresh strawberries and a splash of bubbly Champagne coming together in my kitchen is the kind of thing that makes you stop mid-stir, close your eyes, and grin. The sweet, juicy scent wafts through the air, and suddenly, you’re not just making a treat—you’re crafting pure summer magic. I remember the very first time I made these Champagne Strawberry Mimosa Popsicles for a backyard bash. It was one of those sticky-hot afternoons when everyone was just craving something cold, festive, and a little bit special. You know, the kind of moment where you pause, take a deep breath, and just smile because you know you’re onto something truly special.
Honestly, I wish I’d stumbled on this recipe years ago (so many summer parties could’ve had a delicious twist!). When I was knee-high to a grasshopper, my grandma used to serve homemade fruit popsicles at family reunions, but these? These are the grown-up version, perfect for a little celebration. The first batch disappeared faster than I could get them out of the molds—my friends were sneaking extras from the freezer, giggling like kids. Even my aunt (who claims she “doesn’t do sweets”) snagged one for herself. Let’s face it, these popsicles are dangerously easy to love.
What I love most is how these Champagne Strawberry Mimosa Popsicles fit every occasion: pool parties, bridal showers, Mother’s Day brunches, or just a sunny afternoon when you feel like treating yourself. They brighten up any Pinterest board with those gorgeous, ruby-red hues and tiny bubbles glimmering in the sunlight. And yes, I’ve tested them over and over—strictly in the name of research, of course! Now, they’re a staple at my family gatherings, and I can’t imagine summer without them. If you’re looking for that recipe that feels like a warm hug (but with a chill!), you’re going to want to bookmark this one. Trust me, it’s a keeper for all your summer party needs.
Why You’ll Love This Recipe
These Champagne Strawberry Mimosa Popsicles aren’t just another frozen treat—they’re a celebration in every bite! Over years of party planning and recipe testing, I’ve tweaked every detail so you get the perfect blend of flavor, sparkle, and nostalgia. Here’s why I keep coming back to this recipe, and why you’ll want to as well:
- Quick & Easy: Ready to freeze in under 15 minutes, so you can prep them even on a busy morning or right before guests arrive.
- Simple Ingredients: You probably have most things already—fresh strawberries, a bottle of Champagne (or Prosecco), and a splash of orange juice. No fancy shopping trips required!
- Perfect for Parties: These popsicles are made for summer gatherings—think pool parties, bridal showers, brunches, or even lazy afternoons on the deck.
- Crowd-Pleaser: Both adults and teens love these (especially since you can make a non-alcoholic batch too). They disappear fast, so make extras!
- Unbelievably Delicious: The balance of sweet strawberries, tangy orange juice, and fizzy Champagne is next-level refreshing. The texture is smooth with just the right amount of strawberry chunkiness.
What makes these Champagne Strawberry Mimosa Popsicles stand out is the technique: a gentle muddling of the strawberries before combining with the bubbly, which keeps the fruit fresh and lets the flavors mingle without getting mushy. Honestly, it’s the trick that makes them taste like an actual mimosa—light, crisp, and not overly sweet. I’ve tried a few versions with puree, but nothing beats this balance.
For me, these popsicles are more than just a dessert—they’re a little slice of summer joy. They turn an ordinary day into something worth celebrating, and they’re the ultimate “wow” for guests (without any stress). Imagine taking that first bite, eyes closed, feeling the icy fizz and sweet strawberry burst. That’s the kind of comfort food moment you’ll want to relive again and again.
What Ingredients You Will Need
This recipe uses simple, wholesome ingredients to deliver bold flavor and that signature mimosa sparkle—no fuss, no complicated steps. Most of these are pantry staples and easy to swap if you need to, which makes these Champagne Strawberry Mimosa Popsicles both convenient and customizable.
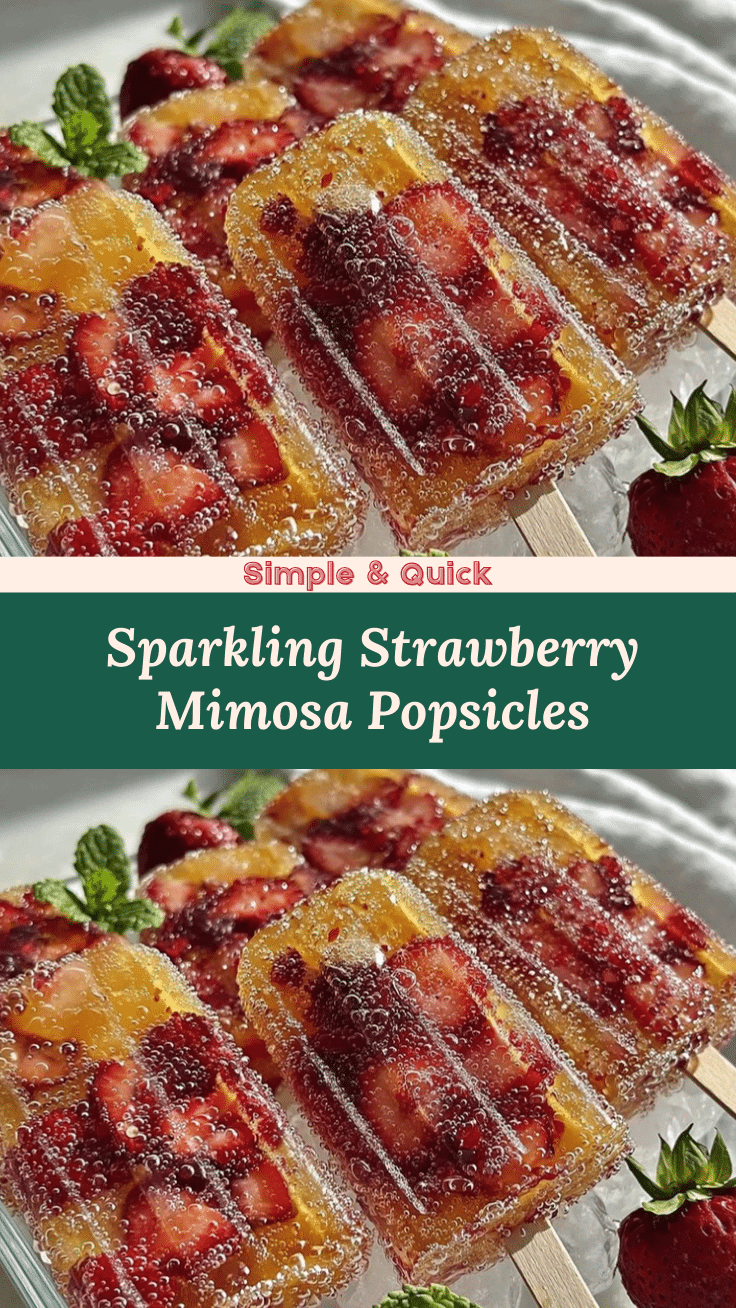
- Fresh Strawberries (about 2 cups / 300g, hulled and sliced) – The hero of the recipe. Go for ripe, sweet berries for maximum flavor.
- Champagne or Prosecco (1 cup / 240ml) – Adds that iconic mimosa fizz. You can use any dry sparkling wine you love. I usually grab a bottle of Korbel or La Marca Prosecco for parties.
- Orange Juice (½ cup / 120ml, fresh squeezed if possible) – Gives a classic mimosa tang. Store-bought works fine, but fresh is worth it if you have oranges handy.
- Simple Syrup (2–3 tablespoons / 30–45ml, to taste) – Adds sweetness. You can make it by dissolving equal parts sugar and water, or use honey/agave syrup for a twist.
- Lemon Juice (1 tablespoon / 15ml, optional) – A splash wakes up all the flavors. I use it if the strawberries need extra zing.
- Pinch of Salt – Just a sprinkle to enhance the fruit (sounds odd, but it really makes a difference).
- Non-Alcoholic Variation: – Sub sparkling apple cider or lemon-lime soda for Champagne if serving kids or anyone avoiding alcohol.
Optional Add-Ins:
- Mint Leaves (a few, minced) – For a fresh, herbal twist. I love adding mint for brunch parties.
- Extra Berries (raspberries or blueberries, a handful) – Toss in for color and flavor.
- Sweetener Alternatives: – Agave syrup, maple syrup, or stevia for lower sugar.
Ingredient Tips:
- Use organic strawberries if possible for richer flavor. I’ve noticed local farm berries taste best.
- Don’t use extra dry Champagne—it’ll be too tart. Brut or Prosecco works beautifully.
- Frozen strawberries work in a pinch, but thaw and drain them first to avoid icy popsicles.
- If you need gluten-free, double-check your Champagne brand (most are naturally gluten-free).
Feel free to swap, mix, or match depending on what’s in your fridge or garden. These popsicles are forgiving—just keep the proportions right and you’ll get a batch that’s bright, refreshing, and totally party-worthy.
Equipment Needed
- Popsicle Molds – Any standard size works. Silicone molds make unmolding easy (I use Norpro brand for consistent results).
- Popsicle Sticks – Wooden sticks give that classic look, but reusable plastic ones work too.
- Mixing Bowl – For combining ingredients. Glass or stainless steel is best for freshness.
- Small Whisk or Spoon – To stir everything together. I sometimes use a fork for muddling the berries.
- Measuring Cups and Spoons – Precision matters here; a little too much liquid, and you get slushy popsicles.
- Fine Mesh Sieve (optional) – For straining pulp if you want ultra-smooth popsicles.
- Freezer Space – Make sure you have a flat spot; popsicle molds tip easily (learned that the hard way!).
If you don’t have a popsicle mold, honestly, you can use small paper cups and cover them with foil to hold the sticks upright. I’ve even made mini-pops in ice cube trays for “cocktail ice.” For easy cleaning, rinse molds with warm water right after unmolding—sticky syrup can be a pain if it sits.
Budget-friendly tip: Dollar store molds work fine for most batches. If you get serious about popsicles, splurge on a silicone set—you’ll thank yourself later!
Preparation Method

Here’s exactly how to make these Fresh Champagne Strawberry Mimosa Popsicles—step-by-step, with all those little tricks I’ve learned from a dozen summer batches.
-
Wash and Prep Strawberries: Rinse 2 cups (300g) fresh strawberries under cold water. Hull and slice them thinly. If you like chunky fruit bits in your popsicles, keep some slices larger.
Tip: Pat berries dry to avoid extra water in your mixture. -
Muddle the Strawberries: Place strawberries in a mixing bowl. Use a fork or muddler to gently mash about half the berries, leaving some pieces whole. The goal is a mix of juicy pulp and texture.
Sensory cue: You want a fragrant, slightly chunky mixture—not a puree. -
Mix the Mimosa Base: Add 1 cup (240ml) Champagne or Prosecco, ½ cup (120ml) orange juice, 2–3 tablespoons (30–45ml) simple syrup, and 1 tablespoon (15ml) lemon juice (if using) to the bowl. Sprinkle in a pinch of salt.
Note: If you’re using non-alcoholic sparkling cider, keep the proportions the same. -
Combine and Taste: Stir everything gently. Taste the mixture—adjust sweetness or acidity as needed. If it’s too tart, add a little more syrup. If too sweet, squeeze in extra lemon juice.
Tip: The flavor should be bold and sweet, with a hint of fizz. -
Fill Popsicle Molds: Pour the mixture into popsicle molds, leaving about ¼-inch (0.5cm) at the top for expansion. Drop in a few mint leaves or extra berries if desired.
Warning: Overfilling can cause popsicles to stick in the mold. -
Insert Sticks: Add popsicle sticks. If your mold doesn’t hold sticks upright, cover with foil and poke sticks through for stability.
Tip: Wiggle sticks gently to distribute fruit chunks. -
Freeze: Place molds in the freezer, flat and undisturbed. Freeze for at least 6 hours, or overnight for best texture.
Note: Alcohol slows freezing, so patience pays off! Popsicles may take longer than non-alcoholic ones. -
Unmold Popsicles: Run molds under warm water for 10–15 seconds. Gently wiggle sticks and pull popsicles free.
Tip: If they’re stuck, wait a bit longer—don’t force them! -
Serve and Enjoy: Arrange popsicles on a tray, garnish with fresh mint or extra berries, and serve immediately. If prepping for a party, keep popsicles on ice to prevent melting.
Sensory cue: Popsicles should be icy, bright, and speckled with fruit.
Troubleshooting:
- Too icy? Add a little more simple syrup next time.
- Popsicles won’t freeze? Double-check alcohol content—too much Champagne can keep them slushy. Stick to the recipe ratio.
- Fruit sinks? Let the mixture sit for 10 minutes before freezing so it thickens slightly.
Personal tip: Make a double batch—the first round never lasts past the first hour of the party!
Cooking Tips & Techniques
Over dozens of summer parties, I’ve picked up some pro tricks for making the best Champagne Strawberry Mimosa Popsicles—here’s what really works:
- Don’t Over-Muddle: You want a blend of juicy and chunky, not strawberry puree. Too much mashing makes the popsicles icy.
- Balance the Alcohol: Stick to the 1 cup (240ml) Champagne per batch. Too much booze, and you’ll get slush instead of popsicles (learned this one the hard way at my cousin’s bridal shower—oops!).
- Freeze Overnight: Alcohol slows the freezing process. Planning ahead is key for solid popsicles—don’t rush it!
- Keep the Fruit Suspended: Letting the mixture sit for a few minutes before pouring helps the fruit distribute more evenly (otherwise, it all sinks to the bottom).
- Use Fresh Citrus: Fresh orange juice and lemon juice have way more flavor than bottled. Trust me, it’s worth the tiny extra effort.
- Test for Sweetness: Strawberries vary each season. Taste your mix before freezing; add syrup as needed.
- Leave Room in Molds: Always leave a little space at the top for expansion. Too full, and you’ll have trouble unmolding.
Timing tip: Prep the mixture right before you need it, but freeze overnight for best results. If you’re multitasking during a party, make popsicles a day ahead—less stress, more fun! If you’re using frozen strawberries, thaw and drain them well to prevent icy texture.
Consistency is key. With the right ratio and a gentle touch, you’ll get popsicles that are smooth, fruity, and sparkling—not too hard, not too slushy. Honestly, the first few batches I made were hit-or-miss, but these tips guarantee party-perfect results every time.
Variations & Adaptations
These Champagne Strawberry Mimosa Popsicles are endlessly customizable! Here are a few favorite twists I’ve tried, plus some ideas for dietary needs and seasonal swaps:
- Non-Alcoholic Version: Swap Champagne for sparkling apple cider or lemon-lime soda—perfect for kids, teens, or anyone skipping alcohol. The flavor is still bright and bubbly.
- Berry Mix-Up: Use raspberries, blueberries, or blackberries instead of (or along with) strawberries. In late summer, I love making a “berry blend” for extra color and flavor.
- Citrus Twist: Add a splash of lime juice or grapefruit juice for a tangy upgrade. I did this once with leftover grapefruit and it was a hit at brunch!
- Herbal Infusion: Toss in a few torn basil or mint leaves before freezing for a refreshing, garden-inspired variation.
- Low-Sugar Adaptation: Use stevia or monk fruit sweetener instead of syrup. You can also skip sweetener entirely if your berries are super ripe.
- Vegan-Friendly: All ingredients are naturally vegan, but double-check your Champagne brand if strict vegan is needed (some use animal-based fining agents).
- Allergen Notes: Totally gluten-free and nut-free. Just watch out for cross-contamination if you’re using flavored syrups.
Personal favorite: Last summer, I made a batch with half strawberries and half mango—wow, the tropical twist was incredible! Don’t be afraid to experiment with whatever fruit is in season or whatever you’ve got on hand. Each version has its own personality, and honestly, you can’t go wrong.
Serving & Storage Suggestions
For best flavor and presentation, serve Champagne Strawberry Mimosa Popsicles straight from the freezer, icy cold, and glistening. Arrange them on a chilled platter with fresh mint sprigs or sliced berries for a Pinterest-worthy display (trust me, they’ll get snapped up before you get a second photo!).
Pair these popsicles with light brunch fare—think mini quiches, fruit salads, or cheese boards. For parties, they’re awesome alongside sparkling wine or fresh lemonade. If you’re hosting an evening event, try a charcuterie tray or salty snacks to balance the sweetness.
Storage is simple: Keep popsicles in their molds or transfer to a freezer-safe bag or container once fully frozen. They’ll stay fresh for up to 2 weeks, though the flavor is brightest within the first few days. If you need to stack them, separate layers with parchment paper.
To reheat (okay, more like “soften”), let a popsicle sit at room temp for 2–3 minutes—it’ll be the perfect texture for biting. Over time, the flavors meld and mellow, but if you notice freezer frost, just rinse quickly under cold water before serving. Honestly, I’ve never seen a batch last long enough to worry about storage!
Nutritional Information & Benefits
Each Champagne Strawberry Mimosa Popsicle contains roughly:
- Calories: 70–90 (depends on syrup and fruit amount)
- Carbs: 12–15g
- Sugar: 8–10g
- Vitamin C: High, thanks to fresh strawberries and orange juice
- Alcohol: Minimal, but present unless using the non-alcoholic swap
Health highlights: Strawberries are loaded with antioxidants and vitamin C, which boost your immune system and brighten your skin. Orange juice adds a dose of potassium and folate. If you use the low-sugar or non-alcoholic variation, these popsicles make a guilt-free treat. Gluten-free, dairy-free, and vegan-friendly—just watch out for the Champagne brand if allergies or strict diets apply.
Personally, I love how light and refreshing these feel—no heavy cream, no processed ingredients, just simple fruit, juice, and a bit of sparkle. It’s a wellness win for summer, especially when you want something sweet without overdoing it.
Conclusion
If you’re looking for a summer party treat that’s as easy as it is gorgeous, Champagne Strawberry Mimosa Popsicles are the answer. They bring together all the best flavors of a classic mimosa—fresh berries, tangy orange, and sparkling wine—in a form that’s fun, portable, and totally Instagram-ready.
Don’t be afraid to make these your own: swap the fruit, adjust the sweetness, or go non-alcoholic for family gatherings. Whether you’re hosting a crowd or just treating yourself, these popsicles turn any day into a celebration. Honestly, I love them because they’re a little bit nostalgic, a little bit fancy, and a whole lot delicious.
Give them a try and let me know in the comments how you adapt them for your party! Share your photos, swap in your favorite fruits, or tag me if you bring them to your next summer bash. One taste, and you’ll see why this recipe has become a staple in our home—here’s to sweet, sparkling summer memories!
Frequently Asked Questions
Can I make Champagne Strawberry Mimosa Popsicles without alcohol?
Absolutely! Substitute Champagne with sparkling apple cider or lemon-lime soda for a bubbly, alcohol-free treat perfect for kids or anyone skipping booze.
How long do these popsicles take to freeze?
With alcohol in the mix, plan for at least 6 hours—overnight is even better for solid popsicles. Non-alcoholic versions freeze in 4–5 hours.
Can I use frozen strawberries instead of fresh?
You sure can. Thaw and drain them first to avoid icy popsicles, and taste for sweetness since frozen berries can be a bit tart.
What’s the best way to unmold popsicles without breaking them?
Run the molds under warm water for 10–15 seconds, then gently wiggle the sticks. Don’t force them—if they’re stuck, let them sit a bit longer.
Can I prep these popsicles ahead for a party?
Yes! Make them up to two weeks in advance and store in a freezer-safe container. Serve straight from the freezer for the best texture and flavor.
Pin This Recipe!
Champagne Strawberry Mimosa Popsicles

These Champagne Strawberry Mimosa Popsicles are a refreshing, grown-up twist on classic fruit popsicles, combining sweet strawberries, tangy orange juice, and bubbly Champagne for the ultimate summer party treat. Perfect for celebrations, brunches, or sunny afternoons, they’re easy to make and guaranteed to impress.
- Prep Time: 15 minutes
- Cook Time: 0 minutes
- Total Time: 6 hours 15 minutes
- Yield: 8 popsicles 1x
- Category: Dessert
- Cuisine: American
Ingredients
- 2 cups (about 1 pint) fresh strawberries, hulled and sliced
- 1 cup Champagne or Prosecco (or sparkling apple cider/lemon-lime soda for non-alcoholic)
- 1/2 cup orange juice (preferably fresh squeezed)
- 2–3 tablespoons simple syrup (or honey/agave/maple syrup, to taste)
- 1 tablespoon lemon juice (optional)
- Pinch of salt
- Mint leaves (optional, minced)
- Extra berries (raspberries or blueberries, optional, a handful)
Instructions
- Rinse strawberries under cold water, hull, and slice them. Pat dry to avoid extra water.
- Place strawberries in a mixing bowl. Gently mash about half the berries with a fork or muddler, leaving some pieces whole.
- Add Champagne or Prosecco, orange juice, simple syrup, lemon juice (if using), and a pinch of salt to the bowl.
- Stir gently and taste the mixture. Adjust sweetness or acidity as needed.
- Pour the mixture into popsicle molds, leaving about 1/4-inch at the top for expansion. Add mint leaves or extra berries if desired.
- Insert popsicle sticks. If needed, cover molds with foil and poke sticks through for stability.
- Freeze molds flat and undisturbed for at least 6 hours, or overnight for best texture.
- To unmold, run molds under warm water for 10–15 seconds and gently wiggle sticks to release popsicles.
- Serve immediately, garnished with fresh mint or berries. Keep popsicles on ice if serving at a party.
Notes
For best results, use ripe, sweet strawberries and fresh citrus juice. Alcohol slows freezing, so allow plenty of time. Non-alcoholic versions freeze faster. Taste the mixture before freezing to adjust sweetness. Let mixture sit for 10 minutes before pouring to help fruit suspend. Popsicles keep up to 2 weeks in the freezer.
Nutrition
- Serving Size: 1 popsicle
- Calories: 80
- Sugar: 9
- Sodium: 10
- Carbohydrates: 14
- Fiber: 2
- Protein: 0.5
Keywords: champagne popsicles, strawberry mimosa, summer dessert, party treat, frozen cocktail, brunch popsicles, easy popsicle recipe