“You wouldn’t believe how a spilled cup of coffee once led me to discover this perfect book stack fondant cake recipe,” my friend Lisa confessed over a cup of tea last spring. It was one of those afternoons when the rain was tapping against the kitchen window, and the world outside felt like a slow-motion movie. Lisa, who rarely bakes, was trying to make a simple birthday cake for her book club’s anniversary. But when she accidentally knocked over a pile of her favorite novels, inspiration struck in the oddest way. She decided to recreate her favorite reads in cake form—stacked, colorful, and covered in smooth fondant.
Honestly, I didn’t expect much at first. Fondant cakes had always seemed a bit intimidating, like something only professional bakers could handle. But this recipe? It’s surprisingly doable, even if you’re a weekend warrior in the kitchen. I remember getting flour on the dog’s nose, forgetting to preheat the oven, and even burning a finger once—all part of the charm, right? The result was a cake that not only looked like a real stack of books but tasted like a dream. And the best part? It quickly became the highlight of every special celebration I’ve hosted since.
You know that feeling when you walk into a party and the centerpiece cake makes everyone stop and stare? That’s what this perfect book stack fondant cake does. Maybe you’ve been there—wanting something unique, a little whimsical, yet utterly delicious. This recipe ticks all those boxes, and I’ll share everything you need to know to make your own showstopper, whether it’s for a birthday, graduation, or just because it’s Tuesday and you feel like impressing yourself.
Why You’ll Love This Recipe
This perfect book stack fondant cake isn’t just about looking fabulous—it’s about being approachable for bakers who want to create something special without a culinary degree. Here’s why it’s quickly become my go-to for celebrations:
- Quick & Easy: The cake layers bake in under 30 minutes each, and the fondant work is broken down into simple, manageable steps.
- Simple Ingredients: You probably have most of the baking staples already—flour, sugar, butter, eggs—and the fondant can be store-bought or homemade, depending on your mood.
- Perfect for Special Celebrations: Whether it’s a graduation party, book launch, or a themed birthday, this cake steals the spotlight every time.
- Crowd-Pleaser: The moist, flavorful cake layers combined with smooth buttercream and fondant get rave reviews from kids and adults alike.
- Unbelievably Delicious: The texture balances richness and lightness so well that you won’t miss overly sweet or heavy cakes.
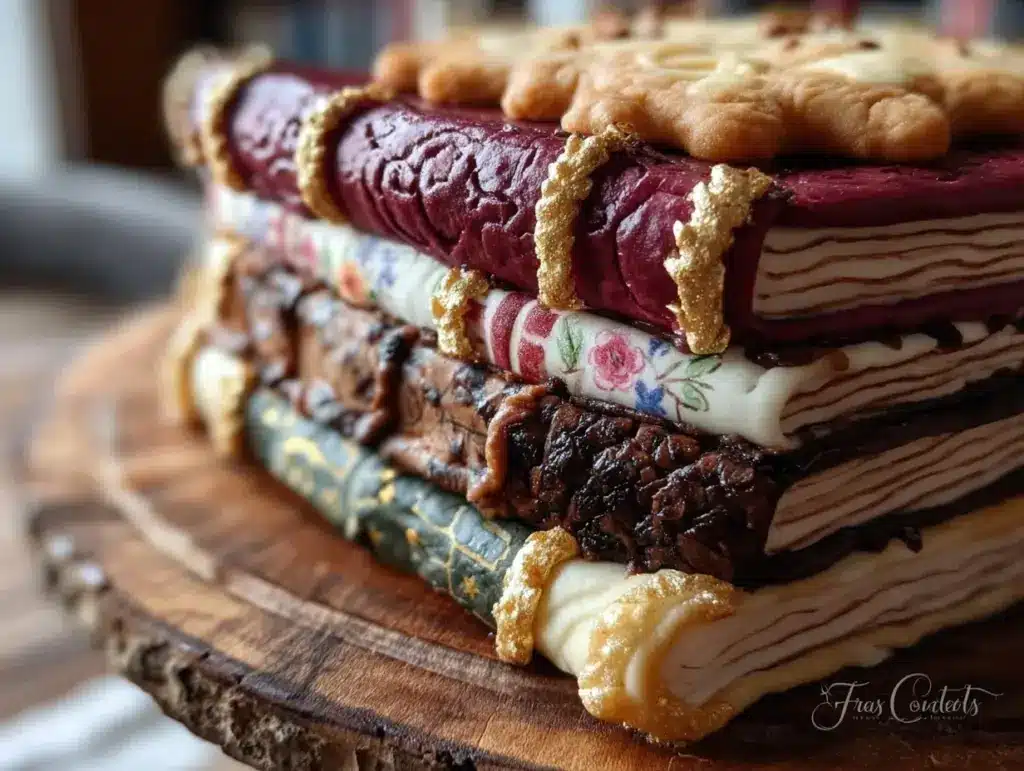
What sets this recipe apart is the way it balances creativity with practicality. The trick is in assembling the cake layers so they mimic the thickness and look of real books, then wrapping them in fondant that you can easily color and shape. I also love the little details—like using edible gold paint to highlight the “pages” or adding personalized book titles in icing. It’s not just a cake; it’s a conversation starter.
Honestly, after making this cake a handful of times, I’ve learned that a little patience and a steady hand make all the difference. But here’s the thing: even if your first attempt isn’t perfect, it still tastes amazing. And that’s what keeps me coming back—because at the end of the day, it’s about sharing something joyful with people you care about.
What Ingredients You Will Need
This recipe uses simple, wholesome ingredients to deliver bold flavor and a satisfying texture without the fuss. Most of these are pantry staples, and you can easily swap out a few depending on your preferences or dietary needs.
- For the Cake Layers:
- All-purpose flour, 3 cups (360g), sifted (I prefer King Arthur for consistency)
- Baking powder, 1 tablespoon
- Salt, 1/2 teaspoon
- Unsalted butter, 1 cup (225g), softened (use European-style butter if you want extra creaminess)
- Sugar, 2 cups (400g), granulated
- Large eggs, 4, room temperature
- Whole milk, 1 cup (240ml), room temperature (or use almond milk for dairy-free)
- Vanilla extract, 2 teaspoons (real vanilla is a game-changer here)
- For the Buttercream Frosting:
- Unsalted butter, 1 cup (225g), softened
- Powdered sugar, 4 cups (480g), sifted
- Heavy cream or milk, 2-3 tablespoons
- Vanilla extract, 1 teaspoon
- Pinch of salt
- For the Fondant Covering:
- Pre-made rolled fondant, about 1 lb (450g) (Wilton brand works well)
- Gel food coloring (various colors to create book covers)
- Edible gold paint or luster dust (for accents)
- Edible markers or piping gel for book titles
If you want to try homemade fondant, you can, but store-bought saves a ton of time and mess. Also, feel free to swap out the buttercream for cream cheese frosting if you prefer a tangier flavor. For seasonal twists, try adding lemon zest to the cake batter or swapping vanilla for almond extract. The possibilities are wide open, and this recipe adapts well.
Equipment Needed
- Three square cake pans (8×8 inches / 20×20 cm) – these create the stacked book shape perfectly
- Mixing bowls and electric mixer (handheld or stand mixer)
- Offset spatula – crucial for smooth buttercream spreading
- Rolling pin – for rolling out fondant evenly
- Fondant smoother (optional but helpful for a polished finish)
- Bench scraper or cake scraper – to get sharp edges on the frosting
- Edible paintbrushes for applying gold accents
- Parchment paper and cooling racks
If you don’t have square pans, round ones work too, but the “book stack” effect won’t be quite the same. For fondant, a little cornstarch or powdered sugar helps prevent sticking while rolling. I’ve found that a good-quality rolling pin (not too heavy) makes the job easier, and using a plastic scraper keeps the cake edges neat without damaging the layers.
Preparation Method

- Prepare Your Pans and Oven: Preheat your oven to 350°F (175°C). Grease and flour three 8×8 inch (20×20 cm) square cake pans thoroughly or line them with parchment paper. This prevents sticking and helps you get clean edges.
- Mix Dry Ingredients: In a medium bowl, sift together 3 cups (360g) all-purpose flour, 1 tablespoon baking powder, and 1/2 teaspoon salt. Set aside.
- Cream Butter and Sugar: Using an electric mixer, beat 1 cup (225g) softened unsalted butter and 2 cups (400g) granulated sugar on medium speed until light and fluffy—about 4-5 minutes. This step is key for a tender crumb.
- Add Eggs One at a Time: Beat in 4 large eggs, one at a time, mixing well after each addition. Scrape down the sides to keep the batter even.
- Incorporate Dry Ingredients and Milk: Gradually add the flour mixture in three parts, alternating with 1 cup (240ml) whole milk, starting and ending with flour. Mix on low speed just until combined. Stir in 2 teaspoons vanilla extract. Avoid overmixing to keep the cake airy.
- Divide and Bake: Evenly divide batter among the three pans. Bake 25-30 minutes or until a toothpick inserted in the center comes out clean. Cool in pans for 10 minutes, then invert onto cooling racks to cool completely.
- Prepare Buttercream: Beat 1 cup (225g) softened unsalted butter until creamy. Gradually add 4 cups (480g) powdered sugar, 2-3 tablespoons heavy cream, 1 teaspoon vanilla, and a pinch of salt. Whip until fluffy and spreadable. Adjust consistency with more cream or sugar as needed.
- Assemble the “Books”: Level each cake layer with a serrated knife if needed. Spread a thick layer of buttercream between each cake layer. Stack them carefully, making sure edges line up to mimic a stack of books.
- Crumb Coat the Cake: Apply a thin layer of buttercream all around the stacked cake to seal in crumbs. Chill for 30 minutes to set.
- Color and Roll Fondant: Divide fondant into portions for each book cover color. Knead gel food coloring into each portion until uniform. Roll out each color about 1/8 inch (3mm) thick on a surface dusted lightly with cornstarch.
- Cover Cake with Fondant: Carefully drape fondant over the cake stack, smoothing with your hands and a fondant smoother to avoid air bubbles. Trim excess fondant from the base.
- Add Details: Use edible markers or piping gel to write book titles and author names on each “book spine.” Add edible gold paint accents with a fine brush for a luxe touch.
- Final Chill and Serve: Refrigerate the cake for at least 1 hour before slicing to allow the fondant and buttercream to set firmly.
If you find the fondant tearing, don’t panic—patch it gently with small fondant scraps and smooth it out. Also, if your cake layers seem uneven, slice off the dome tops carefully; it’s a quick fix for a neat stack. The smell of vanilla and buttercream filling the kitchen? That’s your cue that something special is underway.
Cooking Tips & Techniques
Working with fondant can feel like a puzzle, but a few tricks make all the difference. First, always warm your hands before handling fondant—it becomes more pliable and less likely to crack. If the fondant feels sticky, lightly dust your surface with cornstarch rather than powdered sugar; the latter can dry it out.
When leveling cake layers, use a serrated knife with a gentle sawing motion. I once tried to rush this and ended up with a cake that leaned like the Tower of Pisa—lesson learned! Chilling the stacked cake before fondant application is a lifesaver; it firms it up, making smoothing easier.
Buttercream consistency is key. If it’s too stiff, your fondant may tear; too soft, and it won’t support the fondant well. Aim for a spreadable but firm texture. Also, keep your work area cool and dry—warm rooms make fondant sticky and difficult to work with.
When painting edible gold accents, use a small, fine brush and tap excess paint off before applying. It’s better to build color gradually than to glob it on. For writing book titles, edible markers are easier for beginners, but piping gel with a fine tip offers a more elegant touch.
Finally, patience is your best friend. Fondant cakes aren’t a race. Take breaks if you feel frustrated, and remind yourself that every imperfection adds character. I promise, the taste will make everyone forget a tiny fondant wrinkle or two.
Variations & Adaptations
This perfect book stack fondant cake is a versatile canvas for creativity. Here are some ways to personalize it:
- Dietary: Use gluten-free flour blends to make it suitable for gluten-sensitive guests. Swap dairy butter for coconut oil or vegan butter, and use plant-based milk for a vegan-friendly cake.
- Seasonal: Add fresh fruit layers between the cakes, such as sliced strawberries in summer or spiced apple filling in fall, to complement the rich cake.
- Flavor Twists: Try swapping vanilla for almond or lemon extract for a different aroma. Or mix cocoa powder into the batter for a chocolate book stack effect.
- Cooking Methods: If you don’t have an oven, this cake can be made in a microwave using a mug cake version of the batter, then assembled similarly (though without fondant).
- Personal Touch: I once made a Harry Potter-themed book stack for a friend’s birthday, painting house crests on each “book spine.” It was a hit and made the cake even more memorable.
Serving & Storage Suggestions
Serve this cake at room temperature to enjoy the full flavor and texture. The fondant will have a pleasant chew without being too tough, and the buttercream will be silky smooth. Present it on a simple white platter or a rustic wooden board to let the detail pop.
Pair with a cup of strong coffee or a lightly brewed tea to balance the sweetness. If it’s a celebratory brunch, a glass of sparkling wine adds a festive touch.
To store, keep the cake covered loosely with a cake dome or plastic wrap at room temperature for up to 2 days. If you need to keep it longer, refrigerate it, but bring it back to room temperature before slicing to soften the buttercream.
For freezing, slice into portions and wrap each piece tightly in plastic wrap and foil. Thaw overnight in the refrigerator and then bring to room temperature before serving.
Flavors tend to meld and mellow after a day, making leftovers even tastier. I’ve found that the cake’s texture improves slightly after resting, so if you plan ahead, you’re in for a treat.
Nutritional Information & Benefits
While this cake is a special treat, it contains wholesome ingredients like real butter, eggs, and milk, providing protein and essential fats. A typical slice (about 1/12th of the cake) contains approximately:
| Calories | 380 kcal |
|---|---|
| Fat | 18 g |
| Carbohydrates | 50 g |
| Protein | 5 g |
| Sugar | 35 g |
For those watching carbs, reducing sugar in the buttercream or using a sugar substitute can help. The cake is naturally gluten-full, but gluten-free flour swaps work well. This recipe is free from nuts unless you add them, reducing allergen concerns.
From a wellness viewpoint, making this cake at home means you control ingredients and avoid preservatives. Plus, the joy and connection that come with baking and sharing—well, that’s priceless.
Conclusion
This perfect book stack fondant cake recipe brings together creativity, flavor, and a bit of whimsy in a way that’s surprisingly manageable. Whether you’re celebrating a milestone or simply want to impress friends with a cake that looks like it belongs on a library shelf, this recipe has your back.
Feel free to adjust colors, flavors, and decorations to fit your personal style. After all, the best cakes are the ones made with love, a little mess, and a lot of fun. I love this recipe because it turns baking into an event—one where stories, laughter, and memories stack up just like the books.
Try it out, share your versions, and don’t be shy about telling me how it went. Your feedback makes this kitchen adventure even sweeter. Happy baking!
FAQs
Can I make the fondant from scratch for this cake?
Absolutely! Homemade fondant is an option, but it’s more time-consuming. Store-bought fondant is great for beginners and offers consistent results.
How far in advance can I make this cake?
You can bake the cake layers up to 3 days ahead and store them wrapped in the fridge. Assemble and cover with fondant on the day you plan to serve.
What if my fondant cracks while covering the cake?
Don’t worry—patch small cracks with extra fondant pieces and smooth gently. Keeping fondant warm and pliable helps prevent cracking.
Can I use different shapes for the “books”?
Yes! Rectangles and squares work best to mimic books, but circles could be a fun twist, just a bit less realistic.
How do I write on fondant without edible markers?
You can pipe royal icing or colored buttercream using a fine piping tip, or use food-safe paintbrushes and edible gel colors for more flexibility.
Pin This Recipe!
Perfect Book Stack Fondant Cake

A whimsical and delicious fondant cake designed to look like a stack of colorful books, perfect for special celebrations and approachable for bakers of all skill levels.
- Prep Time: 30 minutes
- Cook Time: 30 minutes
- Total Time: 1 hour
- Yield: 12 servings 1x
- Category: Dessert
- Cuisine: American
Ingredients
- 3 cups (360g) all-purpose flour, sifted
- 1 tablespoon baking powder
- 1/2 teaspoon salt
- 1 cup (225g) unsalted butter, softened
- 2 cups (400g) granulated sugar
- 4 large eggs, room temperature
- 1 cup (240ml) whole milk, room temperature (or almond milk for dairy-free)
- 2 teaspoons vanilla extract
- 1 cup (225g) unsalted butter, softened (for buttercream)
- 4 cups (480g) powdered sugar, sifted
- 2–3 tablespoons heavy cream or milk
- 1 teaspoon vanilla extract (for buttercream)
- Pinch of salt (for buttercream)
- About 1 lb (450g) pre-made rolled fondant
- Gel food coloring (various colors)
- Edible gold paint or luster dust
- Edible markers or piping gel for book titles
Instructions
- Preheat oven to 350°F (175°C). Grease and flour three 8×8 inch square cake pans or line with parchment paper.
- In a medium bowl, sift together flour, baking powder, and salt. Set aside.
- Using an electric mixer, beat 1 cup softened unsalted butter and granulated sugar on medium speed until light and fluffy, about 4-5 minutes.
- Beat in eggs one at a time, mixing well after each addition and scraping down sides.
- Gradually add flour mixture in three parts, alternating with milk, starting and ending with flour. Mix on low speed just until combined. Stir in vanilla extract.
- Divide batter evenly among pans. Bake 25-30 minutes or until a toothpick inserted in center comes out clean. Cool in pans 10 minutes, then invert onto racks to cool completely.
- Prepare buttercream by beating 1 cup softened butter until creamy. Gradually add powdered sugar, heavy cream, vanilla, and salt. Whip until fluffy and spreadable, adjusting consistency as needed.
- Level cake layers if needed. Spread thick buttercream between layers and stack to mimic books.
- Apply a thin crumb coat of buttercream around stacked cake. Chill for 30 minutes.
- Divide fondant into portions and knead gel food coloring into each. Roll out each color about 1/8 inch thick on a surface dusted with cornstarch.
- Drape fondant over cake stack, smoothing with hands and fondant smoother. Trim excess fondant.
- Use edible markers or piping gel to write book titles and author names on spines. Add edible gold paint accents with a fine brush.
- Refrigerate cake for at least 1 hour before slicing to set fondant and buttercream.
Notes
Warm your hands before handling fondant to prevent cracking. Use cornstarch to dust surfaces instead of powdered sugar to avoid drying out fondant. Chill the cake before applying fondant for easier smoothing. Patch fondant tears gently with scraps. Adjust buttercream consistency for best fondant support. Store cake covered at room temperature up to 2 days or refrigerate for longer storage. Bring refrigerated cake to room temperature before serving.
Nutrition
- Serving Size: 1 slice (1/12th of c
- Calories: 380
- Sugar: 35
- Fat: 18
- Carbohydrates: 50
- Protein: 5
Keywords: fondant cake, book stack cake, celebration cake, buttercream, easy fondant cake, themed cake, birthday cake, graduation cake


