
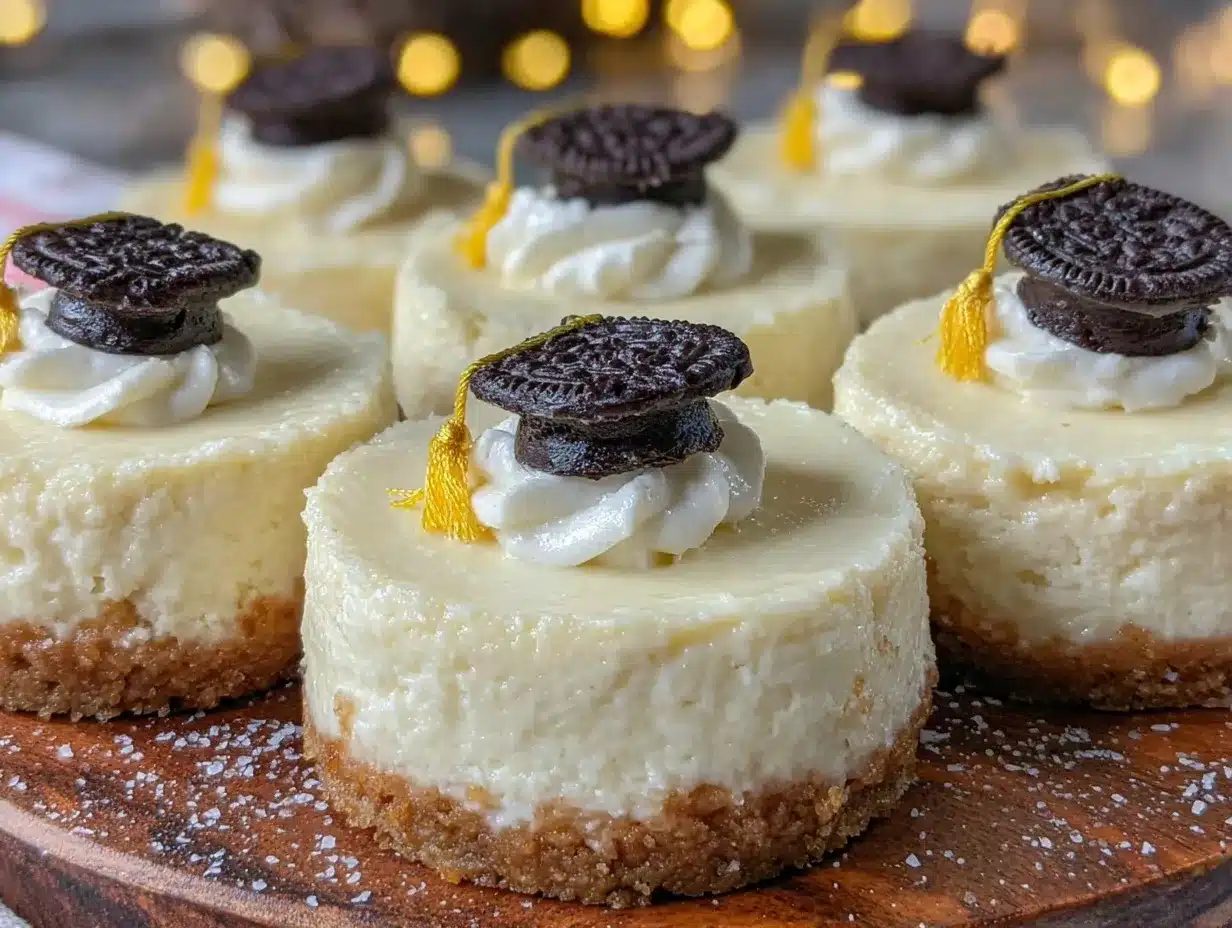
“Hand me that bowl,” my neighbor said as she balanced a tray of tiny, perfectly decorated cheesecakes on her kitchen counter. It was the Saturday before graduation, and honestly, I wasn’t expecting much from these miniature desserts. But as soon as I took a bite of one of those easy mini graduation cap cheesecakes, I was hooked. The creamy texture, the buttery crust, and that playful little fondant cap on top—it all came together in a way that reminded me of the joy and nerves packed into graduation day itself. Maybe you’ve been there too, juggling party prep and last-minute errands, hoping for a dessert that’s both impressive and stress-free.
I’ll admit, I nearly forgot to add the vanilla extract the first time I made these, and the kitchen got a bit messy with powdered sugar flying everywhere (classic me!). But that happy accident didn’t stop me; instead, it made the whole process more memorable. These mini cheesecakes aren’t just cute—they’re the kind of treat that makes you pause and smile, the kind you keep coming back to, long after the caps fly and the speeches end.
Whether you’re planning a graduation party, a casual family gathering, or just want a sweet treat that looks like a celebration, this recipe is a little gift of joy. Let me tell you, this isn’t your run-of-the-mill cheesecake. It’s fun, manageable, and honestly, a crowd-pleaser that’ll have everyone reaching for seconds (and thirds!).
Why You’ll Love This Recipe
After testing this recipe over several celebrations and tweaking every detail, I can say these easy mini graduation cap cheesecakes are a winner for many reasons. Here’s why they might become your go-to dessert for any festive occasion:
- Quick & Easy: Ready in under an hour, perfect when you’re juggling a million things (trust me, I’ve been there).
- Simple Ingredients: Nothing fancy here—just pantry staples and a few decorations you can find at any craft or baking store.
- Perfect for Celebrations: Whether it’s a graduation, a milestone birthday, or a sweet surprise, these mini cheesecakes add that special touch.
- Crowd-Pleaser: Kids love the cute design, adults appreciate the creamy texture and balanced sweetness.
- Unbelievably Delicious: The smooth, tangy filling paired with a crisp crust is comfort food with a classy twist.
This recipe stands out because of the little graduation cap—crafted from fondant or chocolate—that makes a simple cheesecake instantly festive. Plus, the use of cream cheese blended with a hint of lemon zest adds that bright flavor that keeps you coming back. Honestly, it’s the kind of treat that makes you close your eyes for a split second and savor the moment.
What Ingredients You Will Need
This recipe uses simple, wholesome ingredients to deliver bold flavor and a satisfying texture without the fuss. Most are pantry staples, and substitutions are easy to make if needed.
- For the Crust:
- 1 1/2 cups (150g) graham cracker crumbs (I prefer Honey Maid for that classic flavor)
- 1/4 cup (50g) granulated sugar
- 6 tablespoons (85g) unsalted butter, melted (adds richness and binds the crust)
- For the Filling:
- 16 oz (450g) cream cheese, softened (use Philadelphia for the smoothest texture)
- 2/3 cup (135g) granulated sugar
- 2 large eggs, room temperature
- 1 teaspoon vanilla extract (pure is best for flavor clarity)
- 1 tablespoon fresh lemon juice (brightens the filling)
- 1 teaspoon lemon zest (optional but recommended for a fresh twist)
- 1/2 cup (120ml) sour cream (adds creaminess and slight tang)
- For Decoration:
- Black fondant or black modeling chocolate (for the graduation caps)
- Thin ribbon or edible gold/silver beads (optional, for tassels)
- Powdered sugar for dusting (optional)
Substitution tips: Use gluten-free graham crackers or almond flour for a gluten-free crust. If you prefer dairy-free, swap cream cheese with a vegan cream cheese brand and use coconut-based sour cream alternative. For a quicker version, store-bought pre-made crusts work fine but homemade tastes better.
Equipment Needed
- Mini muffin tin (12-cup) – essential for shaping these bite-sized cheesecakes.
- Paper or silicone mini cupcake liners – helps with easy removal and cleanup.
- Electric mixer (handheld or stand) – to beat the cream cheese filling until silky smooth.
- Mixing bowls – a medium and a small one for crust and filling prep.
- Measuring cups and spoons – accuracy counts for perfect texture.
- Spatula – for scraping bowls and folding ingredients gently.
- Rolling pin (optional) – if you’re making fondant graduation caps from scratch.
- Small sharp knife or fondant tools – for shaping caps and tassels.
If you don’t have a mini muffin tin, a regular muffin tin can work, but your cheesecakes will be larger and will need longer baking time. I’ve also successfully used silicone liners for easier cleanup, though paper liners give a prettier finish for parties. For fondant work, you can buy ready-made shapes or even small chocolate decorations from baking stores if you want to skip the crafting.
Preparation Method
- Prepare the crust: Preheat your oven to 325°F (163°C). In a bowl, combine graham cracker crumbs and sugar. Pour in melted butter and stir until the mixture resembles wet sand. Press about 1 tablespoon (15g) of the crust mixture firmly into the bottom of each mini muffin liner. This step is important to get a solid base that holds together when you bite in. Bake for 5 minutes, then remove and let cool slightly.
- Make the filling: In a large bowl, beat the softened cream cheese with an electric mixer on medium speed until smooth and creamy. Add sugar and continue beating until well combined. Beat in eggs one at a time, mixing after each addition. Stir in vanilla extract, lemon juice, lemon zest, and sour cream until just combined. Be careful not to overmix; you want a smooth but slightly airy texture.
- Fill the crusts: Spoon the cream cheese mixture over the pre-baked crusts, filling each about 3/4 full (roughly 2 tablespoons or 30ml). Tap the pan gently on the counter a couple of times to release air bubbles that might cause cracks.
- Bake the cheesecakes: Place the muffin tin on the middle rack and bake for 18-22 minutes, or until the edges are set but the centers still jiggle slightly. Ovens vary, so start checking at 18 minutes. Avoid overbaking to keep the filling creamy.
- Cool and chill: Remove from the oven and let cool to room temperature for about 30 minutes. Then transfer the tin to the fridge and chill for at least 2 hours or overnight to let the cheesecakes firm up fully.
- Decorate with graduation caps: While the cheesecakes chill, shape your black fondant or modeling chocolate into tiny squares for the caps. Use a small knife or fondant tool to cut clean edges. Attach a tiny ribbon or edible bead as a tassel on top if you like. Once chilled, carefully place one cap on each mini cheesecake. If you want, dust lightly with powdered sugar for a finishing touch.
Pro tip: If cracks appear, don’t sweat it! A quick dusting of powdered sugar or a dollop of whipped cream can hide imperfections. Also, remember to soften cream cheese well beforehand for the smoothest filling—cold cream cheese will give you lumps.
Cooking Tips & Techniques
Making mini cheesecakes might seem straightforward, but a few tricks make a huge difference:
- Room temperature ingredients: This is key. Cold cream cheese or eggs can cause lumps or uneven baking.
- Don’t overmix: Overbeating the filling introduces too much air, which leads to cracks or a dry texture. Mix just until combined.
- Prevent cracks: Tap the filled muffin tin gently before baking to release trapped air. Baking at a moderate temperature also reduces cracking.
- Use a water bath (optional): For extra creamy texture, place the muffin tin inside a larger pan filled halfway with hot water. This keeps the baking environment moist and gentle but can be tricky with mini tins, so not required here.
- Chill thoroughly: Don’t skip the refrigeration step; it helps the filling set up perfectly and makes decorating easier.
- Fondant handling: Keep fondant covered when not in use to prevent drying out. If it gets too sticky, dust your hands with powdered sugar.
I once baked these without chilling the filling properly and ended up with a runny mess—lesson learned the hard way. Now, I’m religious about the chill time. Also, timing your decorating right after chilling means the caps stick nicely without sliding off.
Variations & Adaptations
These mini cheesecakes are a perfect canvas for creativity. Here are a few ways to tweak the recipe:
- Flavor twists: Swap lemon zest for orange or lime for a citrusy change. Add a teaspoon of espresso powder to the filling for a mocha kick.
- Crust options: Use crushed Oreos or chocolate wafer cookies for a richer crust. For gluten-free, almond flour mixed with a bit of coconut oil works beautifully.
- Dairy-free adaptation: Use vegan cream cheese and coconut-based sour cream to make these friendly for lactose intolerance.
- Decorations: Instead of fondant caps, try mini chocolate squares or even edible printed toppers with graduate’s name or year.
- Size adjustments: Make larger cheesecakes in a regular muffin tin for a more substantial dessert or smaller bite-sized ones for parties.
Personally, I swapped in crushed ginger snaps once for a fall-themed party—it added a nice spicy note that everyone loved. Don’t be afraid to experiment with what you have on hand or what fits the celebration vibe!
Serving & Storage Suggestions
These mini cheesecakes are best served chilled, straight from the fridge. The cold temperature keeps the filling firm and refreshing. Arrange them on a pretty platter or tiered stand to make them the star of your dessert table.
Pair them with fresh berries, a light fruit compote, or a drizzle of chocolate or caramel sauce for extra flair. For beverages, a crisp sparkling wine or a rich coffee complements the creamy texture well.
Store leftover cheesecakes in an airtight container in the refrigerator for up to 4 days. You can freeze them for up to a month; just thaw in the fridge overnight before serving. When reheating, avoid microwaves as they can melt the decorations—let them come to room temperature naturally for 15-20 minutes.
Over time, the flavors actually deepen, especially if you make the filling a day ahead. This makes them perfect for prepping in advance when you’re busy celebrating.
Nutritional Information & Benefits
Each mini cheesecake (assuming 12 servings) contains approximately:
| Calories | 220 kcal |
|---|---|
| Fat | 15g |
| Carbohydrates | 18g |
| Protein | 4g |
| Sugar | 14g |
The cream cheese provides a good source of protein and calcium, while the lemon juice adds a bit of vitamin C. Using sour cream adds tang and richness without too many extra calories. If you choose gluten-free or dairy-free options, be aware of ingredient nutrition labels as they vary widely.
For anyone watching carbs or sugar, you can lower sugar content by reducing granulated sugar slightly or using a sugar substitute that bakes well. Just keep in mind it may affect texture and sweetness.
Conclusion
Easy mini graduation cap cheesecakes bring together fun, flavor, and festivity in one delightful bite. Whether this is your first time making cheesecakes or you’re a seasoned baker, this recipe offers a simple way to wow your guests without fuss.
Feel free to customize the flavors, decorations, and crusts to match your celebration’s style. Personally, I love how these little desserts make the party feel special—like a tiny celebration on a plate.
If you try this recipe, I’d love to hear how your mini cheesecakes turned out! Share your adaptations, tips, or photos in the comments below. Here’s to sweet celebrations and many more happy bites ahead!
FAQs
Can I make these mini graduation cap cheesecakes ahead of time?
Absolutely! They keep well in the fridge for up to 4 days and can be made a day in advance. Just add the fondant caps right before serving to keep them looking fresh.
What if I don’t have fondant to make the graduation caps?
No worries! You can use small pieces of chocolate, black licorice, or even edible printed toppers as a fun alternative.
How do I prevent the cheesecakes from cracking?
Mix the filling gently and tap the pan before baking to release air bubbles. Baking at a moderate temperature and avoiding overbaking helps too.
Can I double this recipe for a larger crowd?
Yes! Just double all ingredients and bake in multiple mini muffin tins or batches. If using larger tins, adjust the baking time accordingly.
Is there a gluten-free option for the crust?
Definitely. Use gluten-free graham crackers or substitute almond flour mixed with a bit of melted butter for a tasty gluten-free crust.
Pin This Recipe!

Easy Mini Graduation Cap Cheesecakes
These easy mini graduation cap cheesecakes are a quick, crowd-pleasing dessert perfect for celebrations, featuring a creamy filling, buttery crust, and playful fondant caps.
- Prep Time: 15 minutes
- Cook Time: 27 minutes
- Total Time: 3 hours 12 minutes
- Yield: 12 servings 1x
- Category: Dessert
- Cuisine: American
Ingredients
- 1 1/2 cups (150g) graham cracker crumbs
- 1/4 cup (50g) granulated sugar
- 6 tablespoons (85g) unsalted butter, melted
- 16 oz (450g) cream cheese, softened
- 2/3 cup (135g) granulated sugar
- 2 large eggs, room temperature
- 1 teaspoon vanilla extract
- 1 tablespoon fresh lemon juice
- 1 teaspoon lemon zest (optional)
- 1/2 cup (120ml) sour cream
- Black fondant or black modeling chocolate (for the graduation caps)
- Thin ribbon or edible gold/silver beads (optional, for tassels)
- Powdered sugar for dusting (optional)
Instructions
- Preheat oven to 325°F (163°C). In a bowl, combine graham cracker crumbs and sugar. Pour in melted butter and stir until mixture resembles wet sand.
- Press about 1 tablespoon (15g) of crust mixture firmly into the bottom of each mini muffin liner. Bake for 5 minutes, then remove and let cool slightly.
- In a large bowl, beat softened cream cheese with an electric mixer on medium speed until smooth and creamy.
- Add sugar and continue beating until well combined.
- Beat in eggs one at a time, mixing after each addition.
- Stir in vanilla extract, lemon juice, lemon zest, and sour cream until just combined. Avoid overmixing.
- Spoon cream cheese mixture over pre-baked crusts, filling each about 3/4 full (roughly 2 tablespoons or 30ml). Tap pan gently to release air bubbles.
- Place muffin tin on middle rack and bake for 18-22 minutes, until edges are set but centers jiggle slightly.
- Remove from oven and let cool to room temperature for about 30 minutes.
- Transfer tin to fridge and chill for at least 2 hours or overnight.
- Shape black fondant or modeling chocolate into tiny squares for caps. Attach ribbon or edible bead as tassel if desired.
- Place one cap on each mini cheesecake once chilled. Dust lightly with powdered sugar if desired.
Notes
Use room temperature ingredients to avoid lumps. Do not overmix filling to prevent cracks. Tap pan gently before baking to release air bubbles. Chill cheesecakes thoroughly before decorating. Fondant caps can be replaced with small chocolate pieces or edible toppers. For gluten-free crust, substitute graham crackers with gluten-free crackers or almond flour. For dairy-free, use vegan cream cheese and coconut-based sour cream.
Nutrition
- Serving Size: 1 mini cheesecake
- Calories: 220
- Sugar: 14
- Fat: 15
- Carbohydrates: 18
- Protein: 4
Keywords: mini cheesecakes, graduation dessert, easy cheesecake recipe, party dessert, bite-sized cheesecake, celebration dessert


