
“You won’t believe how good these chicken fingers are,” my neighbor Dave said last Saturday while tossing a casual BBQ in his backyard. I was skeptical—after all, I’ve tasted plenty of crispy chicken fingers, but nothing that quite hit the mark like this. The secret? His homemade Crispy Cane’s Chicken Fingers paired with that tangy, slightly spicy Signature Sauce. Honestly, it felt like a little discovery right there beside the grill, with the sun setting and kids running around. I remember dropping the bowl once (classic me), but even with that mess, the taste stayed with me.
Maybe you’ve been there too—searching for that perfect crispy chicken finger recipe that nails the crunch, the juicy tenderness, and that unforgettable sauce. Well, this recipe is my answer after countless trials, burned batches, and sauce tweaks. It’s not just fast food nostalgia; it’s the kind of comfort that makes you close your eyes after the first bite. I mean, who knew that a simple mix of spices and a no-fuss frying method could create something so addictive? Let me tell you, once you try this Crispy Cane’s Chicken Fingers recipe with easy Signature Sauce, you might just find yourself making it again and again, just like I do every time Dave invites me over.
Why You’ll Love This Recipe
- Quick & Easy: Ready in about 30 minutes, perfect when you’re racing the clock on a busy weeknight.
- Simple Ingredients: No need for specialty stores; everything’s probably sitting in your pantry or fridge right now.
- Perfect for Gatherings: Whether it’s casual family dinners, game days, or backyard parties, this recipe always steals the spotlight.
- Crowd-Pleaser: Kids love them, adults rave about them, and picky eaters rarely say no.
- Unbelievably Delicious: The crispy coating gives way to juicy, tender chicken, paired with a sauce that’s tangy, creamy, and just a little spicy.
- Not your average chicken fingers — this recipe uses a buttermilk soak for moisture and a seasoned flour blend for that signature crunch, making it stand apart from the rest.
- It’s comfort food reimagined: simple, satisfying, and with a sauce that’s easy to whip up but hard to forget.
What Ingredients You Will Need
This recipe uses straightforward ingredients to deliver bold flavor and the perfect crispy texture, all without fuss. Most are pantry staples, with a few fresh touches for the sauce. Here’s what you’ll grab:
- For the Chicken Fingers:
- 2 lbs (900 g) chicken tenderloins or boneless skinless chicken breasts, cut into strips
- 1 ½ cups (360 ml) buttermilk (helps tenderize and add moisture)
- 2 cups (240 g) all-purpose flour (for that crispy crust)
- 1 tablespoon paprika (adds color and subtle smokiness)
- 1 teaspoon garlic powder
- 1 teaspoon onion powder
- 1 teaspoon salt (adjust to taste)
- ½ teaspoon black pepper
- ½ teaspoon cayenne pepper (optional, for a kick)
- Vegetable oil or peanut oil for frying (enough for a deep fry, about 4 cups/1 liter)
- For the Signature Sauce:
- ½ cup (120 g) mayonnaise (I prefer Hellmann’s for creaminess)
- 3 tablespoons ketchup
- 1 tablespoon Worcestershire sauce
- 1 teaspoon garlic powder
- 1 teaspoon black pepper
- 1 teaspoon smoked paprika
- 1 tablespoon hot sauce (adjust based on your heat tolerance)
- 1 teaspoon sugar (balances the tang)
- 1 tablespoon lemon juice (freshly squeezed)
Pro tip: If you want a gluten-free version, swap the all-purpose flour for almond flour or a gluten-free blend. For dairy-free, use coconut yogurt mixed with a little lemon juice instead of buttermilk.
Equipment Needed
- Large mixing bowls – for marinating and dredging chicken
- Deep heavy-bottomed skillet or Dutch oven – perfect for maintaining steady frying temperature
- Cooking thermometer – to keep oil between 350°F to 375°F (175°C to 190°C); crucial for crispiness without greasiness
- Tongs or slotted spoon – for turning and removing chicken fingers safely
- Wire rack and baking sheet – for draining excess oil and keeping chicken crispy
- Measuring cups and spoons – for precise seasoning
If you don’t have a deep skillet, a deep fryer works great too. I once used a heavy saucepan in a pinch—just be extra careful with oil levels and heat control. Also, a splatter screen helps keep your stovetop clean (trust me, I learned the hard way).
Preparation Method

- Marinate the Chicken: Place the chicken strips into a large bowl and cover with buttermilk. Stir gently to coat all pieces. Cover with plastic wrap and refrigerate for at least 30 minutes, or up to 4 hours. This step keeps the chicken juicy and tender.
- Prepare the Flour Mixture: In another large bowl, combine the flour, paprika, garlic powder, onion powder, salt, black pepper, and cayenne pepper. Mix well to distribute the spices evenly.
- Heat the Oil: Pour vegetable oil into your skillet or Dutch oven to a depth of about 2 inches (5 cm). Heat over medium-high heat until the thermometer reads 350°F (175°C). Maintaining consistent heat is key—too hot and the outside burns, too cool and the coating gets soggy.
- Dredge the Chicken: Remove chicken from buttermilk, letting excess drip off. Coat each strip thoroughly in the seasoned flour mixture, pressing lightly to adhere. Place coated strips on a wire rack for a few minutes to set the breading.
- Fry the Chicken: Carefully place a few strips into the hot oil—don’t overcrowd the pan! Fry for 4-5 minutes, turning once halfway through, until golden brown and cooked through (internal temp 165°F/74°C). Remove with tongs and transfer to a wire rack over a baking sheet to drain excess oil.
- Keep Warm: If frying in batches, keep cooked chicken warm in a low oven (about 200°F/90°C) while you finish the rest.
- Make the Signature Sauce: While chicken fries, whisk together mayonnaise, ketchup, Worcestershire sauce, garlic powder, black pepper, smoked paprika, hot sauce, sugar, and lemon juice in a small bowl. Taste and adjust seasoning if needed.
- Serve: Plate the crispy chicken fingers with a generous side of signature sauce for dipping. For a classic touch, add some crinkle-cut fries and a cold drink.
Note: If the breading starts to get soggy, let the chicken rest on the wire rack longer. Also, don’t skip the thermometer step—oil temperature makes or breaks the crunch.
Cooking Tips & Techniques
One lesson I learned early is to never rush the marinating process. The buttermilk soak isn’t just for tenderness—it helps the flour stick better, so your chicken fingers come out crisp every single time. Also, using a thermometer isn’t optional, in my book. I once guessed the oil was hot enough and ended up with greasy, sad chicken fingers. Not fun.
When dredging, tap off the excess flour gently; too much can cause clumps that burn. And frying in small batches? Absolutely necessary. Overcrowding drops the oil temp, making everything greasy.
Another trick is to let the coated chicken rest a few minutes before frying. It helps the coating set and prevents it from falling off mid-fry. If you don’t have a wire rack, paper towels work, but the chicken might lose some crispness.
When mixing the sauce, taste as you go. Everyone likes their heat and tang a little different, so trust your palate. I usually add an extra splash of lemon juice for brightness.
Finally, multitasking helps: while the chicken marinates, prep your sauce and set up your frying station to keep things smooth and stress-free.
Variations & Adaptations
- Spicy Twist: Add extra cayenne to the flour mix and a dash more hot sauce to the signature sauce for those who like it fiery.
- Gluten-Free Version: Use almond flour or a gluten-free flour blend for dredging. The texture will be slightly different but still delicious.
- Baked Option: For a lighter take, bake the coated chicken strips at 425°F (220°C) on a greased rack for 20-25 minutes, flipping halfway through. They won’t be quite as crispy but still tasty.
- Herb-Infused Sauce: Mix fresh chopped parsley or chives into the signature sauce for a fresh pop of flavor.
- My Favorite Variation: I once swapped out smoked paprika for chipotle powder in the coating and added a splash of maple syrup to the sauce—unexpected but a total hit at a fall potluck.
Serving & Storage Suggestions
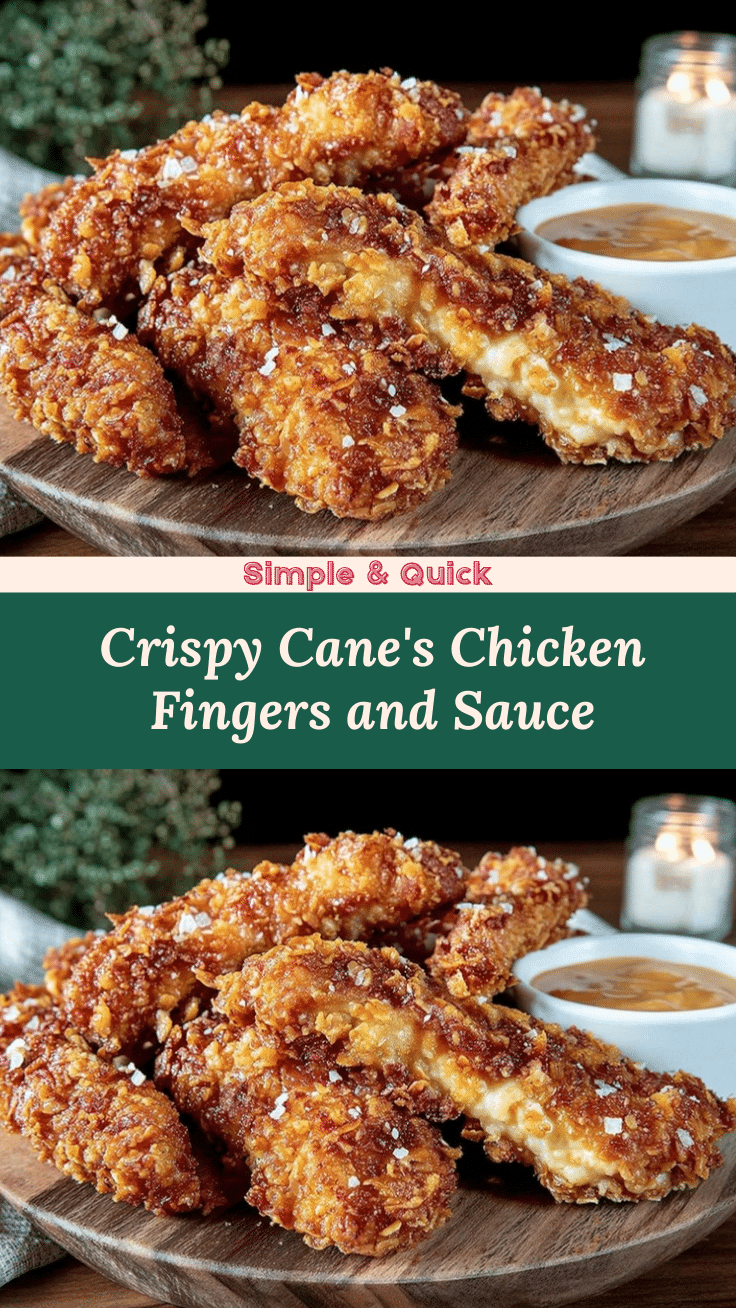
Serve your Crispy Cane’s Chicken Fingers hot, straight from the fryer, with a bowl of that creamy signature sauce for dipping. They pair beautifully with classic sides like coleslaw, crinkle fries, or even a crisp green salad to balance the richness.
If you have leftovers (which is rare), store them in an airtight container in the fridge for up to 3 days. To reheat, pop them in a 375°F (190°C) oven for 8-10 minutes on a wire rack to bring back the crunch without drying them out.
Freezing is possible but best done before frying: freeze the coated strips on a tray, then transfer to a freezer bag. Fry straight from frozen, adding a minute or two to cooking time. The sauce keeps well in the fridge for about a week and tastes even better after a day or two as flavors meld.
Nutritional Information & Benefits
This recipe offers a satisfying source of protein from the chicken, with moderate calories depending on portion size and frying method. Using buttermilk adds a slight tang and helps tenderize without adding fat. The spices in the coating, like paprika and garlic powder, bring antioxidants and flavor without sodium overload.
For those watching carbs, baking instead of frying reduces fat intake. The sauce, while creamy, can be lightened by swapping mayonnaise for Greek yogurt or a dairy-free alternative. Always keep in mind—portion control is key, but this recipe strikes a nice balance between indulgence and nourishment.
Plus, homemade means no mystery additives or preservatives, so you know exactly what’s going into your meal. It’s a way to enjoy that crispy, comforting chicken finger experience with a little more control and care.
Conclusion
This Crispy Cane’s Chicken Fingers recipe with easy Signature Sauce is honestly one of those recipes that’s worth the effort every time. It’s simple enough for a weeknight, special enough to impress friends, and just downright delicious. You can tweak the heat, swap ingredients, and make it your own based on what your family loves.
I love this recipe because it reminds me of those laid-back afternoons with friends, the kind of food that brings people together without fuss. If you give it a try, let me know how you customize it or what sides you pair it with. Share your stories, tips, or even your kitchen mishaps—I’m all ears!
So grab your apron, warm up the oil, and get ready to make some crunchy, juicy chicken fingers that might just become your new go-to comfort food.
FAQs
How do I keep the chicken fingers crispy after frying?
Place them on a wire rack instead of paper towels to drain excess oil—this prevents sogginess. Also, keep them warm in a low oven if frying in batches.
Can I make the signature sauce ahead of time?
Absolutely! The sauce tastes even better after resting in the fridge for a few hours. Just give it a good stir before serving.
What’s the best oil for frying chicken fingers?
Vegetable oil or peanut oil works great due to their high smoke points. Avoid olive oil as it burns easily at frying temperatures.
How do I know when the chicken fingers are cooked through?
Use a meat thermometer to check for an internal temperature of 165°F (74°C). The coating should be golden brown and crispy.
Can I bake these chicken fingers instead of frying?
Yes! Baking at 425°F (220°C) on a wire rack for 20-25 minutes is a healthier option, though the texture will be less crispy than frying.
Pin This Recipe!
Crispy Canes Chicken Fingers Recipe with Easy Signature Sauce

A quick and easy recipe for crispy, juicy chicken fingers with a tangy, slightly spicy signature sauce. Perfect for family dinners, game days, or backyard parties.
- Prep Time: 10 minutes
- Cook Time: 20 minutes
- Total Time: 30 minutes
- Yield: 4 servings 1x
- Category: Main Course
- Cuisine: American
Ingredients
- 2 lbs (900 g) chicken tenderloins or boneless skinless chicken breasts, cut into strips
- 1 ½ cups (360 ml) buttermilk
- 2 cups (240 g) all-purpose flour
- 1 tablespoon paprika
- 1 teaspoon garlic powder
- 1 teaspoon onion powder
- 1 teaspoon salt
- ½ teaspoon black pepper
- ½ teaspoon cayenne pepper (optional)
- Vegetable oil or peanut oil for frying (about 4 cups / 1 liter)
- ½ cup (120 g) mayonnaise
- 3 tablespoons ketchup
- 1 tablespoon Worcestershire sauce
- 1 teaspoon garlic powder
- 1 teaspoon black pepper
- 1 teaspoon smoked paprika
- 1 tablespoon hot sauce
- 1 teaspoon sugar
- 1 tablespoon lemon juice (freshly squeezed)
Instructions
- Place the chicken strips into a large bowl and cover with buttermilk. Stir gently to coat all pieces. Cover with plastic wrap and refrigerate for at least 30 minutes, or up to 4 hours.
- In another large bowl, combine the flour, paprika, garlic powder, onion powder, salt, black pepper, and cayenne pepper. Mix well.
- Pour vegetable oil into a deep heavy-bottomed skillet or Dutch oven to a depth of about 2 inches (5 cm). Heat over medium-high heat until the thermometer reads 350°F (175°C).
- Remove chicken from buttermilk, letting excess drip off. Coat each strip thoroughly in the seasoned flour mixture, pressing lightly to adhere. Place coated strips on a wire rack for a few minutes to set the breading.
- Carefully place a few strips into the hot oil—do not overcrowd the pan. Fry for 4-5 minutes, turning once halfway through, until golden brown and cooked through (internal temp 165°F/74°C). Remove with tongs and transfer to a wire rack over a baking sheet to drain excess oil.
- If frying in batches, keep cooked chicken warm in a low oven (about 200°F/90°C) while finishing the rest.
- While chicken fries, whisk together mayonnaise, ketchup, Worcestershire sauce, garlic powder, black pepper, smoked paprika, hot sauce, sugar, and lemon juice in a small bowl. Taste and adjust seasoning if needed.
- Serve the crispy chicken fingers with a generous side of signature sauce for dipping.
Notes
Use a thermometer to maintain oil temperature between 350°F and 375°F for perfect crispiness. Let coated chicken rest on a wire rack before frying to set the breading. Fry in small batches to avoid overcrowding and greasy chicken. For gluten-free, substitute flour with almond or gluten-free flour. For dairy-free, use coconut yogurt with lemon juice instead of buttermilk.
Nutrition
- Serving Size: About 4-5 chicken fi
- Calories: 450
- Sugar: 3
- Sodium: 700
- Fat: 28
- Saturated Fat: 5
- Carbohydrates: 25
- Fiber: 1
- Protein: 30
Keywords: crispy chicken fingers, chicken tenders, homemade chicken fingers, signature sauce, fried chicken, easy chicken recipe, backyard party food


